
Thank you for putting a link to this tutorial, whenever you display your realization of that tag on a website, on a group or in a mail !
**************************
You'll find some versions of that tag in my gallery HERE
************************
To realize that tag, you'll need the plugins :
- Mura's Meister / Cloud
- Alien skin Eye candy 5 / Nature / drip
and the material zip down below :

**************
*It is forbidden to suppress watermarks on the material provided , to alter, mist or rename the tubes in order to respect the work of the tubers
- The tube " JHanna_396©N.Ceccoli.pspimage" is by Jhanna
You'll be able to get her tubes by joining in her sharing group here
- The tube of the woman is by Guismo
You'll be able to find her tubes on Dakara' s site here
and you can join in her sharing group here
- The tube of the heart is by Rêveries
The other elements have been found on the net
******************
Preparation
Duplicate your tubes and the mask. Close the originals and minimize the copies for now.
- Place the brush files in your Psp brush folder
*****************
Click here to print the tutorial
*******************
You can use my arrow to follow your work

***************
1- Open a transparent image of 800 by 650 pixels
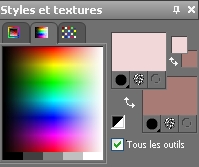
2- Set your colour palette with two colours matching your main tube
My choice : Foreground : colour f1d7d7
Background : colour : a97b75

3- Effects / plugins / Mura's Meister / cloud

4- Add a new raster layer
Activate your brush tool, set as below and apply the brush " fantastic_8.PspBrush" with your dark background colour, in the bottom left hand side of your tag

I have set the mode of that layer on to Multiply ( it is up to you to see what looks better with your colours )
If your Psp doesn't accept that large brush , you can copy my layer enclosed and paste it as a new layer onto your tag ( colorize it if necessary )
5- Layers / Duplicate
Image / flip
6- Activate the text tube " text_fiona_fairymist.pspimage" or a text of your choice, copy it and paste it as a new layer
Place it in the left hand side of your tag
I have set the mode of that layer to Luminance Legacy and lowered its opacity to 50
7- Add a new raster layer
Flood fill that transparent layer with your light foreground colour
8- Layers / New mask layer / choose Brujita_mask_0007.PspMask / Only check Source Luminance
Merge group
I have set the mode of that layer to Overlay ( It is up to you to see what makes your stairs come out better ! )
9- Effects / edge effects / enhance
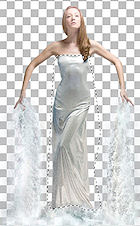
10- Activate the tube "calguisverseau8610.pspimage" or a tube of your choice
With your free hand selection tool , set as below , select the dress of the woman or the parts of the tube you wish to colorize


Adjust / Hue and saturation / colorize / 255, 120 for me
Select none
11- Copy and paste that tube as a new layer onto your tag
I have resized the tube at 75%
Place the tube at the bottom of the stairs
I have lowered the opacity of that layer to 50
12- Activate the tube "1220639746_divers.pspimage"or a tube of your choice, copy it and paste it as a new layer onto your tag
I have resized that tube at 75% twice
I have, then colorized my tube as on step 10
I have lowered its opacity to 90
Place the tube in the bottom hand right corner of your tag
13- Activate the tube "voiles_fiona_fairymist.pspimage", copy it and paste it as a new layer onto your tag
It is up to you to colorize or change the mode of that layer so that it looks nice
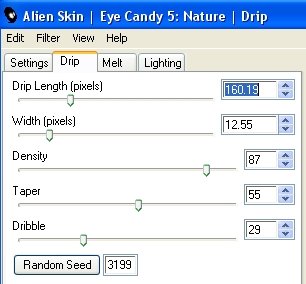
14- Effects / plugins / Alien Skin eye candy 5 / Nature / drip as below or according to your own settings

15- Activate the tube "JHanna_396©N.Ceccoli.pspimage"or a tube of your choice, copy it and paste it as a new layer onto your tag
Place at the right place
16- Effects / 3d effects / drop shadow of your choice / 4, 20, 40, 20, black for me
17- Make sure everything is at the right place
Add some symmetrical borders of 2 pixels with a colour of your choice ( white for me )
18- Layers / Promote Background layer
19- Layers / Duplicate
20- Image / resize at 90 °% (Resize all the layers NOT checked )
21- Effects / 3d effects / drop shadow / 0, 0, 80, 20, black
22 - Activate your bottom layer
Adjust / Blur / Gaussian blur / 10
23- Add a new raster layer and select all
Activate the tube "voiles_fiona_fairymist.pspimage", copy it and paste it into the selection
It is up to you to colorize or change the mode of that layer so that it looks nice
Select none
I have set the mode of my layer on to Multiply
Then, I did Image / mirror
24- Activate your top layer
Add a new raster layer and apply your signature
25- Add some symmetrical borders of 2 pixels with a colour of your choice ( white for me
26- If you feel like it, you may add a title to your tag
Activate the tube " titre_fiona_fairymist", copy it and paste it as a new layer onto your tag
Place the tube as on my tag or to your liking
Colorize it if necessary
I have written my title with the font Tdk doodle
27- Merge all and save your work as a jpeg file and resize it if necessary
***************
That's it !! You've done it !!
If you 've enjoyed doing my tutorial, it would be nice to write a few words in my guest book ! If you 've had the slightest problem, please, send me a mail so I can see to the problem !
Tutorial translated on the 13th of november 2010
**********************
Other versions of that tag
