
Thank you for putting a link to this tutorial, whenever you display your realization of that tag on a website, on a group or in a mail !
**************************
You'll find some versions of that tag in my gallery HERE
*********************
To realize that tag, you'll need the plugins Mura's seamless
and the material zip down below :

***************
*It is forbidden to suppress watermarks on the material provided , to alter, mist or rename the tubes in order to respect the work of the tubers
- The tube of the woman is by Kikirou
The other elements have been found on the web
*******************
Preparation
Duplicate your tubes and your mask, close the originals and minimize the copies for now.
*****************
Click here to print the tutorial
*******************
You can use my arrow to follow your work

*********************
1- Open a new transparent image of 800 by 650 pixels
2- Flood fill that image with a nice colour out of your tube ; I have used the bright pink b32c67 
3- Effects / Texture effects / weave as below :
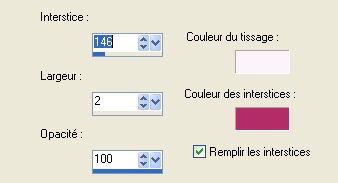
Weave colour : FDF3FB / gap colour : b32c67
4- Add a new raster layer and flood fill it with a darker colour ; I have used the maroon colour 631a48 
5- Effects / geometric effects / circle / transparent
6- Image / resize at 85 % ( all the layers not checked)
7- Choose a mode for that layer that makes the layer look darker than the background; I have chosen the mode Hard Light and I have lowered the opacity to 90
8- Effects /3d effects / drop shadow / 4, 4, 50, 20, colour debed1
Do it again with - 4 vert and horiz
9- Add a new raster layer and flood fill it with the colour debed1
10- Layers / new mask layer / from image / choose the mask Flornambg_16 / check Source luminance and Invert
Merge the group
11- Effects / plugins / Mura's seamless / Emboss at Alpha default
Do it another time !
12- Add a new raster layer and select all
13- Open the tube Frame, copy it and paste it in the selection
Select none
14- Set the mode of that layer to Luminance (Legacy )
15- Open the tube of the woman , copy it and paste it as a new layer
Place the tube as shown on my tag or to your own liking
16- Layers / duplicate
17- Activate the layer which is underneath ( the layer with the woman on line 15)
Adjust / blur / gaussian blur at 10
18- Set the mode of that layer to Dodge ( in order to get some high light around the edge of the woman ) If it's too bright, lower the opacity of the layer ; If you can't see the light effect you can resize your layer to 105 or 110 . It's up to you to decide what looks better !
19- Activate your top layer
Open the tube decobird-sandy, copy it and paste it as a new layer
(You can choose another tube of course)
Place the tube to your liking
20- We're going to turn the tube of the bird to a shadow theater but you can leave your tube as it is if you prefer ( you can colorize it too )
Adjust / Brightness , contrast / - 255, 0
21- Effects /3d effects / drop shadow / 4, 4, 50, 20, light colour (debed1 for me )
22- Add one or several layers to write your text using different fancy fonts in different sizes and different modes (You'll find enclosed the fonts I have used ) But, if you prefer, you can use the tubes of my text and copy them as new layers
23- Add a new raster layer and apply your signature
24- Image / add some symmetrical borders of 2 pixels with your bright colour (for me b32c67 )
25- Save your work as a jpeg file and resize it if necessary
****************
That's it !! You've done it !!
If you 've enjoyed doing my tutorial, it would be nice to write a few words in my guest book ! If you 've had the slightest problem, please, send me a mail so I can see to the problem !
Tutorial translated on the 10th of March 2009
*********************
You'll find some versions of that tag in my gallery HERE