
Thank you for putting a link to this tutorial, whenever you display your realization of that tag on a website, on a group or in a mail !
**************************
You'll find some versions of that tag in my gallery HERE
***********************
To make that tag , you'll need the material zip down below :

*It is forbidden to suppress watermarks on the material provided , to alter, mist or rename the tubes in order to respect the work of the tubers
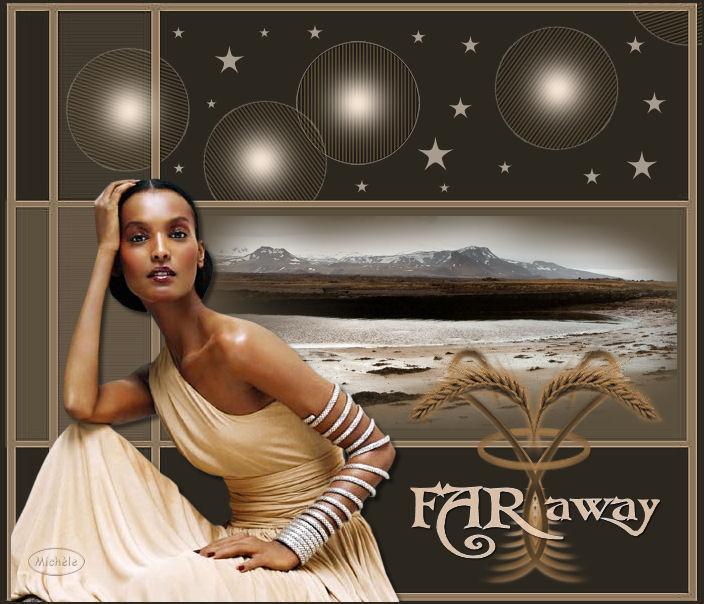
- The tube of the woman is by Gini, the tube of the scenery by Reveries, and the tube of the ear of wheat by Regards Passion
Thanks to all of them
*
Open you font and minimize it. Put your selections in your selections folder
Open your Psp. Open the tubes, the mask, duplicate them, close the originals and minimize the copies for now.
Now, we're ready to start !
*
1- Open a new transparent image of 700 x 600 pixels
2-Flood fill this image with the colour 8c775e
3- Rasters / new mask layer / from picture / find the mask 65 / check source luminance
4- Effects / Edge effects / enhance
Merge the group
5- Add a new layer
Layers / arrange / move down
6- Flood fill that layer with a darker color ( I chose dark brown : 2b271f )
7-Activate the top layer ( group raster 1)
Selections / load from disk / choose selectionfaraway / check source luminance and replace selection
8- Open the tube scenery Nikitapaysages or a tube of your choice, copy it and paste it as a new layer
Place your scenery tube paysage in the middle of your selection with your move tool
9- Selections / invert
Hit delete to suppress all the parts of your tube which are outside the selection borders
Selections / Select none
10- Merge all
Add a new layer
11- Selections / load from disk / choose selectionfaraway2 / check source luminance and replace selection
12-Open the tube Bulles, copy it and paste it as a new layer on your tag
Selections / Select none
13- Add a new layer
Set your foreground with the colour f4e4d4
Activate your airbrush tool and set it as below

14-Apply your airbrush once, in the center of each of the 4 bubbles
15- Add a new layer
Switch the color of your foreground with your background color (close your foreground)
Activate the preset shape tool and set it as below

Draw a few stars of different sizes ( as shown on my tag)
Lower the opacity of that layer with your stars between 60 and 65
16-If you don't wish to make your own stars, you can use the tube étoiles I made with my stars, copy it and paste it as a new layer on your tag !
17-Open the tube Trp004, copy it and paste it as a new layer
Place that tube at the bottom, on the right of your tag, as shown on my tag
18-Add a new layer
Set your background with the colour f9d8bd ( your foreground is closed )
With your text tool set as below, write the word FAR in capital letters using the font tlj (the longest journey) or another font of your choice

Move that word to the right place
19- Add a new layer and write the word away in lower case letters with the same font, but size 48
Move your word to the right place
20-Layers / merge down
21- Set the opacity of that merged layer ( with your two words) at 85
22- Open the tube of the woman, copy it and paste it as a new layer
Place the tube as shown on my tag
23- Effects / 3d effects / drop shadow / 4, 4, 50, 5, black
24-Add a new layer , apply your signature
25- Image / add new symmetrical borders of 2 pixels with the same dark brown colour 2b271f
26-Save as a jpeg file
That's it !! You've done it
If you 've enjoyed doing my tutorial, it would be nice to write a few words in my guest book ! If you 've had the slightest problem, please, send me a mail so I can see to the problem !
Tutorial translated on the 26 of july 2008
***********
You'll find some versions of that tag in my gallery HERE