

Thank you for putting a link to this tutorial, whenever you display your realization of that tag on a website, on a group or in a mail !
**************************
You'll find some versions of that tag in my gallery HERE
***********************
To realize that tag, you'll need the plugin :
- Photo aging kit here to be installed in Filters Unlimited 2.0
and the material zip down below :

**************
*It is forbidden to suppress watermarks on the material provided , to alter, mist or rename the tubes in order to respect the work of the tubers
- The misted tube is by Ly An Ka An
- The main tube is by Katussia
- The tube of the branch and the bird is by Mtm
You can join in her sharing group here
The other elements have been found on the net
******************
Preparation
Duplicate your tubes, masks and image. Close the originals and minimize the copies for now.
*****************
Click here to print the tutorial
*******************
You can use my arrow to follow your work

***************
1- Open a transparent image of 800 by 650 pixels
2- Set your colour palette with two colours of your choice
My choice : Foreground : light colour e8e6f3
Background : dark colour 60639a
Set your foreground with a radial gradient as below :

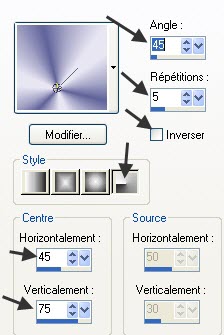
3- Flood fill your transparent layer with that gradient
4- Adjust / Blur / gaussian blur / 40
5- Effects / plugins / Filters Unlimited 2.0 / Photo aging kit / Cracked paper / 128, 128
6- Activate the image "texture_extase.jpg", colorize it so that it is in the same tone as the colours you have chosen, copy it and paste it as a new layer
I have set the mode of that layer to Difference which made me change the tube I had chosen in the first place !!! It is up to you to choose the mode that suits you !
7- Add a new layer and flood fill it with your dark colour
8- Layers / new mask layer / from image / choose " fairymist-extase_mask_1.jpg" / check Source Luminance
Layers / Merge group
I have set the mode of that layer on Multiply
9- Add a new raster layer and flood fill it with your light colour
Layers / new mask layer / from image / choose " fairymist-extase_mask_2.jpg" / check only Source Luminance
Adjust / Sharpness / Sharpen more
Layers / Merge group
I have left the mode of that layer on to Normal
10- Activate the misted tube "TUBE_057.pspimage" or the misted tube of your choice that you have chosen to put in the center of your tag, copy it and paste it as a new layer
Place to your liking ( I have slightly moved my tube upwards )
I have lowered the opacity of that layer to 71 !!
If your tube is much bigger than the circle in the middle of your tag, you can draw a round selection on that layer ( with your selection tool ), invert the selection and hit the delete key to suppress what is outside that selection !
11- Now, when you have reached that stage, you will have to play with the modes and opacities of your different layers to get a result that shows up nicely all the different masks, texture, effects used and whose colours match your different tubes !!
You may duplicate one or several of your layers to emphasize a colour or an effect !
12- Activate the tube "kTs_©Parkes_Michael07.pspimage" or a tube of your choice, copy it and paste it as a new layer
I have resized that layer at 85%
Place the layer as on my tag or to your liking
13- As the colour of my tube didn't quite match the colours of my tag, I did this :
Adjust / Hue and Saturation / Hue Saturation Lightness as below :

14- Effects / 3d effects / drop shadow / 4, 20, 50, 20, black
15- Activate the tube "Mtm_bomen_Raven By SP-20 sept 2005.pspimage"or a tube of your choice, copy it and paste it as a new layer
Place on the top of your tag to your liking
16- Add a new raster layer and apply your signature
17- Make sure everything is at the right place
Image / add some symmetrical borders of 1 pixel with a colour of your choice ( black for me )
18- Layers / Promote background layer
19- Image / resize at 90 °% ( Resize all the layers NOT checked )
20- Add a new raster layer and select all
Layers / arrange / Move down
21- Activate the tube "deeframe.pspimage" or a frame tube of your choice, copy it and paste it into the selection
Select none
22-Add a new raster layer and flood fill it with a colour matching your tag
I have chosen the dark grey colour 4a4a4e
23- Layers / arrange / Move down
23- Image / add some symmetrical borders of 1 pixel with a colour of your choice ( white for me )
24- Save your work as a jpeg file and resize it if necessary
***************
That's it !! You've done it !!
If you 've enjoyed doing my tutorial, it would be nice to write a few words in my guest book ! If you 've had the slightest problem, please, send me a mail so I can see to the problem !
Tutorial translated on the 21st of August 2010
*************
Other versions of that tag
