
Thank you for putting a link to this tutorial, whenever you display your realization of that tag on a website, on a group or in a mail !
**************************
You'll find some versions of that tag in my gallery HERE
***********************
To realize that tag, you'll need the plugins 2manekenai , Sapphire Innovations 1.5 , Andrew's filter 3 , Muraseamless
and the material zip downbelow :

******************
*It is forbidden to suppress watermarks on the material provided , to alter, mist or rename the tubes in order to respect the work of the tubers
- The tube of the child is by Evan
- The mask is by Brujita
All the other elements have been found on the net
*********************
Preparation
Duplicate your tubes and background. Close the originals and minimize the copies for now.
Place the masks in your mask folder and the frame in your frame folder
Export the text brush in your Psp as a custom brush
********************
Click here to print the tutorial
*******************
You can use my arrow to follow your work

**************
1- Open a transparent image of 800 by 650 pixels and flood fill it with the colour 3c4c64 
2- Add a new raster layer
Selections / select all
Open your scenery image, copy it and paste it into the selection
Select none
3- Layers / duplicate / close that layer in your layers palette and highlight the layer which is underneath (scenery layer)
4- Adjust / gaussian blur at 20
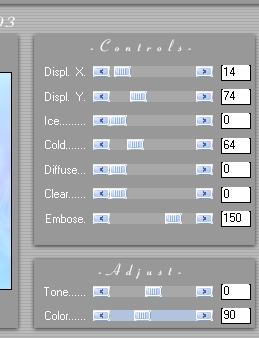
5- Effects / plugins / 2manekenai (tm) / MezzoForce-Ice / Freezemenow as below :
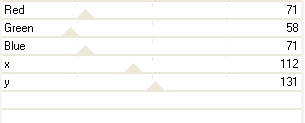
6- Effects / plugins / Innovations 1.5 / Effect mesh as below
7- Effects / edge effects / enhance
8- Edit / copy
Paste as a new image / we're now going to work on that layer : ( steps 9 to 12 ) :
* You may choose not to do steps 9 to 12 and use the "image 6 psp " that I have put in my zip ! *
9- Image / resize at 90 % ( Resize all the layers checked ! )
10- Adjust / Add some noise / Gaussian, monochrome, at 50
Lower the opacity of the layer to 63
11- Effects / plugins / Andrew's filter 3 / Suckedintoahole as below
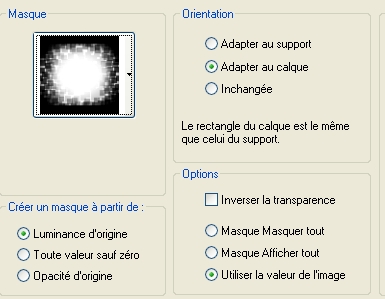
12- Layers / load a mask from disk as below and choose the mask Rand Vierkanten
Merge group
***************
13- Copy that layer and paste as a new layer on the tag you made between steps 1 to 7

Set the mode of that layer to Burn
14- Hightlight the top layer that you have disactivated on step 3
15- Image / resize at 65 % / Resize all the layers NOT checked
Adjust / sharpness / sharpen
16- Layers / load a mask from disk and choose the mask dm83 / same settings as on step 12
Merge group
17- Place it on the top left hand side as on my tag
Lower its opacity to 78
18 - Add a new raster layer and set your foreground with the colour 1f407e 
19-With your brush tool , apply the text brush ,size 255, in the top right hand side corner of your tag and in the top left hand side corner as well
Set the mode of that layer to Hard light
20- Merge all
21- Add a new raster layer and flood fill it in white
22- Layers / load a mask from disk and choose the mask Brujita-navidad-0014 / same settings as on step 12
Merge group
Image / mirror
Place the christmas tree on the right hand side of your tag
23- Layers / duplicate
Image / mirror
Place that second tree on the left hand side of your tag but hide most of it apart from the curls which are on the right part of the tree
24- Layers / merge down
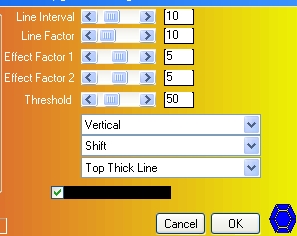
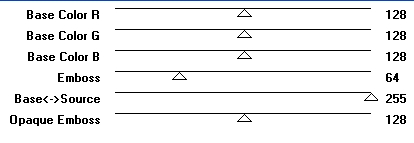
25 -Effects / plugins / Muraseamless / Emboss at Alpha / as below :
Repeat that step
26- Image / add some symmetrical borders of 60 pixels in white
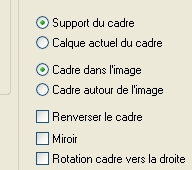
27- Image / Picture frame / as below with the Corel 09-019 psp frame
28- Open the tube of the child or a tube of your choice, copy it and paste it as a new layer
29- Image / resize at 50%. Adjust / sharpness / sharpen
Place the tube as shown on my tag
30- Effects /3d effects / drop shadow / 4, 4, 50, 10, black or a shadow of your choice
31- Add a new raster layer and apply your signature
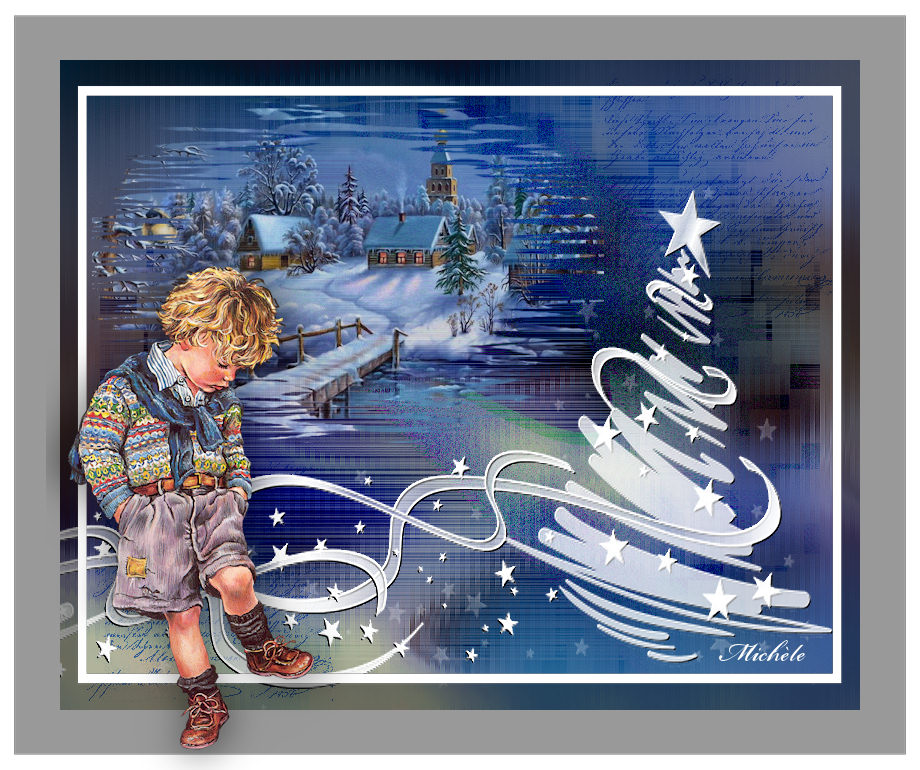
32- Merge all and save your work as a jpeg file
*******************
That's it !! You've done it !!
If you 've enjoyed doing my tutorial, it would be nice to write a few words in my guest book ! If you 've had the slightest problem, please, send me a mail so I can see to the problem !
Tutorial translated on the 16th of December 2009
*************
You'll find some versions of that tag in my gallery HERE