
Thank you for putting a link to this tutorial, whenever you display your realization of that tag on a website, on a group or in a mail !
**************************
You'll find some versions of that tag in my gallery HERE
************************
To realize that tag, you'll need the plugins :
- VM distortion,
- Alien skin Eye Candy 5 / Impact,
- Mura's seamless éventually
and the material zip down below :

**************
*It is forbidden to suppress watermarks on the material provided , to alter, mist or rename the tubes in order to respect the work of the tubers
- The tubes of the woman and of the veil are by Guismo
You'll find some of her tubes on Dakara's site here
You'll be able to get her tubes by joining in her sharing group here
- The tube of the dolphins is by Emeralde Design
- The brush of the snow is by Yana_Stock
The other elements have been found on the net
******************
Preparation
Duplicate your tubes and your mask. Close the originals and minimize the copies for now.
Export the brush in your Psp as a custom brush
*****************
Click here to print the tutorial
*******************
You can use my arrow to follow your work

***************
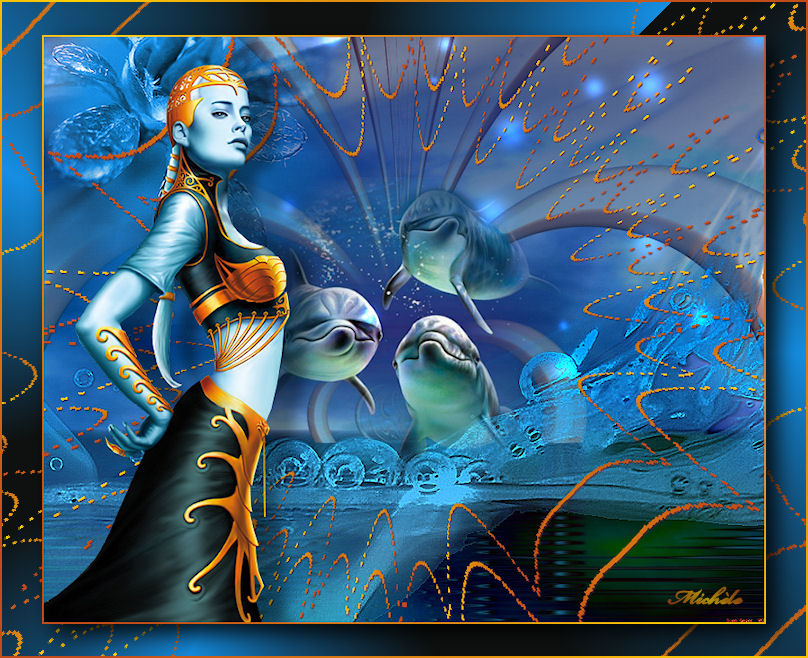
1- Open a new transparent image of 800 by 650 pixels
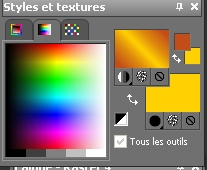
2- Set your material palette with two colours out of your main tube
My choice : Foreground : dark colour 0f1110 
Background : lighter colour 015472 
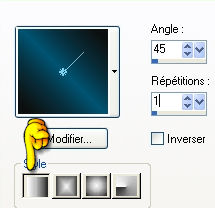
Set your foreground with a linear gradient as below :
3- Flood fill your transparent layer with that gradient
4- Add a new raster layer and select all
5- Open the image Waterworld, copy it and paste it into the selection
Select none
6- Set the mode of the layer on which your picture is to Difference and lower its opacity to 90
7- Duplicate that layer and set the mode of the copy to Dodge; lower its opacity to 80
* According to the colours you have chosen, you may have to set these two layers on different modes and opacities in order to get a result you like .But don't change anything till you have done steps 8 and 9 !!
8- Open the tube Calguisdecorblue2389, copy it and paste it as a new layer
Then I did : Image / flip
9- Effects /3d effects / drop shadow / 1, 1, 100, 2, black
Optionnal : Effects / edge effects / sharpen
10- Open the tube ED-Mars-61 or a tube of your choice, copy it and paste it as a new layer
With my eraser tool , I have rubbed off the parts of the pictures that covered the bodies of the dolphins , you must activate the layers of the picture one by one to do it It may no be necessary if your tube is less transparent than mine
11- Set your background with a bright colour
I have chosen a bright turquoise 76c6f4 
Add a new raster layer
With your brush tool , set as below, , with a right click of your mouse, the Snow brush

Move the snow flakes to the right side of your tag
Set the mode of that layer to Dodge and lower its opacity to 72
** If you don't work with Psp 12 and therefore can't use my brush, I have included in the zip, a layer with the brush on, ready to use !
12- Open the tube Fairymist-rodho-eveil or a tube of your choice, copy it and paste it as a new layer
You may colorize that tube to match your colours
Place it in the top left hand side of your tag
You may duplicate that layer to make it less transparent
13- Prepare your colour palette with two contrasting colours out of you main tube and set your foreground with the same gradient as on step 2 with these two new colours
Avant plan : couleur c34d1a 
Arrière plan : couleur fed104 
14- Add a new raster layer and select all
Selections / modify / contract by 50 pixels
Selections / modify / select the borders of the selection as below :
15- Flood fill that selection with that gradient
Select none
16- Layers / duplicate
17- Image / resize at 75 % ( Red all the layers NOT checked )
18- Layers / Merge down
19- Effects / plugins / VM distortion / Tumbler / 128 everywhere
20- Effects / 3d effects / drop shadow / 1, 1, 100, 2, dark colour 732730
***
** Instead of the drop shadow you may do :
Effects / plugins / Mura's seamless / Emboss at alpha default
or
You may set the mode of the layer to Dodge and lower the opacity to your liking!
***
21- Open the tube Calguisfantaisie_712 or a tube of your choice, copy it and paste it as a new layer
I have resized my tube at 70 % ( Resize all the layers NOT checked )
Place to your liking
Add a drop shadow of your choice ( I have chosen : 4, 4, 40, 20, black )
22- Make sure everything is in its place
Image / add some symmetrical borders of 2 pixels in white
23- With your magic wand set as below, select that border

24- Flood fill that selected border with the same gradient as on step 13
Select none
25- Layers / Promote Background layer
Image / resize at 90% ( Resize all the layers NOT checked )
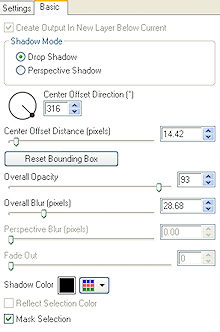
26- Effects / Alien skin Eye candy 5/ Impact / Perspective shadow / drop shadow blurry as below :
28- Add a new raster layer
Layers / arrange / move down
29- Set your colour palette with two colours matching your tag
My choice : Foreground : dark colour as on step : 20f1110
Background : Lighter colour 158ee2 
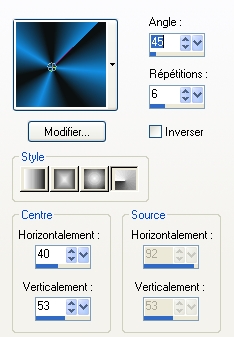
Set your foreground wit a sunburst gradient as below :
30- Flood fill your transparent layer with that gradient
31- Add a new raster layer
Disactivate the layer where your tag is so you can see what you are doing on that new layer !
Repeat steps 13 to 17
32- Duplicate the resized rectangle
Image / resize at 75% ( Resize all the layers NOT checked )
You should get this :
33- Layers / Merge down / twice / so your three rectangle are on the same layer
34- Effects /plugins / VM distortion / Tumbler / 128, 128, 128, 74 !!
35- Activate the top layer , add a new raster layer and apply your signature
36- Repeat steps 22, 23, 24 to get the same border
37- Save your work as a jpeg file and resize if necessary
******************
That's it !! You've done it !!
If you 've enjoyed doing my tutorial, it would be nice to write a few words in my guest book ! If you 've had the slightest problem, please, send me a mail so I can see to the problem !
Tutorial translated on the 21 th of november 2009
************
You'll find some versions of that tag in my gallery HERE