Thank you for putting a link to this tutorial, whenever you display your realization of that tag on a website, on a group or in a mail !
-----------------------
You'll find some versions of that tag in my gallery HERE
***************
To realize that tag, you'll need the plugins :
- VM Extravaganza,
- Alien skin Eye Candy 5 / Impact,
- Graphic plus,
- Simple
and the material zip here
**************
*It is forbidden to suppress watermarks on the material provided , to alter, mist or rename the tubes in order to respect the work of the tubers
- The tube of the woman is by Kikirou
You'll be able to get her tubes by joining in her sharing group here
The other elements have been found on the net
******************
Preparation
Duplicate your tubes and mask; close the originals and minimize the copies for now. Export your brush in your psp as a custom brush. Place your selections in your selection file. If your plugin Extravaganza doesn't have the effect Dribble, place my effect in your plugin files . Don't hesitate to come to me if you have any problem with the material !
*****************
Click here to print the tutorial
*******************
You can use my arrow to follow your work

***************
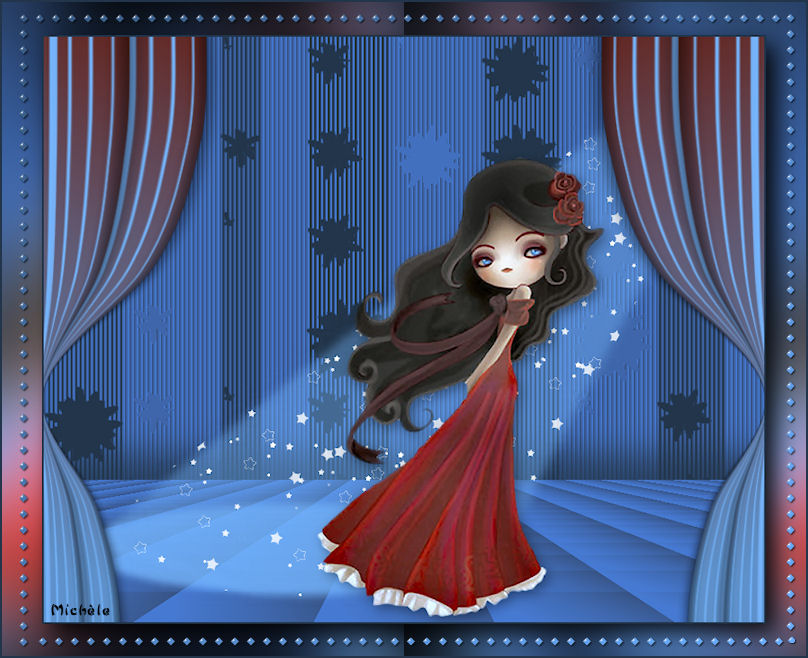
1- Open a new BLACK image of 800 by 650 pixels
2- Set your material palette with two colours which go with your main tube
My choice : Foreground : bright colour 3361c0 
Background : dark colour 1d2a51 
3- Add a new raster layer
Selections / load a selection / from disk / choose the selection En_scene_1_Fairymist / check Source Luminance and Replace the selection
4- Flood fill that selection with your dark colour
KEEP THE SELECTION
5- Effects / texture effects / Blinds as below with your bright colour : 3361c0
6- KEEP THE SELECTION
Effects /plugins / VM Extravaganza / Dribble as below :
7- SELECTIONS / INVERT
Set your foreground with a linear gradient using the colours of point 2, angle 45, repeat 0, Invert NOT checked
8- ADD A NEW RASTER LAYER
Flood fill that new selection with your gradient
9- KEEP THE SELECTION
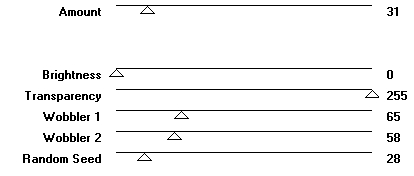
Effects / plugins / Murameister / Perspective tiling as below :
Select none now !
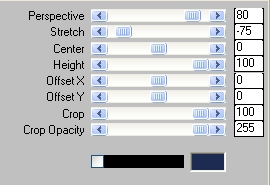
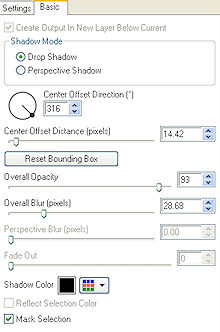
10-Effects / Alien skin Eye candy 5/ Impact / Perspective shadow / Cast on wall / on basic, enter those figures
11- Add a new raster layer
Flood fill that layer with a light colour that will be suitable to make a beam of light; I have chosen a light blue 76b7ff 
12- Layers / new mask layer / from image / choose the mask spotlight / only check Source Luminance
Adjust / sharpen / sharpen more
Merge group
You may change the mode of that layer, if you wish; I have left it on Normal
13- Add a new raster layer
Set your background in white
Activate your brush tool, set as below , apply as many times as necessary (right clic),the brush Star_brush_by_Mim44_5 , inside the beam of light ( we're going to delete what goes outside it in a minute !)

14- When you've finished, stay on that layer :
Selections / load a selection / from disk / choose the selection En_scene_3_Fairymist / check Source Luminance and Replace selection
15- Selections / Invert the selection / hit delete in order to suppress what is outside your beam of light !
Select none
You may change the mode of that layer, if you wish !
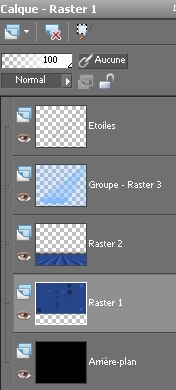
16- At that stage, your layer palette should be like that :
Activate the layer raster 1 as below , we're going to make some effects on that layer
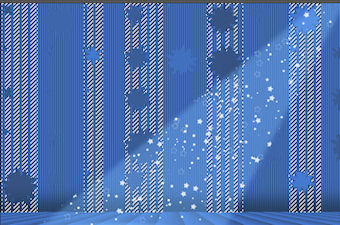
17- With your magic wand set as below, click on the different stains that have been created on point 6 ( dribble effect ) while keeping pressed the key shift in order to get this :

18- Hit delete and select none
Your black background appears in the spaces that have been deleted !
If you don't manage to do these selections, you may use ma selection 4 ( same way as on point 14 ) !
19- Now, go back to your top layer , the one with the stars
Open the tube Kikirou711_healing_the_past_by_diablata or a tube of your choice , copy it and paste it as a new layer
Place the tube to your liking
20- Effects / 3d effects / drop shadow of your choice !
21- Open my tube rideau_en_scene_fairymist, copy it and paste it as a new layer
Image / Image effects / Offset / horiz : - 300, Vert : 0, check custom and transparent
Colorize your curtains if necessary
For those who want to create their own curtains, here is how I made mine
A- Open a new raster layer of 800 by 650 pixels
B- Selections / load a selection / from disk / chose the selection rideaux_en_scene_fairymist / check Source luminance and replace selection
C- Flood fill the selection with the linear gradient you will set in your foreground, angle 45, repeats 0, invetr not checked with two colours of your choice
I have put the colour blue 75b4fa in my foreground and the marroon 702544 in my background
D- Add a new raster layer and flood fill the same selection with your foreground colour ( not the gradient )
Select none
E- Effects / texture effects / blinds / 20, 40, colour 702544, check light from left/ top
F- With your magic wand set as below and the shift key pressed, click on the vertical stripes of your curtain
Hit the delete key
Select none
G- Layers / merge visible
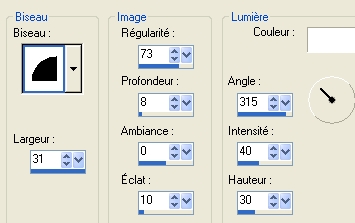
H- Effects / 3d effects / Inner bevel as follows :
I- Activate the deform tool and stretch the top and the bottom of your curtain so that the bevel effect disappears (click on another tool to get rid of your deform tool !)
K- Effects / 3d effects / drop shadow / 4, 4, 50, 20, black
L- Layers / duplicate
M- Activate the bottom layer ( your first curtain)
Effects / image effects / Offset / Horiz : 50, vert : 0, check custom and transparent
N- Merge visible
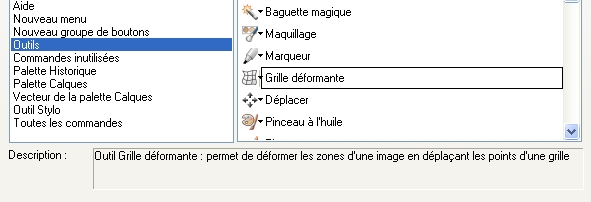
O- Activate your mesh warp tool and set it as below :

If you can't find that tool go to View / customize / tools / look for the Mesh warp in the list, click on it and drag it to your tool palette
Click on the grid and pull or push the small squares in order to get a shape that suits you
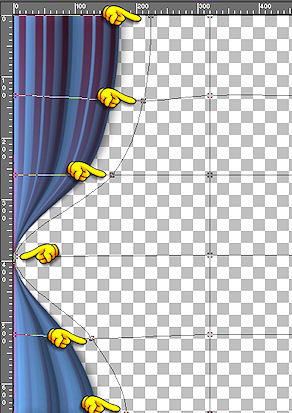
Apply your deformation by clicking on the small green knob

(click on another tool to get rid of your mesh warp tool !!)
That's it, your curtains are ready
**********
|
22- Layers / duplicate
Image / mirror
23- Add a new raster layer and apply your signature
24- Make sure everything is in its place
Image / add some symmetrical borders of 2 pixels with your dark colour
Edit / copy
25- Layers / Promote Background layer
26 - Image / resize at 90% ( Resize all the layers NOT checked )
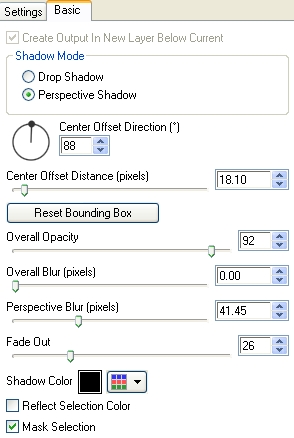
27 - Effects / Alien skin Eye candy 5/ Impact / Perspective shadow / drop shadow blurry
28- Add a new raster layer
Layers / arrange / move down
Select all
29- Paste into the selection (the copy of your tag)
Select none
30- Adjust / Blur / gaussien blur at 40
31- Effects / plugins / Graphic plus / Cross shadow default
32- Effects / plugins / Simple / Left right wrap
33- Open the tube déco_en_scène_fairymist, copy it and paste it as a new layer
Colorize if necessary
34- Image / add some symmetrical borders of 2 pixels with your dark colour
35- Save your work as a jpeg file and resize it if necessary
***************
That's it !! You've done it !!
If you 've enjoyed doing my tutorial, it would be nice to write a few words in my guest book ! If you have the slightest problem, please, send me a mail so I can see to the problem !
Tutorial translated on the 26th of july 2009
*************
Other versions of that tag