
Thank you for putting a link to this tutorial, whenever you display your realization of that tag on a website, on a group or in a mail !
-----------------------
You'll find some versions of that tag in my gallery HERE
*****************
To realize that tag, you'll need
- the plugin Unlimited 2.0
and the material zip down below :

**************
*It is forbidden to suppress watermarks on the material provided , to alter, mist or rename the tubes in order to respect the work of the tubers
- The tube of the elfe is by Guismo
You'll be able to get her tubes by joining in her sharing group here
and you can find some of her tubes on Dakara's site here
-The tube of the coral is by Kikirou
You'll be able to get her tubes by joining in her sharing group here
- The picture of the girls by Julie Fain has been tubed by Jcemaid
- The tube "Mtm_bomen_Raven " is by Brigitte / Manon
You'll be able to get her tubes by joining in her sharing group here
- One of the brushes I have used is by Mel
- The other brush is by Calajane
The other elements have been found on the net
******************
Preparation
- To be on the safe side, duplicate your tubes, mask and image in your Psp :
-
Window / Duplicate
- Close the originals and work with the copies !
- Export your brushes in your Psp as custom brushes
- Put your mask 20-20 in the mask folder of your Psp files
*****************
Click here to print the tutorial
*******************
You can use my arrow to follow your work
Click on it and drag it all along the tutorial !

***************
1- Open a transparent image of 800 by 650 pixels
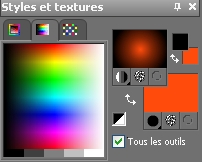
2- Set your Materials palette with two colours matching your main tube
My choice : Foreground : dark colour : black
Background : bright colour : ff4c0e
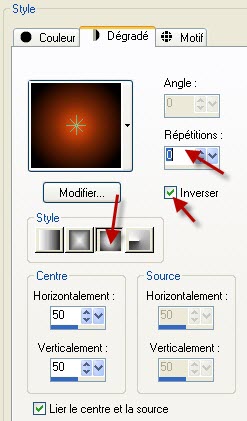
- Set your foreground with a sunburst gradient as below :
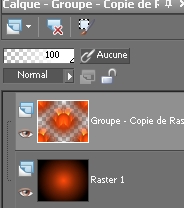
3- Flood fill your transparent layer with that gradient
4- Layers / duplicate
5- Add a new raster layer and select all
6- Activate the mask "hjr_mask_texture52.jpg", copy it and paste it into the selection
Select none
7- Effects /distortion effects / Polar coordinates / Polar to rectangular
8- Adjust / sharpen / sharpen more
Set the mode of that layer to Dodge and lower its opacity to 85
You may choose another mode that suits you better, it all depends on your choice of colours
9- Layers / merge down
10- Layers / load a mask / from disk / choose the mask 2020 / set a below :

Layers / Delete / answer yes to the question
Layers / merge group
11- Effects /image effects / Seamless Tiling default
12- Activate the layer "deco_elfe_fairymist.pspimage", copy it and paste it as a new layer
If you prefer, you can use the png file included in my "pinceaux" folder and export it as a custom brush ...or use a brush of your choice !
13- Activate the tube "kikirou1475_corail.pspimage" or a tube of your choice, copy it and paste it as a new layer onto your tag
I have resize that tube at 50 %
Place the tube in the bottom left hand side of your tag
I have set the mode of that layer to Screen and lowered its opacity to 75
14- Layers / duplicate
Image / mirror
I have set the mode of that layer to Dodge and lowered its opacity to 78
15- Activate the tube "Mtm_bomen_Raven By SP-20 sept 2005.pspimage"or a tube of your choice, copy it and paste it as a new layer onto your tag
Place against the top border of your tag
I have set the mode of that layer to Multiply
16- Activate tube " juliefain_FairySisters_ice.psp"or a tube of your choice, copy it and paste it as a new layer onto your tag
I have set the mode of that layer to Overlay
Place it as on my tag or to your liking
17- Activate the tube "calguiselfe10128.pspimage"or a tube of your choice, copy it and paste it as a new layer onto your tag
Place as on my tag or to your liking
You can add a drop shadow if you with; I haven't put any !
18- Activate the layer "texte_elfe.pspimage"or a tube of your choice, copy it and paste it as a new layer onto your tag
Place to your liking
19- Activate the tube "fleurs_elfe_fairymist.pspimage"or a tube of your choice, copy it and paste it as a new layer onto your tag
If you prefer, you can use the png file included in my "pinceaux" folder and export it as a custom brush !
Duplicate that layer as many times as you wish : you can use the effect mirror and place them at different levels to obtain something you like
20- Add a new raster layer and apply your signature
21- Layers / Merge all
22- Effects / plugins / filters unlimited 2.0 / Edge square / Square edge 04
23- Save your work as a jpeg file and resize it if necessary
***************
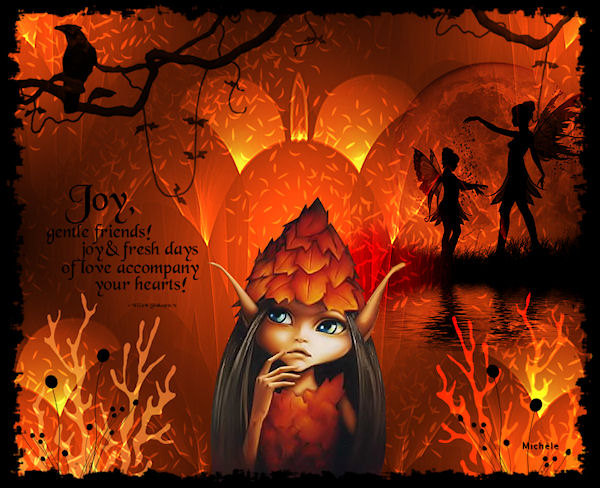
That's it !! You've done it !!
If you 've enjoyed doing my tutorial, it would be nice to write a few words in my guest book ! If you 've had the slightest problem, please, send me a mail so I can see to the problem !
Tutorial translated on the 4th of june 2010
*************
Other versions of that tag