
Thank you for putting a link to this tutorial, whenever you display your realization of that tag on a website, on a group or in a mail !
-----------------------
You'll find some versions of that tag in my gallery HERE
***********************
To realize that tag, you'll need the plugins :
- Simple
- Stylize / extrude
- VM distortion / Tiles à gogo
- Muraseamless / Emboss at alpha
and the material zip down below :

**************
*It is forbidden to suppress watermarks on the material provided , to alter, mist or rename the tubes in order to respect the work of the tubers
- The tube of the woman is by EmersonRose
- The element of decoration "pomme papillon" is by Pspmartine
- The brush "Abstract aura" is by Differentxdreamz
******************
Preparation
Duplicate your tubes. Close the originals and minimize the copies for now.
- Export your brush into your psp as a custom brush
- Put the selection into your Psp selection folder
- Place the mask 2020 into your Psp mask folder
*****************
Click here to print the tutorial
*******************
You can use my arrow to follow your work

***************
1- Ouvrir une image transparente de 800 par 650 pixels
2- Open a transparent image of 800 by 650 pixels
2- Set your colour palette with two colours matching your main tube
My choice : Foreground : light colour f5e0c9
Background : dark colour c28d4f
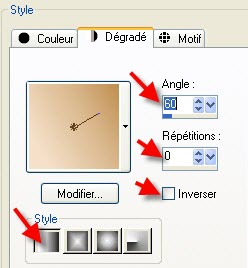
Set your foreground with a linear gradient as below :
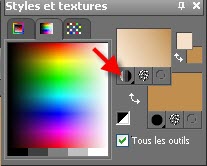
3- Flood fill your transparent layer with that gradient
4- Layers/ duplicate
5- Effects / texture effects / Blinds as below :

6- Effects / plugins / Simple / Diamonds
7- Effects / plugins /Simple / Pizza slice mirror
8- Effects / plugins / Simple / Centre tile
9- Effects / edge effects / enhance
10- Edit / copy
I have set the mode of that layer to Lighten
( It all depens on the colours you have chosen )
11- Edit / paste as a new image
12- On that new image :
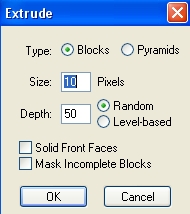
Effects / plugins / Stylize / extrude as below :
13- File / save that image in a folder of your choice and name it Background ( We'll use it later on )
14- You are still on that image :
Image / resize by 75% / Resize all the layers CHECKED
15- Layers / load a mask from disk / choose mask 2020
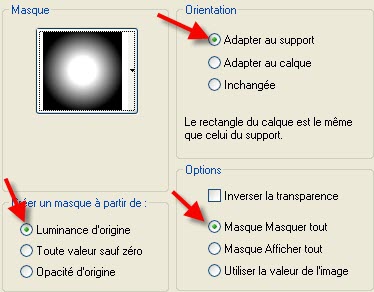
Layers / merge group
16- Edit / copy
Edit / paste as a new layer on your tag
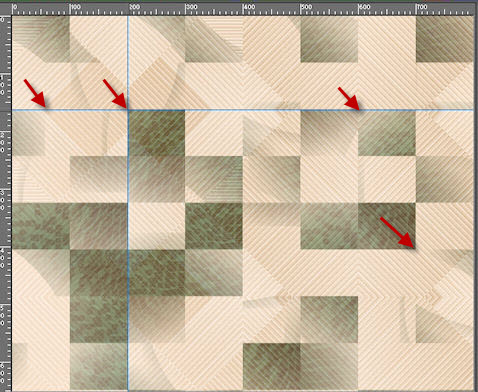
17- Effects / image effects / Seamless tiling default
18- Selections / load a selection / from disk / choose "fairymist_domino.PspSelection" / check Source Luminance and replace the selection
Hit the delete key : you have suppressed the middle part of that layer
Selections / Select none
19- Effects / plugins / VM distortion / Tiles à gogo : 32, 0, 207, 163
Set the mode of that layer to Difference and lower its opacity to 50
20- I tried to get on that layer the same blue as on the lady's necklace, to contrast with my former colours so I did this :
Adjust / Hue and saturation / Colorise / 240, / 120 for me ( my red colour becomes blue thanks to the Difference mode ! )
It is up to you to find the colour which will give a lovely colour matching your tube but contrasting with your other colours thanks to the Difference mode !!!
21- Add a new raster layer
Set your foreground with a nice color which contrasts with your other colours
I chose the colour 84a4a4 similar to the colour of the lady's necklace !

21- Activate your brushtool, set as below, and apply the brush "Abstract_Aura_Brushes_by_differentxdreamz_4.png.PspBrush" 4 times where it is shown below , with your foreground colour .

If your psp, doesn't accept that big brush, you may use my layer and colorize it to match your colours
22- Activate the tube "deco_domino_pommePapillon-marti-2008.pspimage" or a tube of your choice, copy it and paste it as a new layer onto your tag
Place the tube in the bottom left hand side corner of your tag
23- Activate the tube "Text_bis _Friends are Angels Wordart by NikkiArt-4.pspimage",copy it and paste it as a new layer onto your tag ; leave it where it is !
24- Effects / image effects / offset as below :
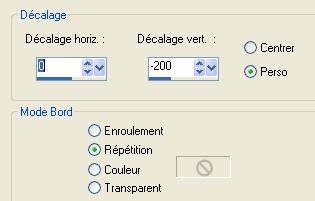
I have set the mode of that layer to Luminance Legacy and lowered the opacity at 70
25 - Activate the tube "etoiles_domino_fairymist.pspimage" , copy it and paste it as a new layer onto your tag
I have set the mode of that layer to Screen, It is up to you to see what mode you prefer
26- Activate the tube "BabyCorset~SM~EmersonRose.psp"or a tube of your choice, copy it and paste it as a new layer onto your tag
I have resized that tube at 120% ( Resize all the layers NOT checked !) and I did : Adjust / sharpen
27- Effects / 3d effects / drop shadow of your choice / 4, 4, 50, 20, black for me
28- Add a new raster layer
Set your background with the colour used on step 21 ( 84a4a4 for me ) and close your foreground
Activate your text tool, set as below and write the first letter of your title ( D for me ) with the font Abdiel, size 100, or a font of your choice

29-Add a new raster layer
With your text tool, set as below, write the other letters of your title ( omino for me ) using the font Floralies, size 75, or a font of your choice

30- Place the two parts of that word to your liking
Layers / merge down so that the two parts are on the same layer
I have set the mode of that layer to Luminance unless you prefer another mode !
31- Effects / plugins / Muraseamless / Emboss at alpha as below :
128, 128, 128, 96, 255, 116
32- Effects / 3d effects / drop shadow / 4, 4, 50, 5, white for me
33- Add a new raster layer and apply your signature
34- Make sure everything is in the right place
Image / add some symmetrical borders of 2 pixels with a colour of your choice ( 84a4a4 for me )
35- Layers / Promote Background layer
36- Image / resize at 90 °% (Resize all the layers NOT checked )
37- Effects / 3d effects / drop shadow / 0, 0, 80, 40, black
38 - Add a new raster layer and select all
Layers / arrange / move down
39- Activate the image Background that you have saved previously and copy it
40- Edit / Paste into the selection of the layer you added on step 38
Select none
41- Image / add some symmetrical borders of 2 pixels with a colour of your choice ( blue 84a4a4 for me )
42- Save your work as a jpeg file and resize it if necessary
***************
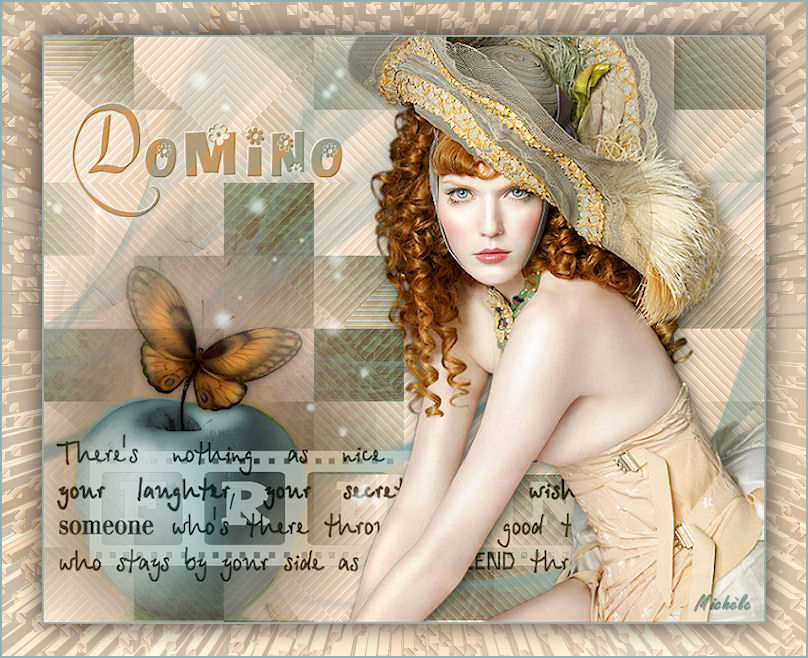
That's it !! You've done it !!
If you 've enjoyed doing my tutorial, it would be nice to write a few words in my guest book ! If you 've had the slightest problem, please, send me a mail so I can see to the problem !
Tutorial translated on the 2nd of october 2010
*************
Other versions of that tag