Thank you for putting a link to this tutorial, whenever you display your realization of that tag on a website, on a group or in a mail !
**************************
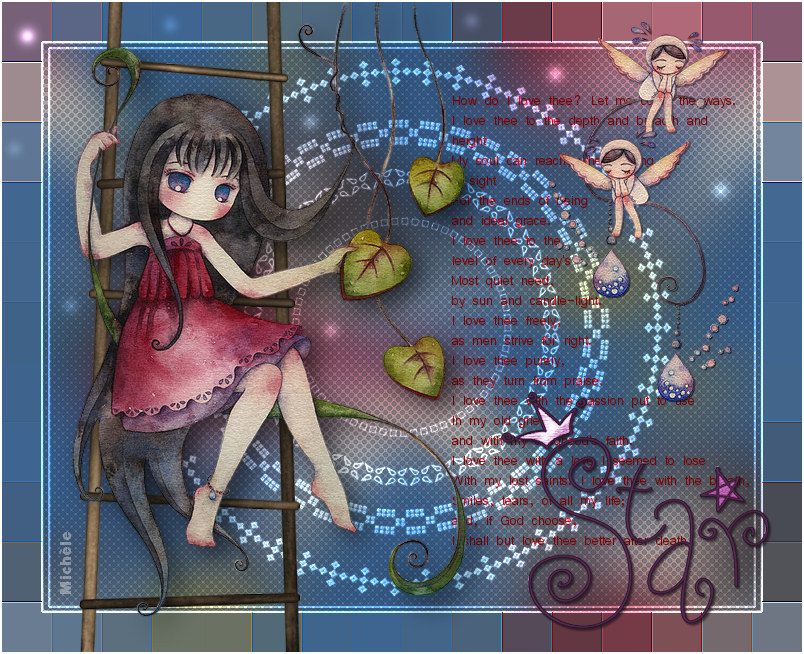
You'll find some versions of that tag in my gallery HERE
***********************
To realize that tag, you'll need the material zip down below :

**************
*It is forbidden to suppress watermarks on the material provided , to alter, mist or rename the tubes in order to respect the work of the tubers
- The tube "mtfp_449_©J.Ueda.pspimage"used is by Mtfp
The tube of the little angels is part of the enclosed tube "mtfp_507_©Juri_Ueda.pspimage" by Mtfp
Thank you Maria Tereza for letting me use and share your beautiful tubes !
The other elements that I haven't created, have been found on the net
******************
Preparation
- To be on the safe side, duplicate your tubes, mask and image in your Psp :
-
Window / Duplicate
- Close the originals and work with the copies !
-Double click on the Dingbat - font "GEMBATS2.TTF"( outside your Psp !) and minimize it.
*****************
Click here to print the tutorial
**********************
You can use my arrow to follow your work
Click on it and drag it all along the tutorial !

***************
Tutorial realized with PSP XIII

Step 1 : The background of the tag
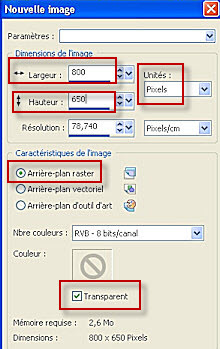
1 - Open a new transparent raster layer of 800 by 650 pixels
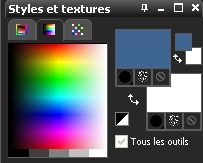
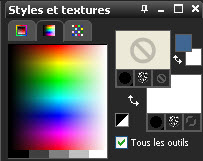
2- Set your Material palette as below :
Foreground : a secondary colour of your tube
I have chosen the blue of the eyes in my tube :
3f6692
Background : White
3 - Flood fill your transparent image with your foreground colour
4- Add a new raster layer
5 - Selections / select all
6 - Activate the tube "mtfp_449_©J.Ueda.pspimage" or a tube of your choice, in your Psp and copy it.
7 - Paste into the selection
8 - Selections / Select none
9 - Effects / image effects / Seamless tiling default
10 - Adjust / Blur / Gaussian blur at 30
11- Layers / Merge down
12 - Selections / Select all
13 - Selections / Modify / Contract by 40 pixels
14 - Selections / Promote selection to layer
Keep the selection until I tell you to deselect !
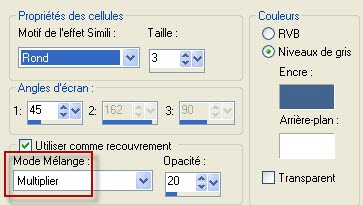
15- Effects / artistic effects / Half tone as below :
I have used my foreground colour, it is up to you to see what colour suits you better !
You may change the mode of that layer !
16- Effects / edge effects / Enhance
17- Add a new raster layer
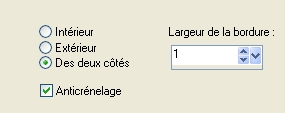
18- Selections / Modify / Select selection borders as below :
19- With your flood fill tool, set as below , flood fill your selection with your background colour ( white ) using a right click of your mouse.

20- Selections / Select none
21- In my layers palette , I have set the mode of that layer to Dodge and lowered its opacity at 60 so that the border takes the colours of my background. It is up to you to see which mode suits your colours better.
22- Layers / Duplicate
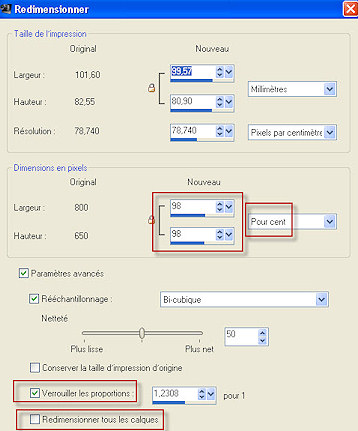
23- Image / Resize by 98 % as below :
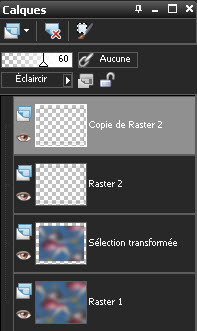
Here is what I get in my layers palette at that stage :
24- In your layers palette, activate your bottom layer ( Raster 1)
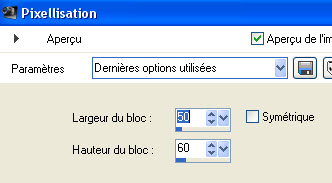
Effects / Distortion effects / Pixelate as below :
25- Effects / Edge effects / Enhance or enhance more, as you like !
26- Go to your top layer
Open the tube "texte.pspimage" or a text tube of your choice, in your Psp and copy it.
27- Paste as a new layer on to your tag
28- Colorize that tube to your liking or set the mode of the layer to Luminance Legacy or any other mode that gives a nice effect. I have used the text tube as it is.
29- Place the tube in the right hand side, as on my tag or to your liking.
30- Layers / Merge all
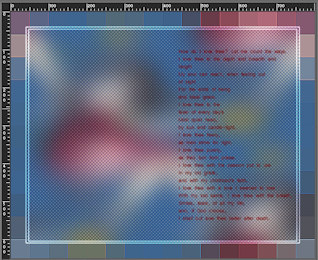
Step 2 : Text effects / Writing in circles
When you want to write in circle, you must use a vector circle to write on !
1- Set your Material palette as below :
Close your background.

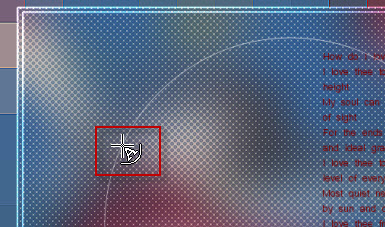
2- Activate the Preset shape tool Ellipse ( Letter Q), set as below :
Click on the blue round button "Dessiner un cercle" ( see red arrow )
* If you don't tick the square "Create on vector", you won't be able to write on your circle !
* If you don't tick the square "Show nodes", you won't be able to change the size ot your circle later on !

3- Put the tip of your cursor in the top left hand side corner of your double rectangle, keep the left click of your mouse pressed and drag your mouse in the direction the arrow is pointing to draw your circle.
Don't worry about the size and the position of your circle, we're going to see about it very soon !

3- Set your Ellipse tool as below :
- Fill in the given figures in the Radius box to get the right dimensions of that circle (1)
- Fill in the given figures in the Center box to get the right orientation of that circle (2)
- Confirm by clicking on the green button "Apply" (3)

4- Set your Material palette as below :
5- Activate your text tool, set as below with the dingbat " GemBats2" or a font of your choice ( There are so many possibilities !!!!!!!!!)


6- Add a new raster layer
This new layer is very important, otherwise your text will be on the same layer as your vector circle and when you want to get rid of that circle, you will delete your text as well !
7- Place the mouse cursor anywhere on that circle and left click when you get the same figure as the one you can see below :
- I have chosen the dingbat which corresponds to the number 5 on my keyboard
- Keep the number 5 key pressed until all your circle is covered with the chosen dingbat or letter.
- Confirm by clicking on the green button "Apply"

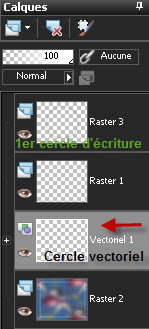
8- Layers / Convert to raster layer
9- We're now going to make our vector circle smaller
CIRCLE 2
- Activate the layer where your vector circle is, as shown below :
10 - Image / resize at 75% ( Resize all the layers NOT checked )
11- Activate Layer Raster 1 which is the layer above the vector circle ( see on the picture above )
12- Repeat steps 7 and 8 to write on that new circle
I have chosen the dingbat which corresponds to the number 2 ( same size )
CIRCLE 3
13- Repeat steps 9, 10 and 11
14- Repeat steps 7 and 8 to write on that new circle
I have chosen the dingbat which corresponds to the letter u, in small letters ( same size
CIRCLE 4
I have set my Material palette as below
15- Repeat steps 9, 10 and 11
16- Repeat steps 7 and 8 to write on that new circle
I have chosen the font Arial Black, size 36 and have used the dot (period).
17- Suppress now the circle on which we have been writing, we don't need it any more.
We're now going to put the 4 written circles on the same layer.
- Close your bottom layer ( Raster 2 as shown on the picture above )
- Merge visible
18 - I have set the mode of that layer on to Dodge ( use the same mode as your rectangle layer ) and I have lowered the opacity at 65
19 - Open the eye of your bottom layer and activate your top layer .
Step 3 : The tubes
If you don't use my tubes, you can choose any tubes of your choice !
This tag can be made on any theme you like ( the ladder is not necessary at all !)
1- Activate the tube "ladder.pspimage" or a tube of your choice, in your Psp and copy it.
- Paste it as a new layer on to your tag.
- Place as on my tag or to your liking.
- Effects / 3d effects / drop shadow of your choice / 0, 0, 50, 20, noir for me.
2- Activate the tube "mtfp_449_©J.Ueda.pspimage"or a tube of your choice, in your Psp and copy it.
- Paste it as a new layer on to your tag.
- Place as on my tag or to your liking.
- Effects / 3d effects / drop shadow of your choice / 0, 0, 50, 20, noir for me.
3- Activate the TWO tubes "element-mtfp_507_©Juri_Ueda.pspimage"
AND "star.pspimage"or tubes of your choice, in your Psp and copy them.
- Paste them as new layers.
- Place them as on my tag or to your liking.
- These tubes have their own drop shadow.
Step 4 : Borders
1- Apply your signature on the tag
2- Make sure everything is at the right place !
3-- Image / add some symmetrical borders of 2 pixels with a colour of your choice ( White for me )
- Save your work as a jpeg file and resize it if necessary
***************
That's it !! You've done it !!
If you 've enjoyed doing my tutorial, it would be nice to write a few words in my guest book ! If you 've had the slightest problem, please, send me a mail so I can see to the problem
Tutorial translated on the 18th of June 2011
*************
Other versions of that tag