Thank you for putting a link to this tutorial, whenever you display your realization of that tag on a website, on a group or in a mail !
**************************
You'll find some versions of that tag in my gallery HERE
***********************
To make that tag, you'll need the plugins
- BKG Designer sf IV/ sf10 shades of shadow (included in my zip).
!!! I had to install that filter in Filters Unlimited. !!!
If you don't know how to do it, just go on that site here.
- L en K Landksiteofwonders / L en N Kaithlyn
- VDL Adrenaline / Snowflakes
and the material zip down below :

**************
*It is forbidden to suppress watermarks on the material provided , to alter, mist or rename the tubes in order to respect the work of the tubers.
- The image I have used is by Snowkadi
- The tube 85 a is by Jhanna
You can join her sharing group here
- The tube of the woman is by Cibi
- The tube of the tree branch is by Guismo
You'll be able to find her tubes on Dakara' s site here
and you can join in her sharing group here
- The decorating element has been made from a tube by Mtm.
- The brush Bubbles is by Hawksmont.
- The other elements that I haven't created, have been found on the net.
******************
Preparation
To be on the safe side, duplicate your tubes and image in your Psp :
-
Window / Duplicate
- Close the originals and work with the copies !
- Place the brush files in the brush folder of your Psp files.
- Place the selection files in the selection folder of your Psp files.
*****************
Click here to print the tutorial
**********************
You can use my arrow to follow your work
Click on it and drag it all along the tutorial !

***************
Tutorial made with PSP XIII

Step 1 : The background of the tag
- If you have decided to use my colours, here is what you can do :
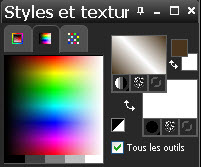
- Open the colour palette "Fairymist_Palette_Deja", in your Psp and using your dropper tool, pick out my colours to set your Material palette ( left click for your foreground / right click for your background )

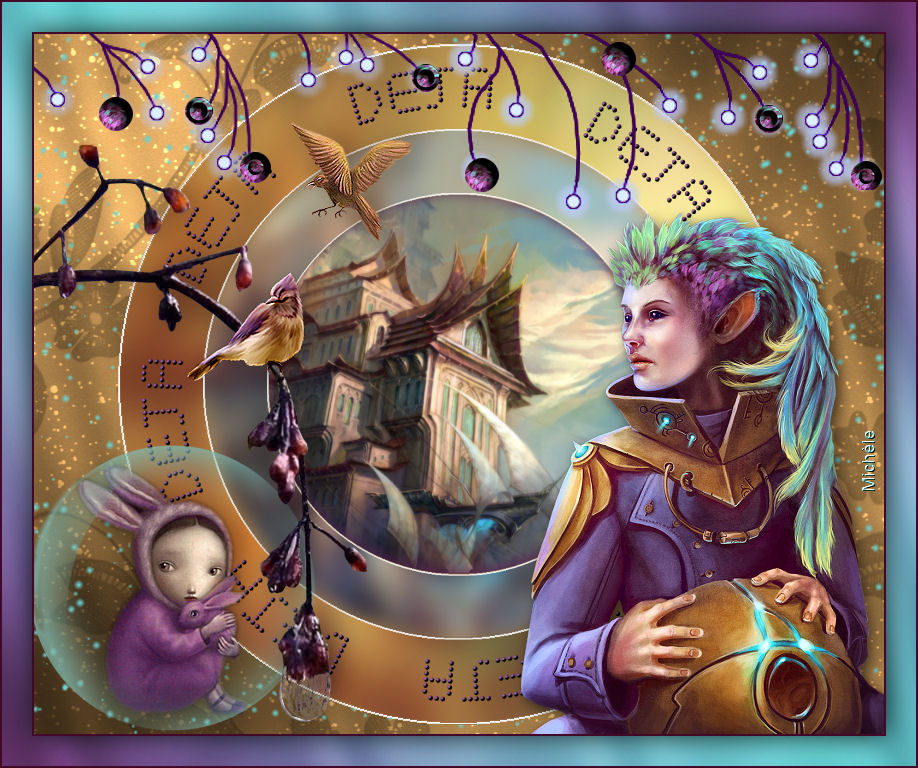
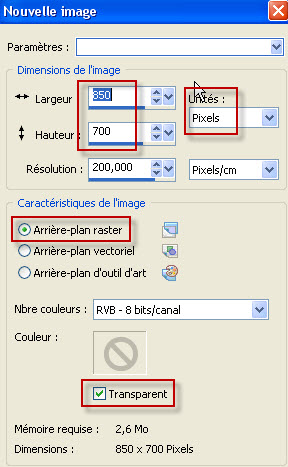
1 - Open a new transparent image of 850 by 700 pixels.
2 - Set your Material palette with two colours of your main tube.
- My choice : Foreground : colour 4a361e
- Background : colour c29456
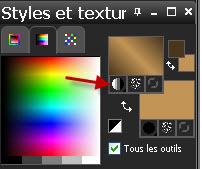
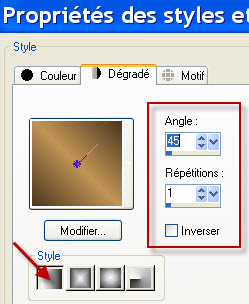
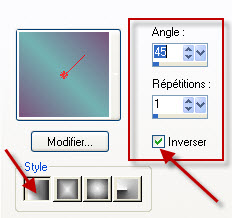
- Set your foreground with a linear gradient as below :
3 - With your flood fill tool, set as below, flood fill your transparent image with your foreground gradient.

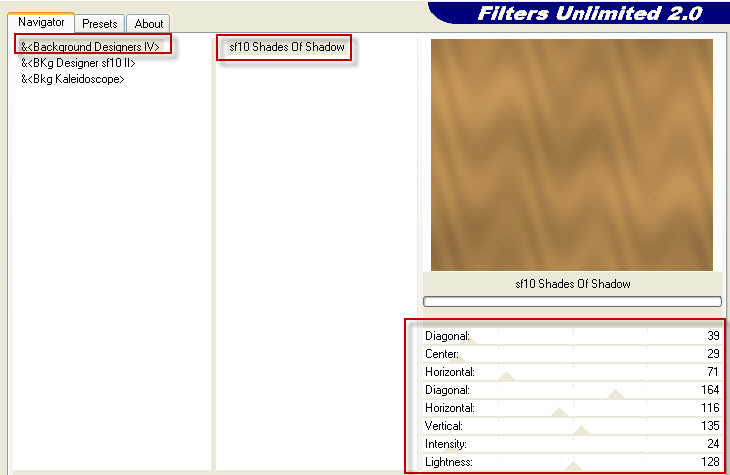
4- Effects / Plugins / Filters Unlimited 2.0 / BKG Designer sf IV/ sf10 shades of shadow as below :
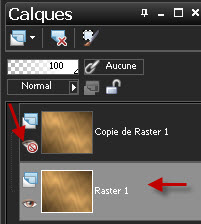
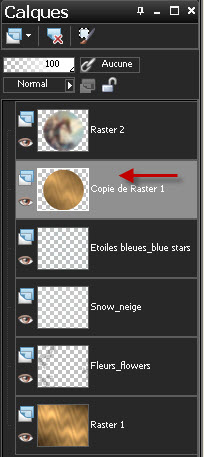
5- Layers / Duplicate..
6- Close that duplicated layer as below and activate the layer at the bottom of the pile (raster 1).
 :
:
7- Effects / plugins / Filters Unlimited 2.0 / BKG Designer sf IV/ sf10 shades of shadow as on point 4.
8- Open the decorative tube "Fairymist_deja_fleurs.pspimage". Copy it and paste it as a new layer (It is at the right place).
9- Open the tube "Fairymist_deja_neige.pspimage". Copy it and paste it as a new layer.
- I have set the mode of that layer on to Dodge and have modified the opacity at 40. It is up to you to see which mode and which opacity suit you better.
10- ADD A NEW RASTER LAYER.
- Effects / Pluins / VDL Adrenaline / Snowflakes as below :
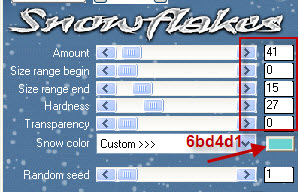
- Click on the colour box as shown just above and choose a colour that matches the colours of your tubes.
Step 2 : The circles
Circle 1 :
1- Activate the layer that is on top of the pile (coy of raster 1) and open the eye of that layer.
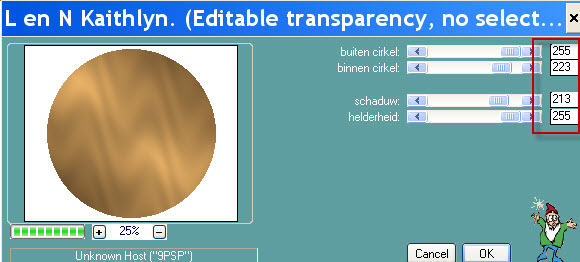
2- Effects / Plugins / L en K Landksiteofwonders / L en N Kaithlyn as below :
3- Image / Mirror.
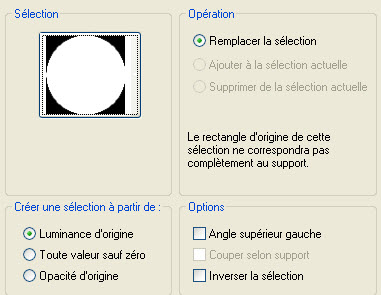
4- With your magic wand, set as below, click on the white part and hit the delete key of your keyboard.

5- Selections / Invert.
6-ADD A NEW RASTER LAYER.
- Set your background in white :
7- Flood fill that selection, on that new layer, in white (right click).
8- Selections / modify / Contract by 2 pixels.
- Hit the delete key of your keyboard.
9- Layers / Merge down . Keep selection !
10-ADD A NEW RASTER LAYER.
11- Open the image "Aerius ... " or an image of your choice and copy it.
12- Paste it INTO THE SELECTION, on that new layer. Keep selection !
13- Adjust / Blur / Gaussian blur at 20.
- Deselect all !!!!!
14 - I have set the mode of that layer on to Overlay. It is up to you to see which mode suits you.
..............................................
Circle 2 :
1- Activate the layer Copy of raster 1 as shown below :
 .
.
2- Layers / Duplicate.
3- Layers / arrange / Bring to top.
4- Image / Resize at 75% (Resize all the layers NOT checked).
5- ADD A NEW RASTER LAYER.
6- Selections / Load a selection / from disk / choose "Fairymist_deja_1.pspselection" and set as below :
7- Paste INTO THE SELECTION, on your new layer (The image you have copied previously is still in memory).
8- Adjust / Blur / Gaussian blur at 10.
- Deselect all !!!!!
9 - I have left the mode of that layer on to Normal. It is up to you to see which mode suits you.
.....................................
Circle 3 :
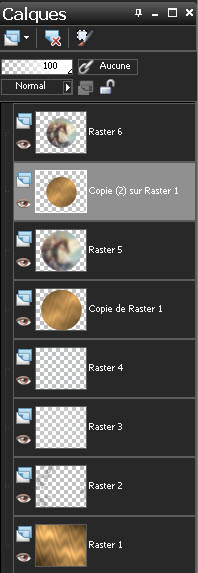
1- Activate the layer Copy (2) of raster 1 as below :
2- Layers / Duplicate.
3- Layers / arrange / Bring to top.
4- Image / Resize at 75% (Resize all the layers NOT checked).
5-ADD A NEW RASTER LAYER.
6- Selections / Load a selection / from disk / choose "Fairymist_deja_2.pspselection" and set as previously :
7- Paste INTO THE SELECTION (The image you have copied previously is still in memory), on your new layer.
8- Layers / Duplicate. Keep selection !
- I have set the mode of that layer on to Multiply and lowered its opacity at 50. It is up to you to see which mode and which opacity suit you better.
...................
Cut out effect :
9-ADD A NEW RASTER LAYER. Keep selection !
10- Effects / 3d effects / Cut out as below :
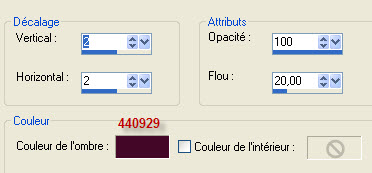
- Repeat the same effect with - 2 Vertical and Horizontal.
- It is up to you to chooxe a dark colour matching your tag.
DESELECT ALL!
.......................
Text :
11- Open the tube " Fairymist_deja_texte.pspimage" and copy it.
12- Paste it as a new layer on to your tag.
- You may colorize that layer to your liking.
- If you wish to write your own text, you can use the vectorial circle I have included in my zip :
- Copy that circle, paste it as a new layer and place your text tool on the circle. I have used the Basic dots font, size 40 pixels.
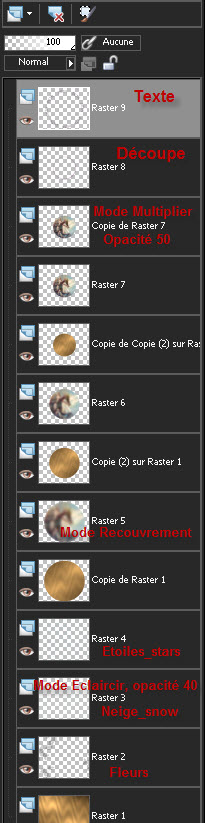
- Here is my layers palette, at that stage :
Step 3 : The tubes
1- Open the tube "Audela_fantasy_CibiBijoux.pspimage" or a tube of your choice and copy it.
2- Paste it as a new layer on to your tag.
- Place the tube as on my tag.
3- Effects / 3d effects / drop shadow of your choice / 4, 4, 60, 20, black for me.
........................
4- Open the tube "decoration.pspimage"or a tube of your choice and copy it.
5- I have placed that tube like this :
- Effects / Image effects / Offset as below :

- That tube may be colorized to your liking.
........................
6- Open the tube " Fairymist_deja_boules.pspimage"or a tube of your choice and copy it.
7- Paste it as a new layer on to your tag.
8- I have placed that tube like this :
- Effects / Image effects / Offset as below :

.............................
9- Open the tube "JHanna_85a_modified .pspimage"or a tube of your choice and copy it.
10- Paste it as a new layer on to your tag and place it as on my tag.
- That tube has already got a drop shadow.
- That tube may be colorized to your liking. (I have selected the face and inverted the selection in order not to colorize that part).
......................
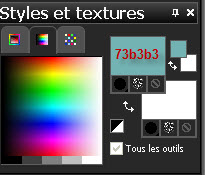
11- Set your foreground with a colour matching your main tube.
- My choice : colour 73b3b3
12- ADD A NEW RASTER LAYER.
13- Activate your brush tool, set as below and apply the brush "bubble_brushes_by_hawksmont.PspBrush" with your foreground colour as shown below. Click once (or twice but don't move !).

..........................
14- Open the tube "calguisbranchefr1519.pspimage"or a tube of your choice and copy it.
15- Paste it as a new layer on to your tag.
16- I have placed that tube like this :
- Effects / Image effects / Offset as below :

17- Effects / 3d effects / drop shadow of your choice / 4, 4, 40, 40, black for me.
........................
18- Open the tube "oiseau_bird_1.pspimage"or a tube of your choice and copy it.
19- Paste it as a new layer on to your tag.
- Place it as on my tag or to your liking.
20- Effects / 3d effects / drop shadow of your choice / 4, 4, 40, 40, black for me.
21- Open the tube "oiseau_bird_2.pspimage"or a tube of your choice and copy it.
22- Paste it as a new layer on to your tag.
- Place it as on my tag or to your liking.
23- Effects / 3d effects / drop shadow of your choice / 4, 4, 40, 40, black for me.
..........................
24- Apply your signature.
Step 4 : The borders
1- Make sure everything is at the right place.
- Image / add some symmetrical borders of 2 pixels with a dark colour of your choice :
- 440929 for me.i

2- Image / add some symmetrical borders of 30 pixels in white.
3- With your magic wand, set as below, select this white border.
4- ADD A NEW RASTER LAYER.
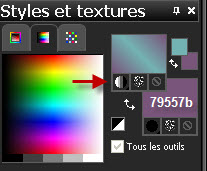
5- Set your Material palette, with two colours out of your tag.
- I have kept the foreground colour, used previously (73b3b3).
- I have set my background with that new colour 79557b.
- Set your foreground with a linear gradient as below :
6- Flood fill your selection, on that new layer, with your foreground gradient.
7- Effects / Plugins / Filters Unlimited 2.0 / BKG Designer sf IV/ sf10 shades of shadow as at the beginning of the tutorial l (Step 1 / point 4)
- Keep selection.
8- Layers / Duplicate.
9- In order to make my border brighter, I have set the mode of that layer on to Hard light . - Keep selection.
10- Layers / Merge all.
11- Selections / Invert.
12- Effects / 3d effects / drop shadow / 0, 0, 80, 40, black.
- Deseélect all.
13 - - Image / add some symmetrical borders of 2 pixels with a dark colour of your choice :
- 440929 for me.i
14 - Save your work as a jpeg file.
***************
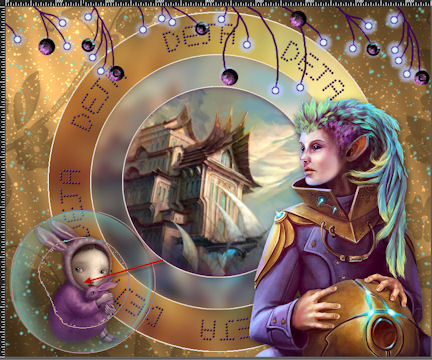
That's it !! You've done it !!
If you 've enjoyed doing my tutorial, it would be nice to write a few words in my guest book ! If you 've had the slightest problem, please, send me a mail so I can see to the problem
Tutorial translated on the 12th of January 2013
*************
You'll find some versions of that tag in my gallery HERE