
Thank you for putting a link to this tutorial, whenever you display your realization of that tag on a website, on a group or in a mail !
-----------------------
You'll find some versions of that tag in my gallery here
**********
To realize that tag, you'll need the plugins :
- Universe here,
- AP 01,
- Graphic plus,
- Alien skin Eye candy 5 / Impact
and the material zip here
*****************
*It is forbidden to suppress watermarks on the material provided , to alter, mist or rename the tubes in order to respect the work of the tubers
- The tube of the girl is by BT
The brushes I have used are by Coby 17
The mask navidad 0011 is by Brujita
The other elements have been found on the net
************************
Preparation
Duplicate your tubes. Close the originals and minimize the copies for now.
Put your selection in your selection folder and the masks in your mask folder
Open the brushes in your Psp and export them as custom brushes
********************
Click here to print the tutorial
*******************
You can use my arrow to follow your work

******************
1- Open a new transparent image of 800 by 650 pixels
2- Flood fill that transparent layer with a colour matching your main tube; I have chosen the colour 762524 
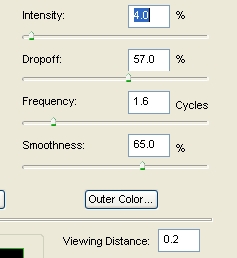
3- Effects / plugins / Universe / Nebula as below :
If you have any problem finding or using the filter Universe, you can use the jpeg file here and continue the tutorial on step 5
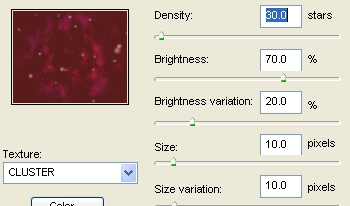
4- Effects / plugins / Universe / Textured stars as below :
5- Add a new raster layer and flood fill it in black
6- Layers / load a mask / from disk / choose ivy_hearts3 mask / check Source luminance, Fit to layer and use image value
Layers / merge group
Merge all !
7- Add a new raster layer
Set your foreground in white ( we'll use that colour for all the brushes)
Activate your brush tool set as below and choose the brush Delicate_Brushes 1 by Brenda ( size 845 !)

Apply the tip of your brush at 400 pixels from the left side so that your brush is centered
With your move tool , drag that brush at the bottom of your tag as shown on the model
8- Set the mode of that layer to Difference
According to the colours of your tag , you may have to choose another mode so the brush contrast with your background ( my brush is turquoise and my background marroon)
Eventually , lower the opacity of the layer
9- Add a new raster layer
With your tool brush set as above but size 623 choose the brush Delicate_Brushes 2 by Brenda
Apply that brush in the top right hand corner of your tag
Set the mode of that layer to the same mode as on step 8
10- Add a new raster layer
With your tool brush set as above but on size 195 choose the butterfly brush Delicate_Brushes 9 by Brenda
Apply the brush as on my tag ( I did : Image / mirror )
Set the mode of that layer to the same mode as on step 8
11- Add a new raster layer
With your tool brush set as above but on size 279 choose the star brush Delicate_Brushes 11 by Brenda
Apply the brush as on my tag
Set the mode of that layer to the same mode as on step 8
12- Add a new raster layer
With your tool brush set as above but brush size on 160 and rotation on 90 and choose the brush Volute simple Delicate_Brushes 5 by Brenda
Apply the brush as on my tag ( Image / mirror )
Set the mode of that layer to the same mode as on step 8
You may use your own brushes and place them to your liking according to the tube you have chosen !
13-Open the tube texte 1, copy it and paste it as a new layer
Place to your liking
Do the same thing with the tube texte 2
I have written that text in white with the font Cocaine sans,included in the zip and I have set the mode of the layer to Difference
You may play about with the opacity of the different layers where your words are written
14- Open your main tube ( if you use mine, resize it at 75 % then, Adjust / sharpen ), copy it and paste it as a new layer
Place the tube at the right place
I have chosen to set the mode of that layer on Exclusion to get that turquoise colour you can see on my brushes
15- Add a new raster layer and apply your signature
16- Make sure everything is at the right place
Image / add some symmetrical borders of 1 pixel with a colour of your choice ( black for me )
Save your tag and keep it aside for later on
17- Open a new transparent image of 900 by 750 pixels
18- Flood fill that new transparent image with the colour 591c1b  ( That colour is darker than the one used on step 2 )
19- Effects / plugins / Graphic plus / cross shadow default
Lower the opacity of that layer to about 50
20- Add a new raster layer and flood fill it in white
21- Effects / plugins / Filtre AP 01 (Innovations) / Lines silverlining as below :
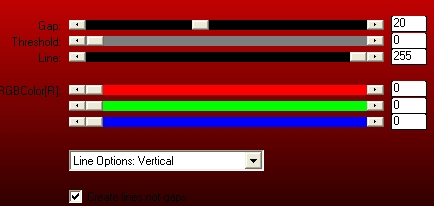
Set the mode of that layer to Difference
22- Merge all
23- Add a new layer and flood fill it with the same colour as on step 18
24- Layers / load a mask / from disk / choose Brujita navidad 001 / check Source luminance, Fit to layer and use image value
Adjust / sharpness / sharpen more
Merge group
25- Selections / load from disk / select1coeursolitairefairymist / check Source luminance and replace the selection
Hit delete
Select none
26- Go back to your previous tag and copy it
27- Come back on the picture which we have just been working on and paste as a new layer
28- Effects / plugins / Alien skin Eye candy 5 / Impact / Perspective shadow / drop shadow, blurry
29- Image / add some symmetrical borders of 1 pixel in black
30- Image / add some symmetrical borders of 2 pixels with a light colour ( white for me )
31- Image / add some symmetrical borders of 1 pixel in black
32- Save your work as a jpeg file and resize if necessary
*****************
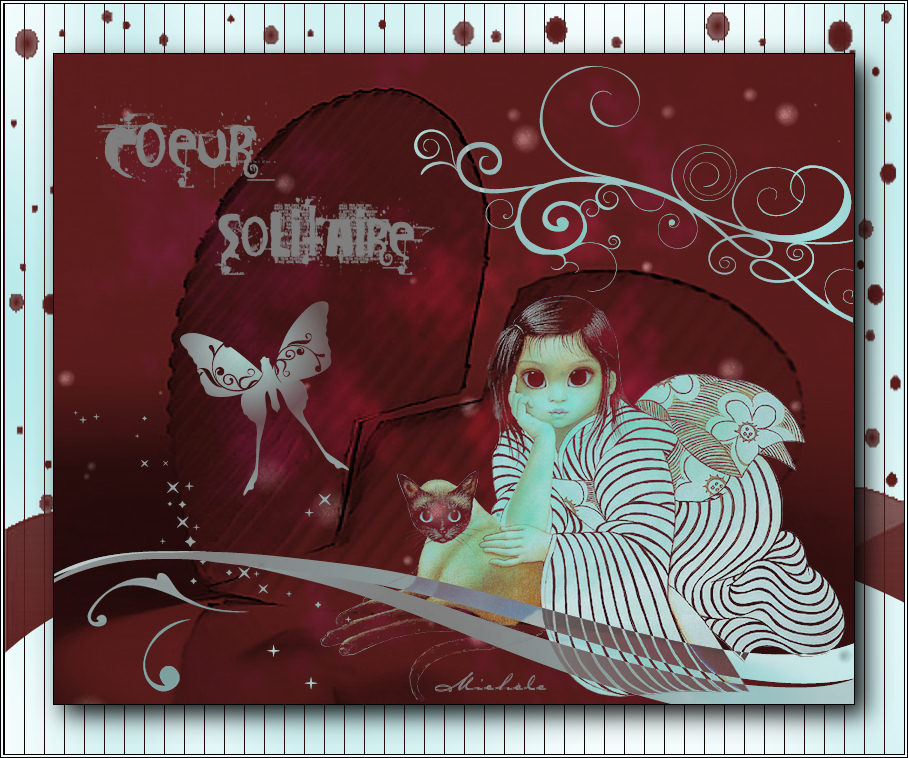
That's it !! You've done it !!
If you 've enjoyed doing my tutorial, it would be nice to write a few words in my guest book ! If you 've had the slightest problem, please, send me a mail so I can see to the problem !
Tutorial translated on the 4th of november 2009
*********************
You'll find some versions of that tag in my gallery here
