
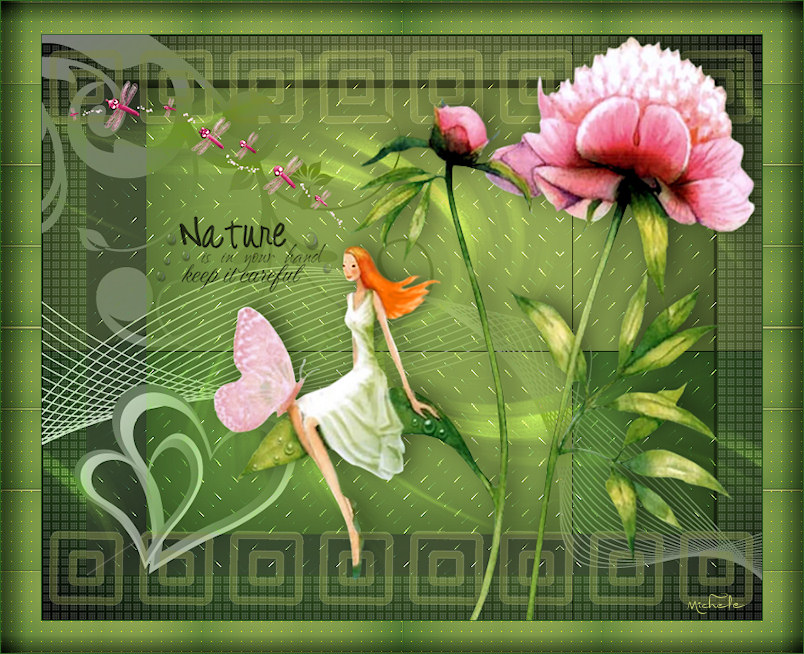
Thank you for putting a link to this tutorial, whenever you display your realization of that tag on a website, on a group or in a mail !
-----------------------
You'll find some versions of that tag in my gallery here
***********************
To realize that tag, you'll need the plugins :
- Filter Factory V / Incantations
- Filter Factory S / Blured Mesh
- Transparency / Eliminate black
- Simple
- Penta Com / Dot and cross
- Alien skin Eye candy 5 / Impact
- Mura's meister / Copies
- AP lines silverlining
and the material zip down below :

**************
*It is forbidden to suppress watermarks on the material provided , to alter, mist or rename the tubes in order to respect the work of the tubers
- The tube of the woman is by my Brazilian friend Mtfp
Gracias Maria Thereza !
- The mask is by Vixpsp
The other elements have been found on the net
******************
Preparation
Duplicate your tubes and the mask. Close the originals and minimize the copies for now.
- Place the two brush files in the brush folder of your Psp files
- Place the pattern "Motif-Pattern_Senga_5.jpg" in the pattern folder of your Psp files
*****************
Click here to print the tutorial
*******************
You can use my arrow to follow your work

***************
1- Open a transparent image of 800 by 650 pixels
2- Set your Materials palette with two colours matching your main tube
My choice : Foreground : Light colour c8cf6d
Background : Dark colour 2c5f22
Set your foreground with a sunburst gradient as below :

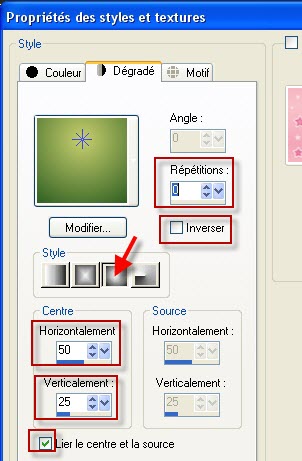
3- Flood fill your transparent layer with that gradient
4- Effects / Plugins / Filter Factory V / Incantations / 188, 138, 0
5- Effects / Plugins / Filter Factory S / Blured mesh / 0, 130, 0, 0 as below

6- Add a new raster layer
Selections / Select all
Selections / modify / contract by 50 pixels
7- Set your Materials palette as below
Set your foreground with the Pattern "Motif-Pattern_Senga_5.jpg" with the following settings
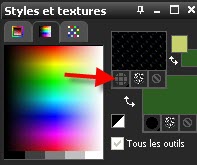
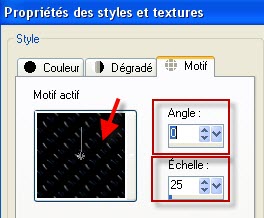
8- Flood fill your selection with that pattern
9- Effects / Plugins / Transparency / Eliminate Black
10- Effects / Plugins / Simple / Zoom out and flip
Set the mode of that layer on Dodge or on another mode that will fetch your pattern out nicely
11- Selections / Invert
In your layer palette , activate the bottom layer as shown below
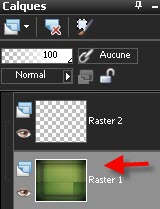
Effects / plugins / Penta com / Dots and cross default ( 72, 10, 2 )
12- Keep the selection !
Effects / Plugins / alien skin Eye candy 5 / Impact / Extrude as below
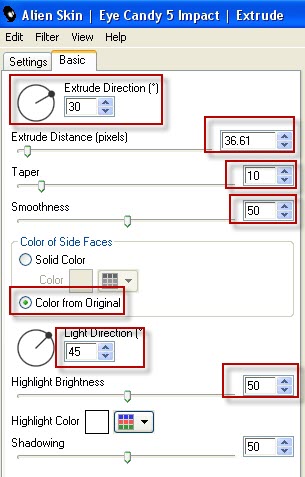
Selections / Select none
13- In your layers palette , activate the top layer
Set your Materials palette as below :
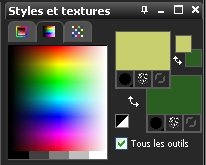
14-Add a new raster layer and flood fill it with your light foreground colour
15- Layers / New mask layer / from image / choose the mask " Vix_Mask106.jpg" as below
That mask must be opened in your Psp even if it is minimized
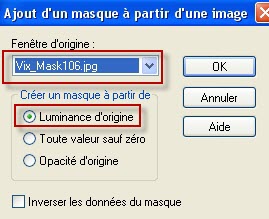
Adjust / Sharpness / Sharpen more
Layers / Merge group
Set the mode of that layer on to Dodge, lower its opacity to your liking ( 60 for me )
16- Effects / Image effects / Seamless tiling default
17-Add a new raster layer
Activate your brush tool, set as below , apply the brush "claudia_fairymist.PspBrush" with your light colour, in the top right hand corner of your tag ,as shown below :

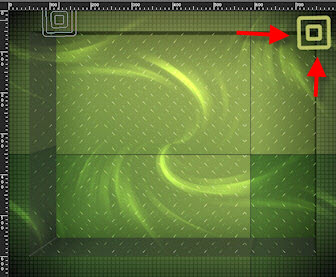
18- Effects / Plugins / Mura's meister / copies as below :

19- Effects / Edge effects / enhance
Lower the opacity of that layer to your liking ( 30 for me )
20- Layers / Duplicate
Image / Flip
21- Activate the tube " Heart_13.pspimage", copy it and paste it as a new layer on to your tag
Effects / Image effects / Offset as below
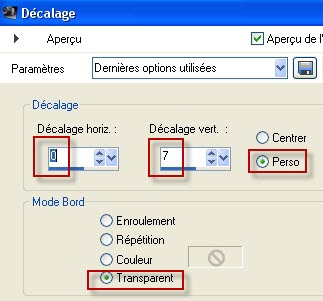
Set the mode of that layer on to Luminance Legacy
You may prefer to colorize or paint that tube or even put the layer on another mode !!
22- Activate the tube "wordart_nature_biene.pspimage" or a text tube of your choice, copy it and paste it as a new layer on to your tag
Place like me or to your liking
23- Activate the tube "mtfp_358_©Marquis.pspimage"or a tube of your choice, copy it and paste it as a new layer on to your tag
I did : Image / Mirror
Place like me or to your liking
24- Effects / 3d effets / Drop shadow of your choice ( 4, 4, 60, 20, Black for me )
25- Activate the tube "butterflies1.pspimage"or a tube of your choice, copy it and paste it as a new layer on to your tag
You may colorize that tube or use the effect Adjust / Hue and saturation / Hue map that allows you to keep several colours !
I have colorized my tube in pind ; you'll find it in my zip under the name of " butterflies2.pspimage"
Place like me or to your liking
26- Make sure everything is at the right place
Image / add some symmetrical borders of 1 pixel with a colour of your choice (Dark green for me )
27- Layers / Promote Background layer
28- Image / resize at 90% ( Resize all the layers NOT checked )
29- Add a new raster layer
Layers / arrange / move down
Flood fill that new layer with your foreground gradient set on step 2
30- Effects / Plugins / Filter factory S / Fractal tiler / 179. 42
31- Effects / Plugins / Simple / 4 way average
32- Effects / Edge effects / Enhance more
33- Effects / Plugins / AP01 (Innovations) / Line silver lining / Dot grid as below

34- Effects / Plugins / Filter Factory S / Blured mesh / 0, 10, 0, 0
35- Add a new raster layer and appy your signature
36- Image / add some symmetrical borders of 1 pixel with a colour of your choice (Dark green for me )
37 - Save your work as a jpeg file and resize it if necessary
***************
That's it !! You've done it !!
If you 've enjoyed doing my tutorial, it would be nice to write a few words in my guest book ! If you 've had the slightest problem, please, send me a mail so I can see to the problem
Tutorial translated on the 19th of March 2011
*************
Autres versions de ce tag / Other versions of that tag