Thank you for putting a link to this tutorial, whenever you display your realization of that tag on a website, on a group or in a mail !
-----------------------
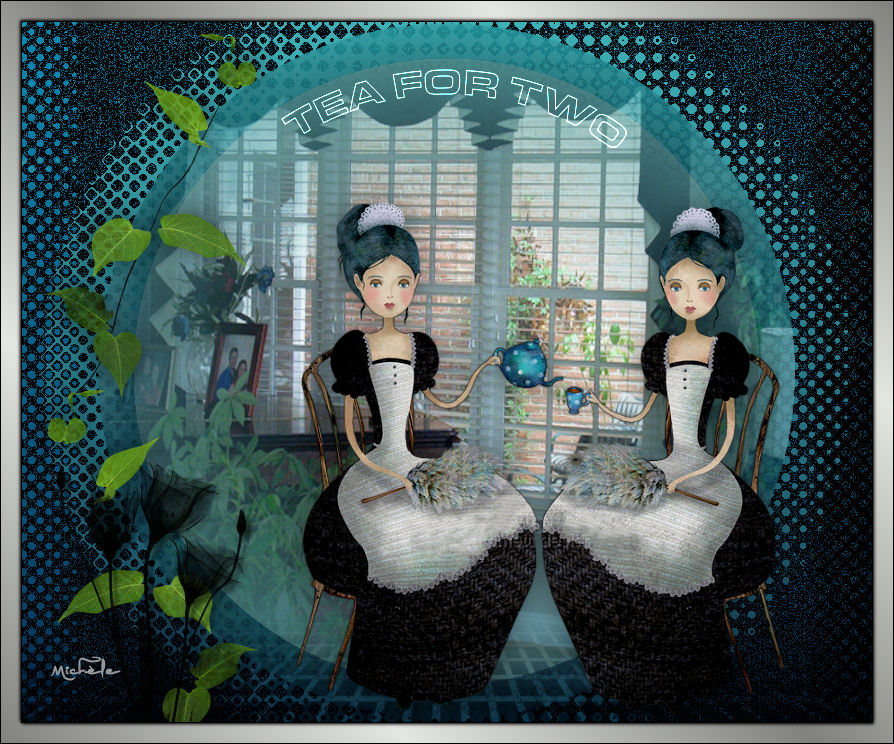
You'll find some versions of that tag in my gallery here
************************
To realize that tag, you'll need the plugins :
AP01 Innovations / Silverlining
VDL Adrenaline / Snowflakes
DSB flux/ Bubbles
and the material zip down below :

**************
*It is forbidden to suppress watermarks on the material provided , to alter, mist or rename the tubes in order to respect the work of the tubers
- The tube " JHanna_304 tube©C.Ometti.pspimage" is by Johanna.
You can join in her sharing group here
- The tube of the branch is by Mtm
You can join in her sharing group here
- The tube of the flower is by Queen Bee
- The misted tube of the room is by Aclis
You can join in her sharing group here
The other elements that I haven't created, have been found on the net
******************
Preparation
- To be on the safe side, duplicate your tubes, mask and image in your Psp :
-
Window / Duplicate
- Close the originals and work with the copies !
- Double click on the font "eurostarblackextended.ttf" ( outside your Psp !) and minimize it.
*****************
Click here to print the tutorial
**********************
You can use my arrow to follow your work
Click on it and drag it all along the tutorial !

***************
Tutorial realized with PSP XIII

Step 1 : The background of the tag
- If you have decided to use my colours, here is what you can do :
-Open the colour palette "Fairymist_Palette_Chiantal", in your Psp and using your dropper tool, pick out my colours to set your Material palette ( left click for your foreground / right click for your background )

1- Open a new transparent image of 850 by 700 pixels. ( NEW SIZE)

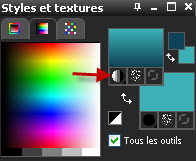
2- - Set your Material palette as below :
My choice : Foreground : dark colour 114259
Background : Light colour 3cb1b6
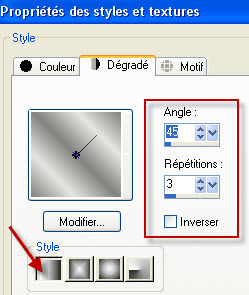
Set your foreground with a linear gradient as below :
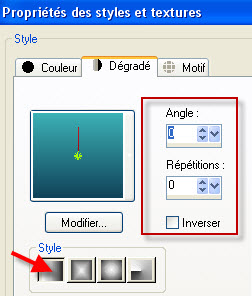
3 - Flood fill your transparent image with that gradient.
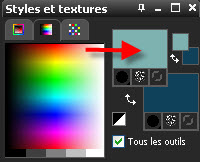
4- Now, set your foreground with a colour slightly lighter than your light colour.
My choice : 7db2b0 ( Notice the gradient is no more there )
5- Add a new raster layer
Flood fill that new layer with your foreground colour ( left clic ).
6- Effects / geometric effects / Circle as below :
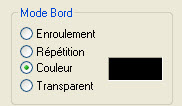
7- With your magic wand, set as below, click on the center of that circle.

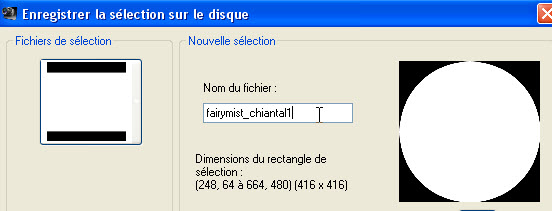
8- We're now going to save that round selection which we'll need later on.
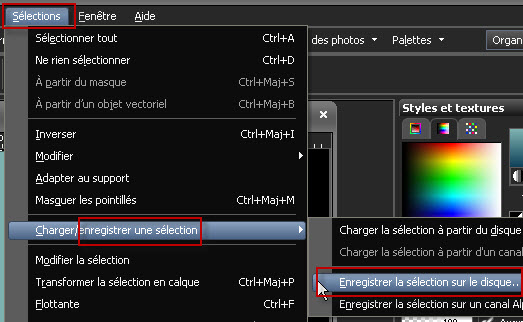
- Write down the name of that selection and click on Save.
Keep that selection until I tell you to deselect !
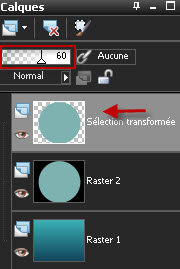
9- Selections / Promote selection to layer.
In your layers palette, lower the opacity of that promoted selection to about 60.
10- Activate the layer which is underneath ( Raster 2) and hit the delete key of your keyboard.
11- Selections / INVERT
12- On your Raster 2 : Effects / Plugins / AP01(Innovations) /Liner Silverlining as below :
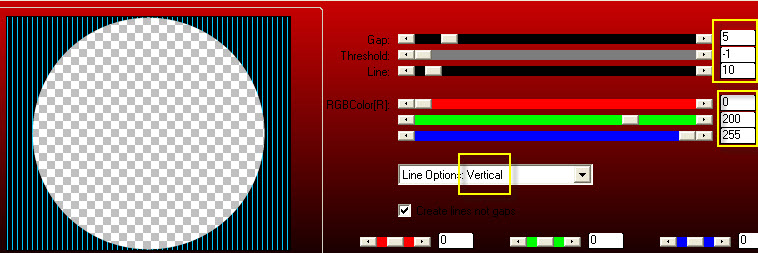
It is up to you to move the cursors of your horizontal RGB color bands ( red, green and blue ) in order to get the right colour on the vertical lines of your tag. ( My choice : 0 / 200 / 255 )
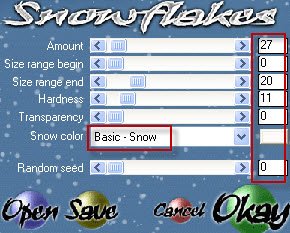
13- Effects / Plugins / VDL adrenaline / Snowflakes as below :
14- Selections / DESELECT all
In the layers palette , I have set the mode of that layer to Multiply ( see which mode suits you better )
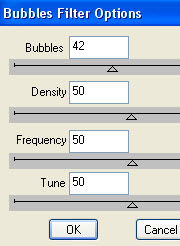
15- Effects / Plugins / DSB flux / Bubbles as below :
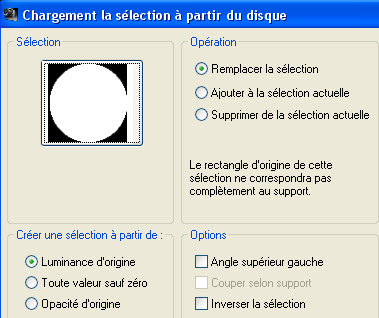
16- We're now going to use the round selection we have saved previously !
- Selections / Load from Disk as below :
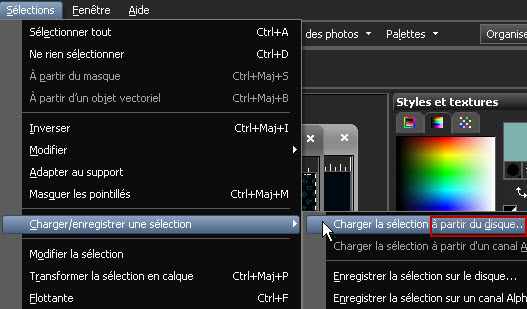
- Choose the selection "fairymist_chiantal1":
17- You are still on your raster 2 :
Selections / Promote selection to layer
18- Go back to Raster 2 and hit the delete key of your keyboard
- Selections /Select none
19- In your layers palette, activate the layer above Raster 2 ( Your new promoted selection )
I have set the mode of that layer on to Soft light and lowered the opacity of it to 50.
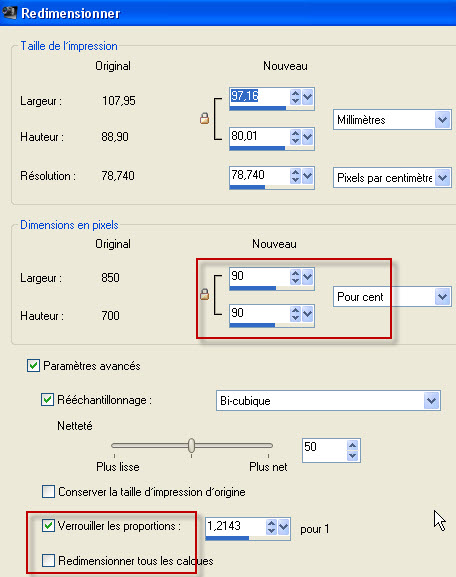
20- Activate your top layer ( Your first promoted selection )
Image / Resize at 90% as below :
21- Here is what I get, at that stage :
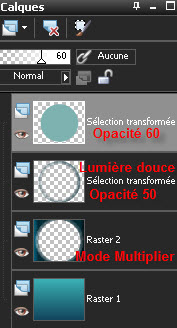

I could well merge all those layers at that stage but I rather leave them separate so it is still possible to change modes or opacity until the end !
Step 2 : The tubes
1- Add a new raster layer and SELECT ALL.
2- Activate the tube "aclis_interior_02_12_2008.pspimage" or a misted tube of your choice in your Psp and copy it.
3- Paste into the selection / Move the tube if necessary.
No need to deselect, the next selection will remove this one !
4- Selections / Load the previous round selection from the disk ( the same way you did it previously!)
5- Selections / Invert
6- You are on the layer where your tube is : Hit the delete key of your keyboard.
- DESELECT ALL
7- Activate the tube "Sol_chiantal_fairymist.pspimage" and copy it.
8- Paste as a new layer on to your tag and leave it where it is !
9- Effects / image effects / Offset as below :

10- I have set the mode of that layer on to Multiply so that my tube looks part of the previous tube ( See which mode looks better with your colours ).
11- Activate the tube " JHanna_304 tube©C.Ometti.pspimage" or a tube of your choice in your Psp and copy it.
12- Paste as a new layer on to your tag.
Place the tube to your liking.
13 - Effects / 3d effects / drop shadow of your choice / 0, 0, 40, 40, noir for me.
14- Activate the tube "element_Mtm_bomen 31-16 nov 2008" ( which is a composition made from Brigitte's tube which is included in the material ) or a tube of your choice in your Psp and copy it.
15- Paste as a new layer on to your tag.
Place the tube to your liking.
I have lowered the opacity of that layer to 85.
My tube has already got a drop shadow.
16- Activate the tube "marisel.pspimage"or a tube of your choice in your Psp and copy it.
17- Paste as a new layer on to your tag.
Place the tube to your liking.
Step 3 : The text
( If that seems too difficult for you and if you are using my tubes, your may use the layer with my text that I have included in the material !
1- Set your Material palette as below :
- Foreground : White
- Background closed
2- Activate the Preset Ellipse tool ( letter Q) and set it as below :


Draw a vectorial circle by placing the cursor of your mouse in the left hand side corner of your tag ; the size of your circle doesn't really matter for the moment !
- Set your Ellipse tool as below :
- Fill in the given figures in the Radius box to get the right dimensions of that circle
- Fill in the given figures in the Center box to get the right orientation of that circle

- Confirm by clicking on the green button "Apply"
3- Add a new raster layer ( in order not to write on your vectorial circle !)
4- Activate the text tool, set as below :

If you use another font as mine, you'll have to find the right size for it.
Place the mouse cursor anywhere on that circle and left click when you get the same figure as the one you can see below :

Write down your text ( TEA FOR TWO, in capital letters for me ) or any other text in relation with your picture.
Before confirming your text , you may memorize it by clicking on the square shown below : That will be useful if you want to try another font (This only concerns Psp X3)

While you are writing ( before applying it ) if your text isn't well centered, you may place the cursor of your mouse just before the text and use your space bar to push the text forwards ; if you want your text to go left , you must use the return key to push the text that way !
When your text is placed as you wish , apply your text.
- Layers / Convert to raster layer.
I have set the mode of that layer to Dodge ( see what is best for you !)
5 - Suppress now the circle layer, we don't need it any more.
6- Apply your signature.
Step 4 : The borders
1- Make sure everything is at the right place.
2 - Image / add some symmetrical borders of 1 pixel in black ( or another colour )
Image / add some symmetrical borders of 20 pixels in white
3- With your magic wand , set as previously , select that border.
4- Set your Material palette as below :
I have chosen two secondary colours of my main tube.
My choice : Foreground : 81827D
Background : E4E6E1
5- Flood fill that selected border with that gradient ( No need to add a new layer !)
6- Selections / Invert
7- Effects / 3d effects / Drop shadow / 1, 1, 100, 5, black.
and - 1, - 1, 100, 5, black.
8- Selections / Select none.
9-Image / add some symmetrical borders of 1 pixel in black ( or another colour )
10 - Save your work as a jpeg file and resize it if necessary
***************
That's it !! You've done it !!
If you 've enjoyed doing my tutorial, it would be nice to write a few words in my guest book ! If you 've had the slightest problem, please, send me a mail so I can see to the problem
Tutorial translated on the 2nde of July 2011
*************
Other versions of that tag