

Thank you for putting a link to this tutorial, whenever you display your version of that tag on a website, on a group or in a mail !
**************************
You'll find some versions of that tag in my gallery Here
***********************
To make that tag, you'll need
the material zip down below :

**************
*It is forbidden to suppress watermarks on the material provided , to alter, mist or rename the tubes in order to respect the work of the tubers
- The tube of the woman and of the Eiffel tower are by Odette.
- The other elements that I haven't created, have been found on the net.
******************
Preparation
To be on the safe side, duplicate your tubes and image in your Psp :
-
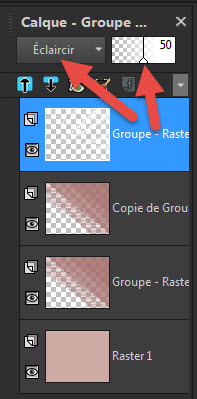
Window / Duplicate
- Close the originals and work with the copies !
- Place the selection files in the selection folder of your Psp files.
*****************
Click here to print the tutorial
**********************
You can use my arrow to follow your work
Click on it and drag it all along the tutorial !

***************
Tutorial made with PSP X8
***************
1 - Open a new transparent image of 850 by 700 pixels.
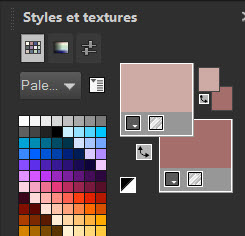
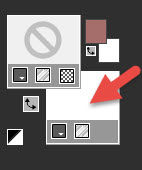
2 - Set your Material palette with two colours of your choice :
My choice : Foreground : Light colour : ceaaa5.
Background : Dark colour : a56e6b.
3 - Flood fill your transparent image with your light foreground colour.
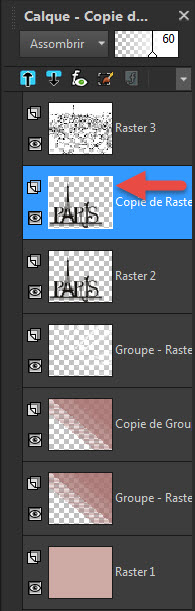
4- ADD A NEW RASTER LAYER.
- Flood fill that new layer with your dark background colour.
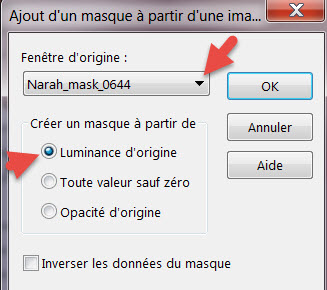
5- Open the mask "Narah_mask_0644" in your Psp and minimize it.
6- On your tag : Layers / New mask layer / From image / Set as below :
7- Adjust / Sharpness / Sharpen more
- Layers / Merge group.
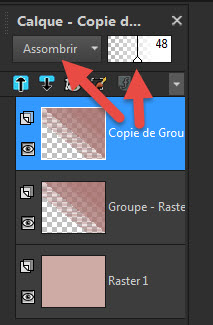
8- Layers / Duplicate
- I have set the mode of that layer on to Burn et ai baissé l'opacité à 48.
9- ADD A NEW RASTER LAYER.
- Flood fill that new layer in white.
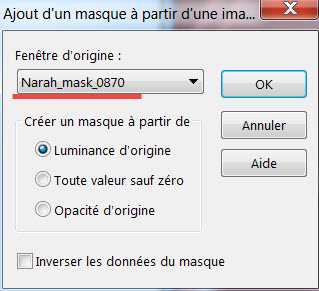
10- Open the mask "Narah_mask_0870" in your Psp and minimize it.
On your tag : Layers / New mask layer / From image / Set as below :
11- Adjust / Sharpness / Sharpen more
- Layers / Merge group.
- I have set the mode of that layer on to Dodge and lowered its opacity at 50.
12- Open the tube "Logo Paris" in your Psp and copy it.
13- Paste it as a new layer on to your tag.
(Erase the name of the tuber Odette).
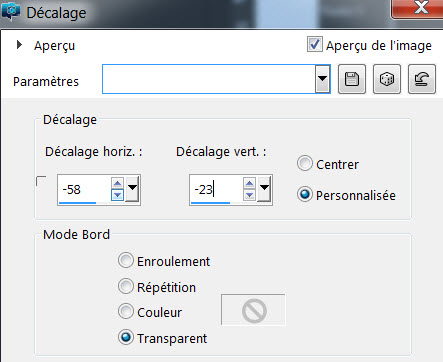
14- Place that tube at the right place, this way:
- Effects / Image effects / Offset / Set as below :
15- I have set the mode of that layer on to Overlay.
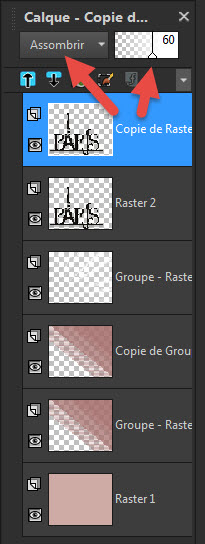
16- Layers / Duplicate.
- I have set the mode of that layer on to Burn and have lowered its opacity at 60.
17- Open the image "Dessin Paris" with a white background and copy it.
18- Paste it as a new layer on to your tag.
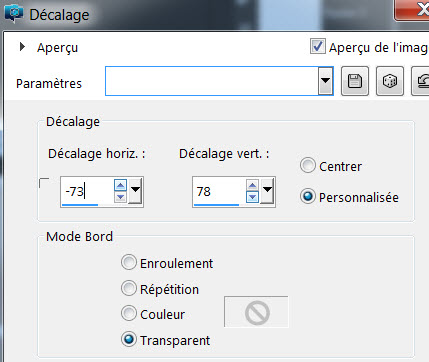
19- Place that tube at the right place, this way:
- Effects / Image effects / Offset / Set as below :
20- I have set the mode of that image with a white background on Multiply = Its white background disappear !
21- Activate the layer just below :
- Selections / Select none.
- Selections / Float .
- Selections / Defloat.
22- Activate now the layer that is just above (the one with the white background image) :
- Hit the delete key of your keyboard.
- Select / Select none.
23- Stay on the white background image layer.
- Selections / Load a selection / from Disk / Choose the selection "Fairymist_Annie1".
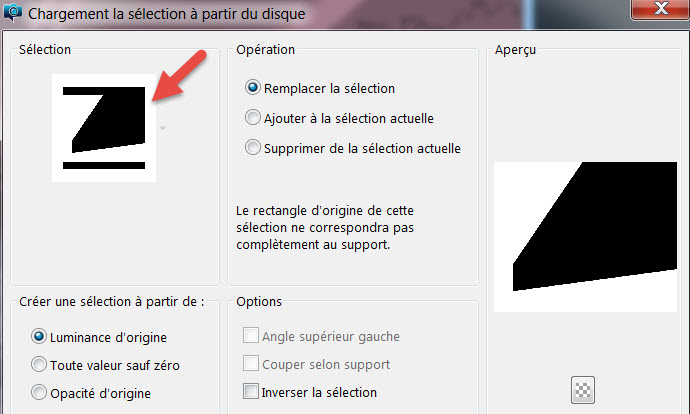
24- Hit the delete key of your keyboard.
- Select / Select none.
25- Open the tube "Chanson Paris" in your Psp and copy it
26- Paste it as a new layer on to your tag.
- Place that text against the left hand side of your tag.
27- Selections / Load a selection / from Disk / Choose the selection "Fairymist_Annie2"/ Configurer le tableau comme suit :
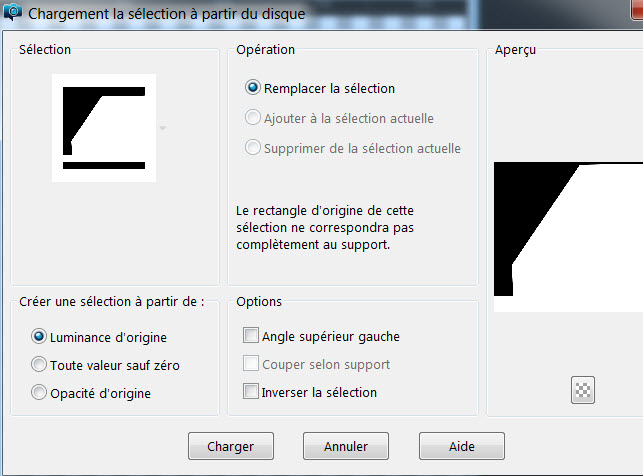
28- Hit the delete key of your keyboard.
- Select / Select none.
29- Open the tube "La petite Parisienne" in your Psp and copy it.
30- Paste it as a new layer on to your tag.
31- Place the tube as on my tag.
32- Set your Material palette as down below:
33- Activate your text tool and set it as below :

- Write down your text (Chez Annie for me), apply changes and promote vectorial layer to a raster layer.
- Place the text as on my tag.
34- Layers / Duplicate.
- Layers / Merge down.
35- Effects / 3D ffects / Drop shadow / 1, 1, 80, 4, black
36- Apply your signature
- Make sure everything is at the right place !
37- Layers / Merge all.
- Copy your merged tag.
38- Image / Add some symmetrical borders of 2 pixels
with the dark colour 4e0000 that is for me the colour of the tube Paris.
39- Layers / Promote background layer.
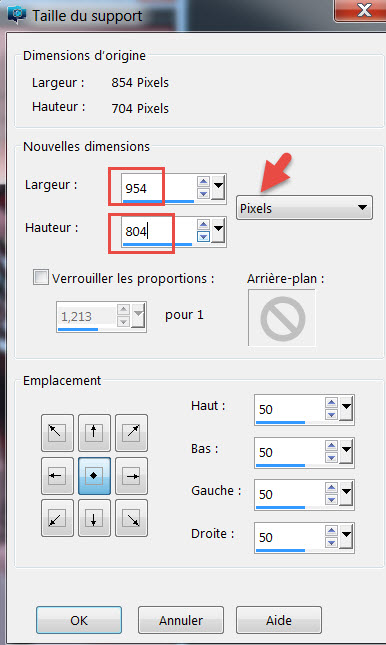
40- Image / Canvas size / Set as below :
41- ADD A NEW RASTER LAYER.
- Layers / Arrange / Move down.
42- Selections / Select all.
- Paste into the selection (the copy of your tag that is still in memory!).
- Selections / Select none.
43- Adjust / Blur / Gaussian blur at 30.
44- Optionnal :to use, if you wish, like me, to darken the bottom of your background.
Activate the Burn brush set as below :


- Drag that brush all along the bottom of your background (once or twice) .
45- In your layers palette, activate the layer on top of the pile.
46- Open the tube "Fenêtre" in your Psp and copy it.
47- Paste it as a new layer.
48- IImage / Add some symmetrical borders of 2 pixels
with the dark colour 4e0000 used on step 38.
49 - Save your work as a jpeg file.
***************
That's it, you have done it !
If you have the slightest problem, don't hesitate to get in touch with me !
Tuto translated on the 13th of november 2017.
*******************
You'll find some versions of that tag in my gallery Here