Thank you for putting a link to this tutorial, whenever you display your realization of that tag on a website, on a group or in a mail !
**************************
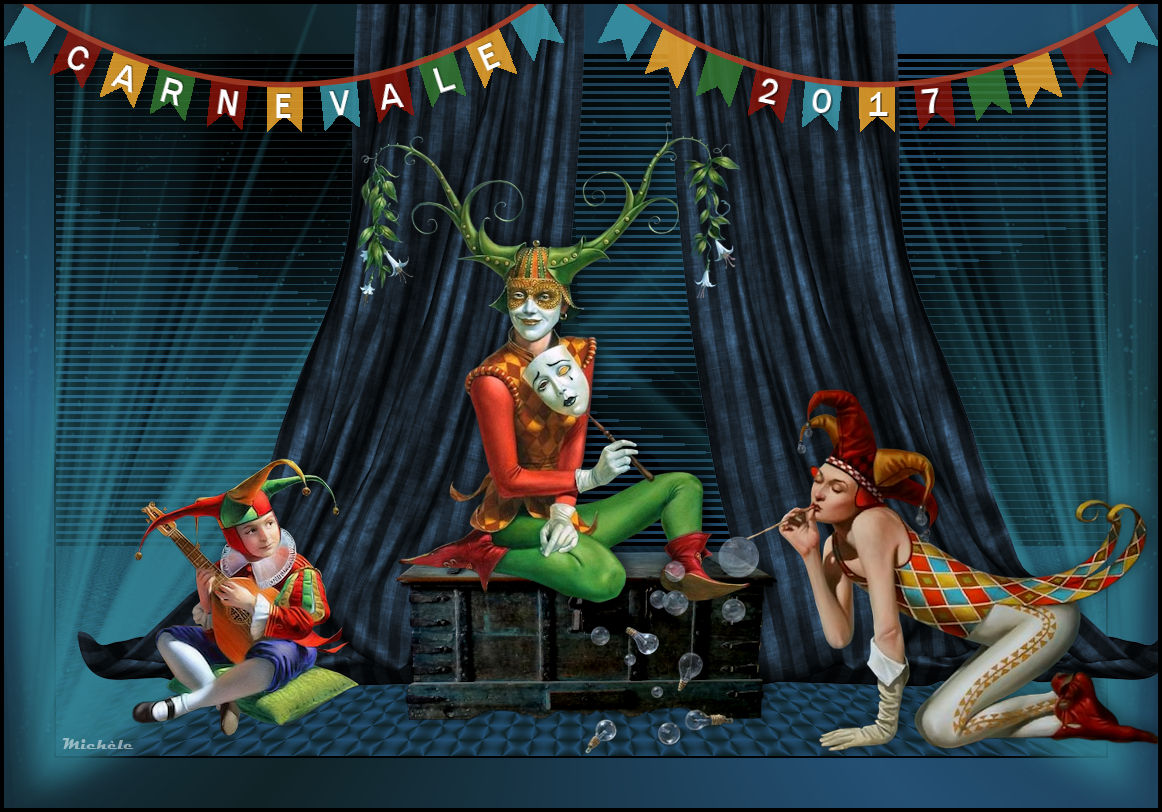
You'll find some versions of that tag in my gallery Here
***********************
To make that tag, you'll need the filters
- VM Experimental / TeeWee.
- Mura's Meister / Perspective tiling.
and the material down below :

**************
"It is forbidden to suppress watermarks on the material provided, to alter, mist or rename the tubes, in order to respect the work of the tubers.
- The tube of the man in the middle is by Tatie.
- The tube of the woman is by Katjoes.
- The tube of the child is by Betsie.
- The tube of the trunk is by JHanna.
-The brush is by Obsidiandawn..
- The other elements that I haven't created have been found on the net.
******************
Preparation
To be on the safe side, duplicate your tubes and image in your Psp :
-
Window / Duplicate
- Close the originals and work with the copies .
- Place the two brush files in the brush folder of your Psp files.
*****************
Click here to print the tutorial.
**********************
You can use my arrow to follow your work
Click on it and drag it all along the tutorial !

***************
Tutorial made with PSP X8
********************
1 - Open a new transparent image of 1050 by 700 pixels.
!!! Be careful ! New dimensions !!!
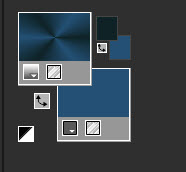
2 - Set your Material palette with two colours of your choice.
- My choice : Foreground :dark colour 102327
Background : light colour 245074
- Set your foreground with a radial gradient as below :
3 - Flood fill your transparent image with that foreground gradient.
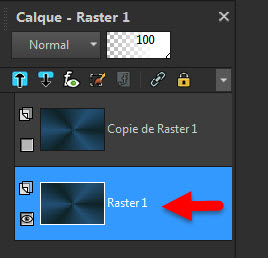
4- In your layers palette, right click on Raster 1 / Duplicate.
- Close that layer and activate layer Raster 1.
5- Effects / Plugins / VM Experimental / TeeWee / 154, 154.
- Optionnal : Effects / edge effects / Enhance.
6- Activate your top layer (Copy of Raster 1) and open it.
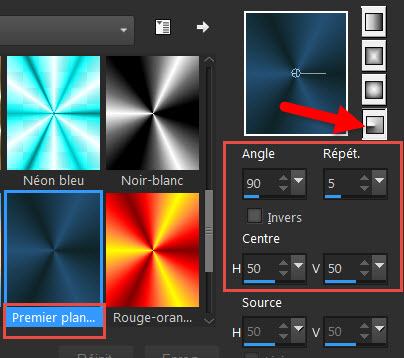
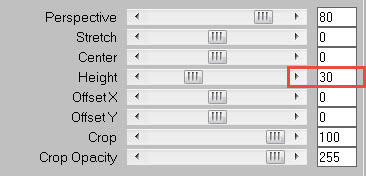
7- Effects / Reflexion effects / Pattern as below :
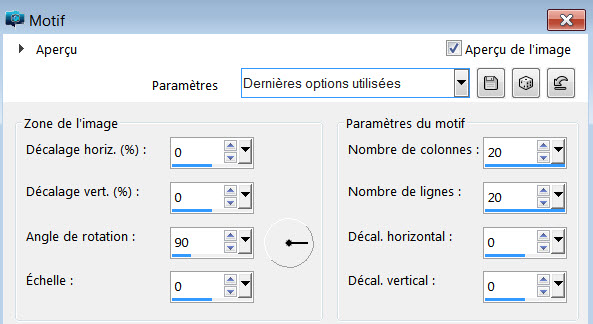
8- Effects / Plugins / Mura's Meister / Perspective tiling as below :
9- Image / Add some symmetrical borders of 2 pixels (in black for me).
10- Image / Add some symmetrical borders of 50 pixels in white
11- In your layers palette, double click on background layer
and click on OK in the new window that opens.
12- With your magic wand, select the white border.
- Hit the delete key to suppress that white border.
- Selections / select none.
13- ADD A NEW RASTER LAYER.
14- Layers / Arrange / Move Down.
15- Flood fill that layer with your foreground gradient.
16- Activate your top layer.
17- ADD A NEW RASTER LAYER.
18 - Activate your brush tool "SS-light-beams_5" and set it as below :

- Apply the brush in the bottom left hand side corner with a colour of your choice (Turquoise 318193 for me)
and click as many times as necessary without moving !
- For those that can't use a large size brush, you can use the png layer I have joined to the material.
19- In your layers palette, right click on the brush layer / Duplicate.
20- Image / Mirror horizontal.
21- Open the tube "Rideau" in your Psp and copy it.
22- Paste it as a new layer on to your tag.
23- Image effects / Offset / Horizontal : - 250 / Vertical : 117 / Click on Custom and transparent.
24- In your layers palette, right click on the curtain layer / Duplicate.
25- Image / Mirror horizontal.
26- Image effects / Offset / Horizontal : 90 / Vertical : 0 / Click on Custom and transparent.
27- Open the tube "JHanna_794 chest_modifié"in your Psp and copy it.
28- Paste it as a new layer on to your tag.
29- Place it like me in front of the curtains.
30- Effects / 3d effects / Drop shadow of your choice / - 4, 4, 60, 20, black for me.
31- Open the tube de Tatie in your Psp and copy it.
32- Paste it as a new layer on to your tag.
33- I have resized that tube at 60% (Resize all the layers NOT checked).
- Place it like me, sitting on the trunk.
34- Effects / 3d effects / Drop shadow of your choice / - 4, 4, 60, 20, black for me.
35- Open the tube " Katjoes-bulb blower"in your Psp and copy it.
36- Paste it as a new layer on to your tag.
37- I have resized that tube at 85% (Resize all the layers NOT checked).
- Sharpness / Sharpen / Sharpen.
Image / Mirror horizontal.
- Place it like me, to the right of the central tube.
38- Effects / 3d effects / Drop shadow of your choice / - 4, 4, 40, 20, black for me.
39- Open the tube "Betsie 814-15-10-2011"in your Psp and copy it.
40- Paste it as a new layer on to your tag.
41- I have resized that tube at 60% (Resize all the layers NOT checked).
- Sharpness / Sharpen / Sharpen.
Image / Mirror horizontal.
- Place it like me, to the left of the central tube.
42- Effects / 3d effects / Drop shadow of your choice / - 4, 4, 40, 20, black for me
43- Open the tube "Fairymist_carnevale2017_fanions" in your Psp and copy it.
44- Paste it as a new layer on to your tag and place it as below.
45- Image effects / Offset / Horizontal : - 298 / Vertical : 337 / Click on Custom and transparent.
46- With your magic wand, select one by one each flag and flood fill them with colours to match your tubes.
46-Open the tube "Fairymist_carnevale2017_corde"in your Psp and copy it.
47- Paste it as a new layer on to your tag and place it as below.
- Colorize it , if necessary.
48- Image effects / Offset / Horizontal : - 298 / Vertical : 377 / Click on Custom and transparent.
49- Layers / Merge down.
50- Effects / 3d effects / Drop shadow of your choice / - 4, 4, 40, 20, black for me
51- Layers / Duplicate.
- Image / Mirror horizontal.
- You may lower the opacity of those two layers if you wish (opacity at 90 for me).
52- Open the tube "Fairymist_carnevale2017_lettres" then "Fairymist_carnevale2017_chiffres" and copy them one by one.
53- Paste them as new layers and place them on the little flags like me.
54- Layers / Merge down TWICE,
(the rope, the flags, the letters and the figures are now all on the same layer).
55- Apply your signature
- Make sure everything is at the right place.
- Image / add some symmetrical borders of 4 pixels with a dark colour :
3c2d2f for me.
- Save your work as a jpg file.
***************
That's it, you have done it !
If you have the slightest problem, don't hesitate to get in touch with me !
Tuto translated on the 18th of february 2017
*************
You'll find some versions of that tag in my gallery Here