
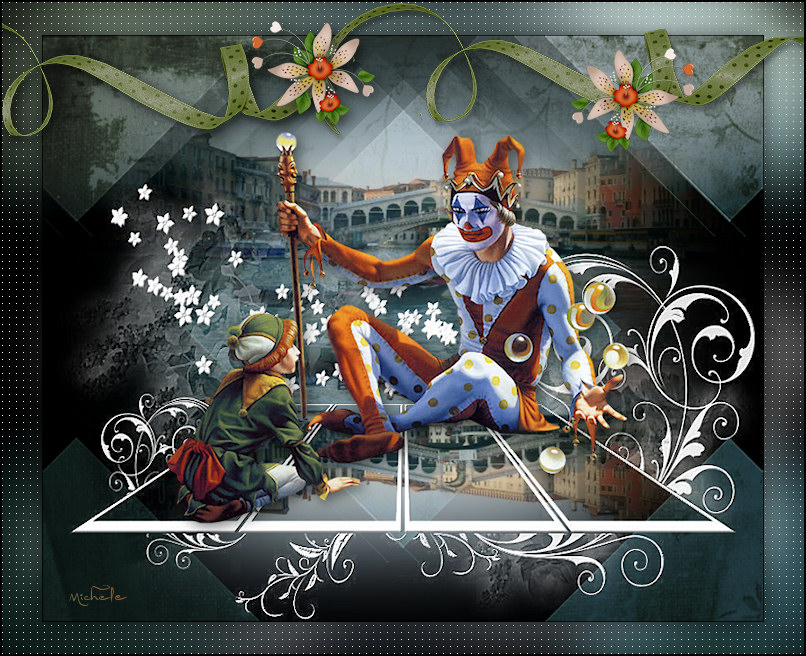
Thank you for putting a link to this tutorial, whenever you display your realization of that tag on a website, on a group or in a mail !
-----------------------
You'll find some versions of that tag in my gallery here
************************
To realize that tag, you'll need the plugins :
- Mura's Seamless / Emboss at alpha
- AP01 Innovations
and the material zip down below :

**************
*It is forbidden to suppress watermarks on the material provided , to alter, mist or rename the tubes in order to respect the work of the tubers
- The tube of the clowns is by Mtm Brigitte
You can join in her sharing group here
- The tube of the scenery is by Rire et Psp
You can join in her sharing group here
The tube of the flower is an element of a freebie from Sky Scraps
The other elements have been found on the net
******************
Preparation
Duplicate your tubes, mask and image. Close the originals and minimize the copies for now.
- Place the selection in the selection folder of your psp files
*****************
Click here to print the tutorial
*******************
You can use my arrow to follow your work

***************
1- Activate the image "paperfond.jpg". You may have to colorize it later on with one of your colours ( Hang on until you reach step 23 !)
2- Add a new raster layer
3- Set your colour palette with two colours matching your main tube
My choice : Foreground : Light colour 909da1
Background : Dark colour 293433
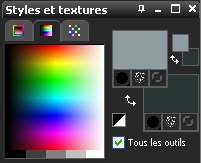
4- Flood fill your transparent layer with your dark background colour ( right click of your mouse )
5-Add a new raster layer
Selections / Load a selection / from disk / choose " fairymist_carnaval_ " and set as below
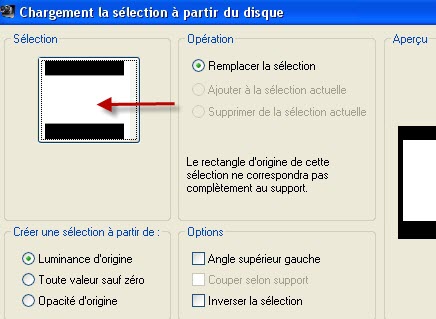
6- With your flood fill tool,set as below , flood fill your selection with your light colour
Make sure your new transparent layer is activated !

Keep the selection !
Add a new raster layer!!!!!!!!!!!!!!
7- Activate the tube " Scen4Juin08Bnll.pspimage" or a tube of your choice, copy it and paste it into the selection
Select none
8- Effects / Image effects / Offset as below

9- Activate the layer which is underneath as shown below
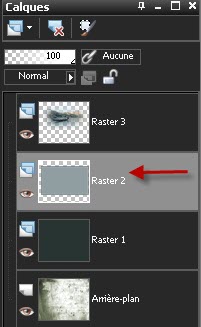
Effects / edge effects / enhance more
10- Effects / Plugins / Simple / 4 Way average
11- Effects / Plugins / Simple / Diamonds
12- Effects / Plugins / Simple / 4 Way average
13- Layers / Merge down
I have set the mode of that merged group to Multiply ( It is up to you to see which mode makes your geometrical effects show better !)
14- Activate your Emboss brush and set it as below


Apply that brush in the bottom half of your tag to darken it
15- Activate now your top layer ( where you have the scenery tube )
Layers / Duplicate
Image / Flip
You may have to lower the opacity of that duplicated layer in order to create a reflection
I left the opacity of mine to 100 but I slightly moved it downwards !
16-Add a new raster layer
Flood fill that layer with a colour of your choice assorted to your main tube
I have chosen white
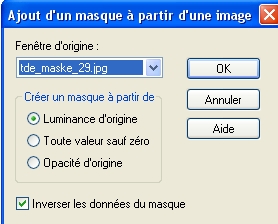
17- Layers / New mask layer / from image / choose "tde_maske_29.jpg" and set as below
Adjust / Sharpness / Sharpen more
Layers / Merge group
18- Effects / Plugins / Mura's seamless / Emboss at alpha / default
19- With your eraser tool ( size 20) rub off the text at the bottom of your mask

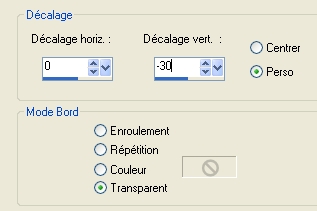
20- Effects / image effects / Offset as below
21- Activate the tube " Mtm_clowns_33-19jan 2008.pspimage" or a tube of your choice, copy it and paste it as a new layer on to your tag
My tube is at the right place !
22- Effects / 3d effects / drop shadow / 4, 4, 50, 20, black
23- Have you checked if your bottom background needs colorizing ?
Make sure everything is in its place
Image / add some symmetrical borders of 1 pixel with a colour of your choice
I have chosen black
24- Layers / Duplicate
25- Image / resize at 90% ( Resize all the layers NOT checked )
26- Effects / 3d effects / drop shadow / 0, 0, 80 , 40, black
27- Activate your bottom layer
Adjust / Blur / Gaussian blur of your choice ( 20 for me )
28- Apply your emboss brush, set as below to enlighten the layer but don't apply the brush more that once at the same place as it will be too bright !

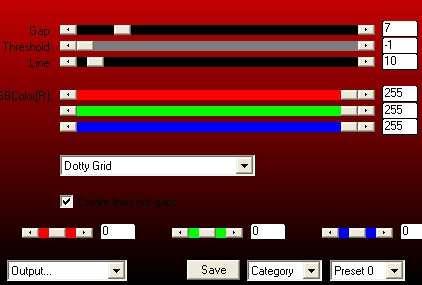
29- Effects / Plugins / AP O1 ( Innovations) / Lining silverlining / as below
30- Activate your top layer
Activate the tube " ruban.pspimage"or a tube of your choice, copy it and paste it as a new layer on to your tag
Colorize the tube to your liking
Apply the same drop shadow as on step 22
31- Activate the tube " fleur.pspimage"or a tube of your choice, copy it and paste it as a new layer on to your tag
Apply the same drop shadow as on step 22
Place the flower to your liking
Duplicate the flower ( Layers / Duplicate )
Image / mirror
Place to your liking
32- Add a new raster layer and apply your signature
33- Image / add some symmetrical borders of 1 or 2 pixels with a colour of your choice
I have chosen black
34- Save your work as a jpeg file and resize it if necessary
***************
That's it !! You've done it !!
If you 've enjoyed doing my tutorial, it would be nice to write a few words in my guest book ! If you 've had the slightest problem, please, send me a mail so I can see to the problem
Tutorial translated on the 26th of February 2011
*************
You'll find some versions of that tag in my gallery here
