

Thank you for putting a link to this tutorial, whenever you display your realization of that tag on a website, on a group or in a mail !
**************************
You'll find some versions of that tag in my gallery HERE
************************
To realize that tag, you'll need the plugins :
- Penta Com,
- Alien skin Eye candy 5 / Impact
and the material zip here
*******************
*It is forbidden to suppress watermarks on the material provided , to alter, mist or rename the tubes in order to respect the work of the tubers
- The tube of the woman is by JHanna
You can join in her sharing group here
- The tube of the flower is by Nimue La fée
You can join in her sharing group here
- The tube of the scenery is by Guismo
You'll find some of her tubes on Dakara's site here
You'll be able to get her tubes by joining in her sharing group here
- The brushes are by Coby 17
The other elements have been found on the net
*******************
Preparation
Duplicate your tubes, images and mask. Close the originals and minimize the copies for now.
Place the selection in your selections folder.
Export your brushes in your Psp as custom brushes
*****************
Click here to print the tutorial
*******************
You can use my arrow to follow your work

1- Open a transparent image of 800 by 650 pixels and select all
2- Open the background 130 from JHanna, copy it and paste it into the selection
** You may use a background of your choice as long as it goes with your main tube
Select none
3-Open the tube 353NLF100308 from Nimue la Fée, copy it and paste it as a new layer
You may use another tube (it's up to you to see if the final effect suits you )
Place the tube on the top right hand side of your tag
4- Effects /distortion effects / wind / 100 left
Set the mode of that layer to Dodge
5- Layers / duplicate
Image / flip
6- Add a new raster layer
Selections /load from disk / choose selectbutterflyfairymist / check Source Luminance and Replace the selection
7- Set your foreground with a sunburst gradient set as below with the following colours
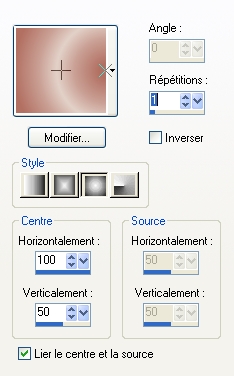
Foreground : b27062 
Background : e2d1c8 
8- Flood fill your selection with that gradient
Select none !
9- Set the mode of that layer to Dodge and lower its opacity to about 60
10- Layers / duplicate
Lower the opacity of that second layer to about 33
According to the chosen background , you'll have to play around with the modes and opacity of your layers
11- Open the tube calguismachirery1729 or a tube of your choice, copy it and paste it as a new layer
Place it on the top right hand side of your tag
12- Set the mode of that layer to Luminance Legacy and lower its opacity to about 50
13- Add a new raster layer
Apply the brush Harmonie or a brush of your choice with your light background colour (right click ) with the following settings

14- Set the mode of that layer to Dodge and lower its opacity a little (92 for me )
15- Add a new raster layer
Apply the brush Spring Brushes 5 by Coby, with your brush tool set as above but size at 320, with your light background colour
Image / mirror
16- Place the tube in the top left hand side of your tag
Set the mode of that layer to Dissolve and lower its opacity to 45
17- Layers / duplicate
Image / mirror
Image / flip
Place the tube in the bottom right hand side corner of your tag
18- Open the tube Ms sweet branch or a tube of your choice, copy it and paste it as a new layer
Adjust / hue and saturation / colorize / 1, 106 (to get a colour similar to your background )
Image / resize at 25 %
Place the tube in the bottom right hand side of your tag
Set the mode of that layer to Dodge
19- Layers / duplicate
Image / free rotation / 25°/ left
Place as on my tag
Lower the opacity of that layer to about 80
20- Add a new raster layer
Apply the brush Spring Brushes 9 by coby with your background colour
Place as shown on my tag
Set the mode of that layer to Hard Light and lower its opacity a little (82 for me )
21- Open the tube JHanna 130 or a tube of your choice, copy it and paste it as a new layer
Place it in the bottom left hand side corner of your tag
22- Effects /3d effects / drop shadow / 4, 4, 50, 20, white and check Shadow on a new layer
23- Adjust /blur / gaussian blur at 10
24 - Go back on the layer where your lady is
Effects /3d effects / drop shadow / - 4, - 4, 50, 20, white and check Shadow on a new layer
25- Adjust /blur / gaussian blur at 10
26-Open the tube Larissap42 or a tube of your choice, copy it and paste it as a new layer
Image / resize at 60 %
Place the tube on the left hand side of the lady
Lower the opacity of that layer to 72
27- Make sure everything is in the right place
Image / add some symmetrical borders of 2 pixels with a light colour
( here : e4e0dc )
Put your tag aside for the moment
28- Open a new transparent image of 900 by 750 pixels and select all
29- Open the picture "fond du cadre", copy it and paste it into the selection
Select none
30- Adjust / Blur / gaussian Blur at 30
31- Effects / Plugins / Penta Com / dot and cross / 72, 10, 2
32- Add a new raster layer
Prepare the same sunburst gradient as on step 7 but with the following colours :
Foreground : bab2ad 
Background : fdfcfc 
Flood fill your transparent layer with that gradient
33- Layers / new mask layer / from image / choose Dakara C mask 17 / check Source Luminance and Invert the data
Merge group
34- Activate the tag you 've put aside, copy it and paste it as a new layer on your new background
35- Effects / plugins / Alien skin Eye candy 5 / impact / perspective shadow / drop shadow blurry
36- Image / add some symmetrical borders of 2 pixels with a light colour
( here : e4e0dc )
37- Open the tube Butterfly or a tube of your choice, copy it and paste it as a new layer
Place it to your liking
38- Add a new raster layer and apply your signature
Merge all . Save your work as a jpeg file and resize it if necessary
****************
That's it !! You've done it !!
If you 've enjoyed doing my tutorial, it would be nice to write a few words in my guest book ! If you 've had the slightest problem, please, send me a mail so I can see to the problem !
Tutorial translated on the 4th of January 2010
****************
You'll find some versions of that tag in my gallery HERE
************************