
Thank you for putting a link to this tutorial, whenever you display your realization of that tag on a website, on a group or in a mail !
**************************
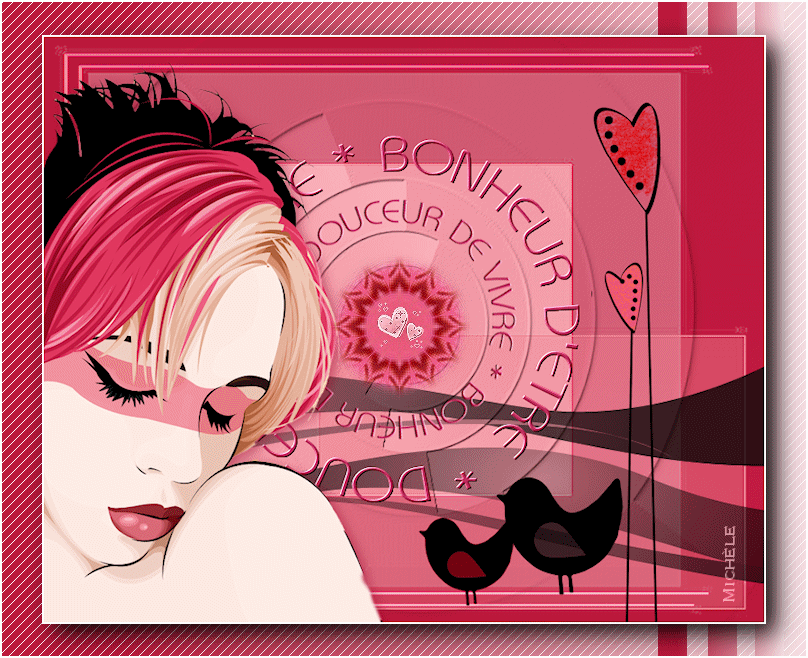
You'll find some versions of that tag in my gallery HERE
**************
To realize that tag, you'll need the plugins :
- Graphic plus,
- Filters Unlimited 2.0,
- Mura's seamless,
- Alien skin Eye Candy 5 / Impact,
- AP01
and the material zip here
**************
*It is forbidden to suppress watermarks on the material provided , to alter, mist or rename the tubes in order to respect the work of the tubers
- The tube of the woman is by Pita
- The mask circles is by HJR
- The tube coeurs is by Anna BV Designs
- One of the brushes I have used is by Ales1984
The other elements have been found on the web
******************
Preparation
Duplicate your tubes and the mask circles. close the originals and minimize the copies for now. Put the mask 20% playboy in your mask file and the selection in your selections file
*****************
Click here to print the tutorial
*******************
You can use my arrow to follow your work

***************
1- Open a new transparent image of 800 by 650 pixels
2- Prepare your palette layer with two colours out of your main tube
My choice : Foreground : colour f8919d 
Background : colour c21c42 
3- Flood fill your transparent image with your foreground colour
4- Add a new raster layer and flood fill it with your background colour
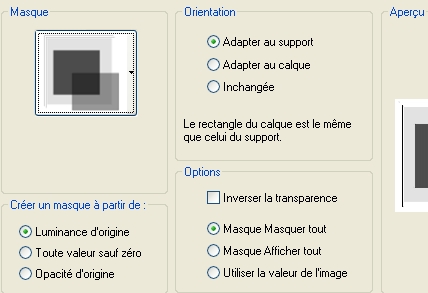
5- Layers / load a mask / from disk / choose Mask %20playboy
Adjust / sharpness / sharpen more
Merge group
6- Effects / plugins / Filters Unlimited 2.0 / Tile&mirror / Mirror vertical
7- Add a new raster layer and flood fill it with a very pale colour
My choice: colour f6dee3 
8- Layers / new mask layer / from an image / choose the mask Hjr mask circles / check Source luminance
Adjust / sharpness / sharpen more
Merge group
9- Effects / plugins / Mura's seamless / Emboss at alpha default
Set the mode of that layer to Multiply or choose another mode if you prefer
10- Open the tube vagues, copy it and paste it as a new layer
Place the tube as shown on my tag
11- Open the tube texte bonheurdetre, copy it and paste it as a new layer
Move the tube to the middle of your circle
* If you prefer to write your own text, you can draw a circle with your circle shape ( close your background colour in your colour palette ! ) write your text around this vector circle and suppress that circle. I've enclosed in the zip, my vector circle if you want to use it
12- Open, one by one, the bird tubes, copy them and paste them as new layers
Place the tubes at the bottom of your tag
You can use other tubes than my birds of course !
13- Open the tube Anna Bv xoxo, or a fancy tube of your choice, copy that tube and paste it as a new layer
Place the tube in the right hand side of your tag
14- Open the tube of the woman or a tube of your choice, copy it and paste it as a new layer
Place that tube in the bottom left hand side corner of your tag
15- Effects /3d effects / drop shadow / 4, 4, 50, 20, very dark colour (dark red for me )
16- Make sure everything is in its place
Image / add some symmetrical borders of 1 or 2 pixels in white
17- Layers / Promote background
Image / resize at 90% ( Resize all the layers NOT checked )
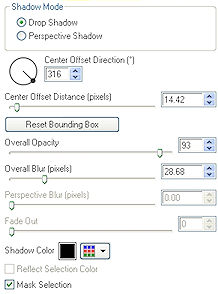
18- Effects / Alien skin Eye candy 5/ Impact / Perspective shadow / drop shadow blurry as below
19- Add a new raster layer
Calques / arrange / move down
20- Prepare your colour palette with two colours similar to the ones used on line 2 but in brighter shades
My choice : 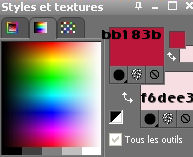
21- Set your foreground with a gradient , angle 90, repeats 0, Invert NOT checked
Flood fill your transparent image with that gradient
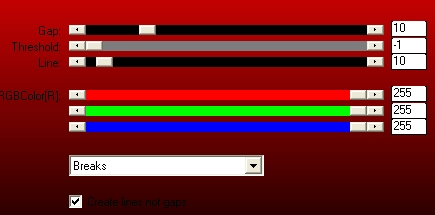
22- Effects / plugins / AP01 / Lines Silverlining as below
23- Add a new raster layer
Selections / load from disk / choose the selection bonheurdetrefairymist / check Source Luminance and replace the sélection
24- Flood fill your selection with the gradient
Select none
25- Image / add some symmetrical borders of 1 or 2 pixels in white
26- Add a new raster layer and apply your signature
27- Open the tube etoile, copy it and paste it as a new layer
Place that tube right in the middle of your circle
28- Open the tube coeur, copy it and paste it as a new layer
Place that tube in the center of the tube etoile
You may use your own tubes to put in the center of your circle !
29- If you don't wish to animate your tag, just merge all and save your work as a jpeg file. Resize your tag if necessary.
***************
ANIMATION
1- Active the layer etoile
Edit / copy special / copy merged
2- Open your animation shop
In your animation shop : right click on the desk / paste as a new animation
3- In your Psp : ( You are still positionned on your etoile layer !) :
- Image /Free Rotation as below :

- Edit / copy special / copy merged
4- In your Animation shop : Right Click / Paste after the active image
Do steps 3 and 4 twice
5- In your Animation shop : View / zoom out x5, you' ll see the 4 layers you've created
6- In your animation shop :
Edit / select all
Animation / Frame property / 15 ( the bigger the number is the slowler the animation is ! )
7- Test your animation by clicking on that small picture

Click again on the picture to stop the animation
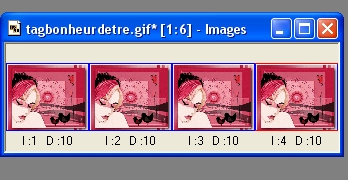
8- Save your work as a gif file
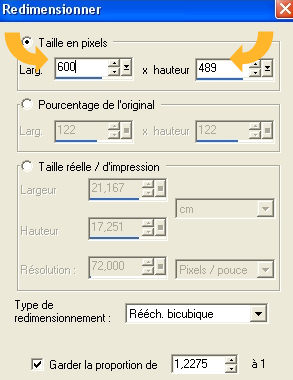
9-If you wish to resize your animation :
Animation / resize animation
*****************
That's it !! You've done it !!
If you 've enjoyed doing my tutorial, it would be nice to write a few words in my guest book ! If you 've had the slightest problem, please, send me a mail so I can see to the problem !
Tutorial translated on the 3rd of may 2009
*************
You'll find some versions of that tag in my gallery HERE