Other versions of that tag
***********************
To realize that tag, you'll need the plugins :
- Filters Unlimited 2.0
- Simple
and the material zip down below :

**************
*It is forbidden to suppress watermarks on the material provided , to alter, mist or rename the tubes in order to respect the work of the tubers
- The tube of the Boudha is by Gina
- The tube of the bamboo is by Guismo
You'll be able to find her tubes on Dakara' s site here
and you can join in her sharing group here
The other elements that I haven't created, have been found on the net.
******************
Preparation
- To be on the safe side, duplicate your tube and image in your Psp :
-
Window / Duplicate
- Close the originals and work with the copies !
- Place the selections in the selection folder of your Psp files.
*****************
Click here to print the tutorial
**********************
You can use my arrow to follow your work
Click on it and drag it all along the tutorial !

***************
Tutorial realized with PSP XIII

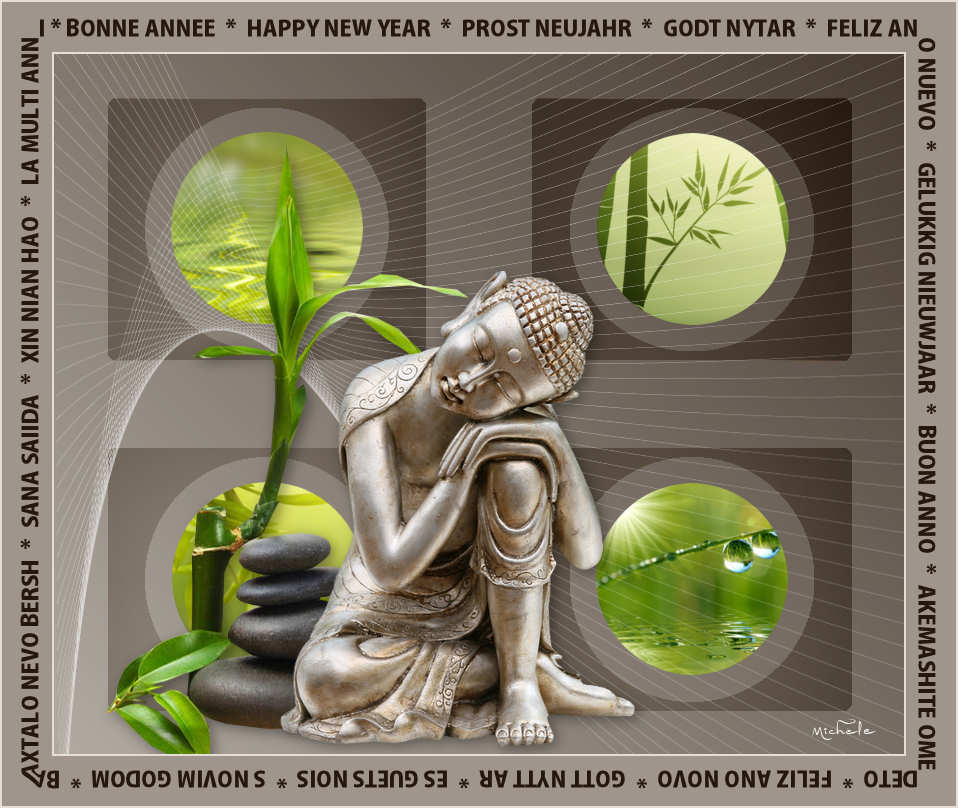
Step 1 : The background of the tag
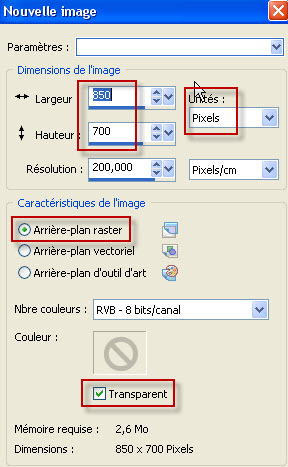
1 - Open a new transparent image of 850 by 700 pixels.
2 - Set your Material palette with two colours out of your main tube, as below :
My choice : Foreground : Light colour a49c92
- Background : Dark colour 25170b
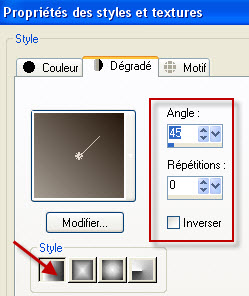
- Set your foreground with a linear gradient as below :

3 - Flood fill your transparent image with that gradient.
4- Layers / Duplicate.
5- Image / Resize at 75% / Resize all the layers NOT checked.
6- Effects / Edge effects / Enhance.
7- Effects /Plugins / Filters Unlimited 2.0 / Tile & Mirror / Distortion Mirror (horizontal) / 126 as below :

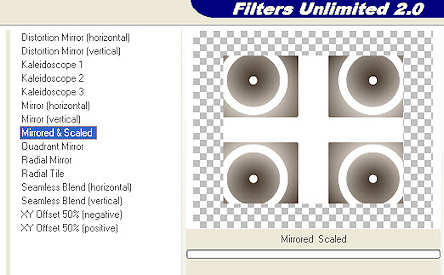
8- Effects / Plugins / Filters Unlimited 2.0 / Tile & Mirror / Mirrored & Scaled as below :
9- Effects / Plugins / Simple / Centre tile.
10- I have set the mode of that layer on to Hard light and lowered its opacity at 28.
It is up to you to see which mode and which opacity give a better effect, with your own colours.
11- Optionnal : To give more contrast to my colours , I have done :
- Adjust / Brightness and contrast / Brightness : - 53 and Contrast : - 10
Step 2 : The images
You will need 4 images or 4 pieces of images.
1- Open the "image_1_bloavezmad_fairymist.pspimage" or an image of your choice, in your Psp.
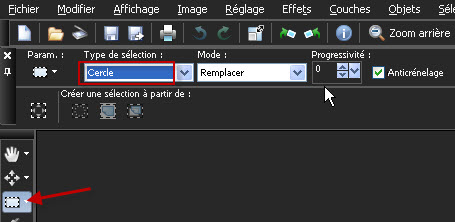
If you use your own images, make a round selection in your image to select the best part of it, with your circle selection tool, set as below :
2 - Copy that round image ( mine or yours ) as below :
- Edit / Copy
3 - Go back on to your tag :
Selections / Load a selection / from disk / Choose "fairymist_bloavezmad_1.PspSelection" and set as below :

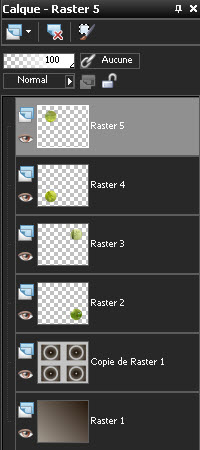
4- ADD A NEW RASTER LAYER
5 - Paste into the selection ( the copy of your image)
Keep the selection !
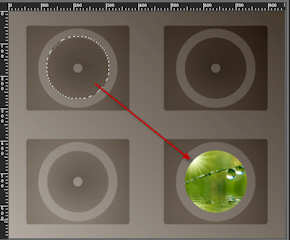
6- With your move tool, place your image in the bottom right hand side circle of your tag.
You may have to use the arrows of your keyboard to move your picture of 1 or 2 pixels.
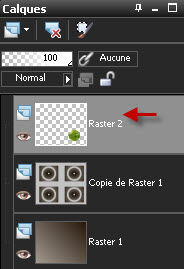
7- Repeat steps 1 to 6 for the three other images and don't forget to add a new layer for each new image.
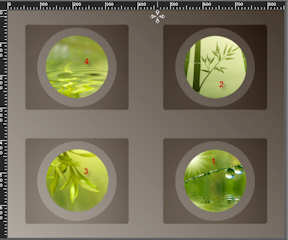
Place them as below :
Now, you can DESELECT ALL.
Step 3 : The veil
1-ADD A NEW RASTER LAYER
2- Selections / Load a selection / from disk / Choose "fairymist_bloavezmad_2.PspSelection" and set as for the previous selection :
3- With your flood fill tool, set as below, flood fill that selection with a colour of your choice. I have chosen white and set the mode of that layer on to Screen, opacity at 60.
It is up to you to see which mode and which opacity give a better effect.

- DESELECT ALL.
Step 4 : The tube (s)
1- Open the tube "calguisrzen100211.pspimage" or a tube of your choice, in your Psp and copy it.
2- Paste it as a new layer on to your tag.
Place that tube like me or to your liking.
3- Effects / effects 3d / drop shadow of your choice / 4, 4, 40, 20, black for me.
4- Open the tube "GINATUBES FEMME 2009.pspimage"or a tube of your choice, in your Psp and copy it.
5- Paste it as a new layer on to your tag.
Place that tube like me or to your liking.
6- Effects / effects 3d / drop shadow of your choice / 4, 4, 40, 20, black for me.
Step 5 : The borders
1- Make sure everything is at the right place as the borders are going to merge all the layers !
- Image / add some symmetrical borders of 2 pixels with a colour of your choice :
- very light colour : e5ded4 for me.
2- Image / add some symmetrical borders of 50 pixels with a colour of your choice :
- colour : 9f958c for me.
3- Open the tube "text_bloavezmad_fairymist.pspimage", in your Psp and copy it.
4- Paste it as a new layer on to your tag.
You may change the mode of that layer if that suits you better .( Soft light for example )
********************
If you have chosen other colours for your tag, you may colorize the text or paint it that way :
- Selections / select all
- Selections / Float
- Selections / Defloat
ADD A NEW RASTER LAYER
- Flood fill your selection with a colour of your choice.
- Deselect all.
- Delete the layer which is underneath ( the one with my brown text ) unless your prefer to keep it if it looks nice that way.
**************
You may choose to write your own text , on a vectorial rectangle that you will have drawn beforehand !!
5- To finish : Apply your signature
6- Image / add some symmetrical borders of 2 pixels with a colour of your choice :
- very light colour : e5ded4 for me.
7 - Save your work as a jpeg file and resize it if necessary .
***************
That's it !! You've done it !!
If you 've enjoyed doing my tutorial, it would be nice to write a few words in my guest book ! If you 've had the slightest problem, please, send me a mail so I can see to the problem
Tutorial translated on the 30th of december 2011
*************
Other versions of that tag