
Thank you for putting a link to this tutorial, whenever you display your realization of that tag on a website, on a group or in a mail !
**************************
You'll find some versions of that tag in my gallery HERE
***********************
To realize that tag, you'll need the plugins :
- Mura's Meister here
- Two Moon here
- Transparency / Eliminate Black here
- VDL Adrénaline / Snowscape here
- Alien skin Eye Candy 5 / Impact
***********
Click on the trunk to get the material !

**************
*It is forbidden to suppress watermarks on the material provided , to alter, mist or rename the tubes in order to respect the work of the tubers
- The tube of the girl is by Patries
- The picture I have used is by Anne Julie
- The brush I have used is by Ro-Stock
The elements of scrap come from Winterblue's kit by AddictivePleasure
******************
Preparation
- Duplicate your tubes and image. Close the originals and minimize the copies for now.
- Export your brush in your Psp as a custom brush
- Put the mask "2020 msk" in your mask folder
- Put the texture "paper-155-4" in your texture folder
- Place the file "ib-althemusborderFour.jsl" in your preset shapes folder
*****************
Click here to print the tutorial
*******************
You can use my arrow to follow your work

***************
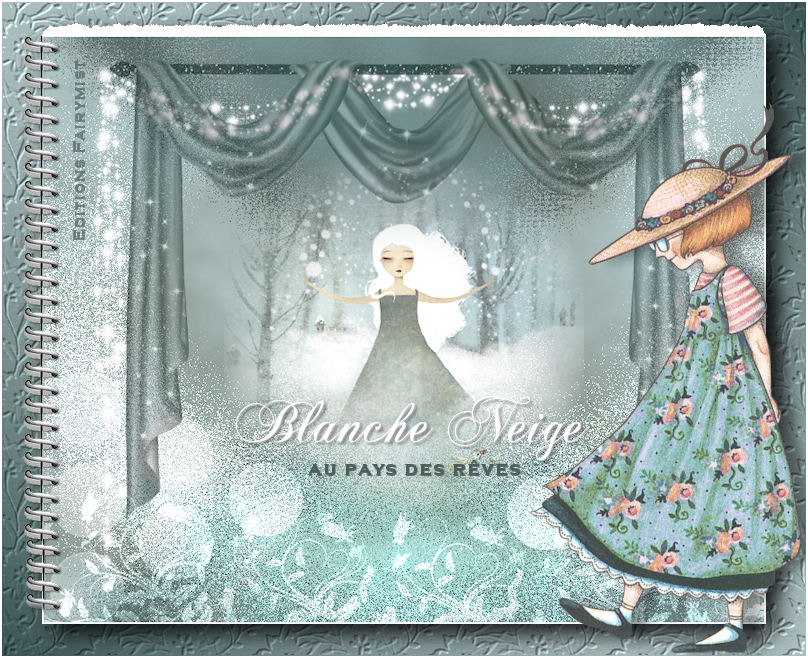
1- Open a new transparent image of 800 by 650 pixels
2- Set your material palette with two colours out of your picture
My choice : Foreground : light colour bbd4d8 
Background : dark colour 889289 
3- Open the picture AJSO4_AnneJulie or picture of your choice that will illustrate your imaginary tale
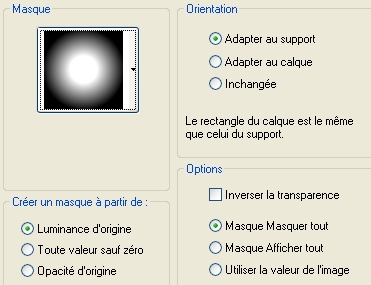
Layers / load a mask from disk / choose 2020.msk, with the following settings
Merge group
4- Layers / duplicate
Layers / Merge down
5- Copy and paste your misted image as a new layer on your tag
6- Activate now the transparent layer which is underneath
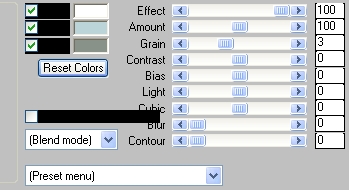
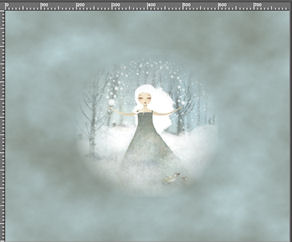
Effects / plugins / Mura's Meister / Cloud default, as below :
If your misted picture doesn't blend very well in your sky , change colours and see if it's better !
7- The layer with the clouds is still activated :
Layers / duplicate
8- Effects / plugins / Two Moon / Rip'n' Burn / 29
9- Effects / plugins / Transparency / Eliminate Black
10- Layers / duplicate
11- Activate the layer which is underneath as shown below :
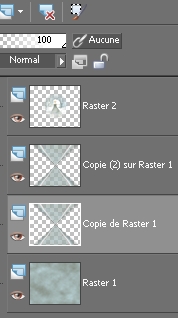
Effects / texture effects/ Mosaïc Glass as below

Set the mode of that layer to Multiply
You won't be able to see the effects unless you close the duplicated layer which above !!
12- Activate that layer above now !
Effects /distortion effects / Polar Cordinate / check Rectangular to polar and Transparent
13- Effects /texture effects / Mosaïc Antique as below
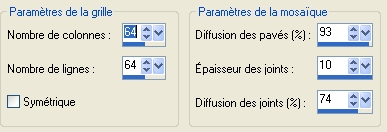
Set the mode of that layer to Dodge and lower its opacity to about 80
14- Go back to your second layer from the bottom ( copy of raster 1)
Activate the preset shape tool and choose the shape AltemusBordersfour-C
or another shape of your choice !

Set your background with white and close your foreground
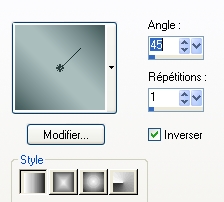
( I have set my background with a linear gradient, angle 45, repeat 1 : light colour and white
Apply your shape as below (size of your choice )
15- Layers / convert to a raster layer
16- Layers / duplicate
Image / mirror
Layers / merge down
17- Set the mode of that layer to Overlay and lower its opacity to your liking (about 50 for me )
You may prefer to use another mode, depending on the chosen colours !
18- Activate your top layer
Open the tube "curtain", copy it and paste it as a new layer
Place it as shown on my tag
I have set the mode of that layer to Luminance Legacy and lowered its opacity to 53
19- Open the tube Sparkles 2, copy it and paste it as a new layer
Place it at the right place
20- Add a new raster layer and activate your brush tool, set as below

Set your foreground with white
Apply the brush Floral_deco_Brushes_2by _ ro_stock_18 or a brush of your choice , several time all along the bottom of your tag ( left click)
Set the mode of that layer to Dodge and lower its opacity to your liking
(60 for me )
21- Make sure everything is in its right place
Image / add some symmetrical borders of 1 pixel in white or a colour of your choice
22- Layers / Promote Background layer
27- Image / resize at 90 °% ( Resize all the layers NOT checked )
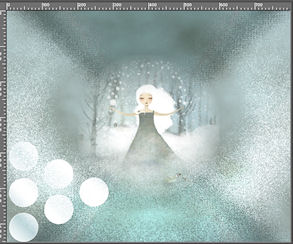
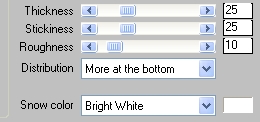
24- Effects / plugins / VDL Adrénaline / Snowscape default :
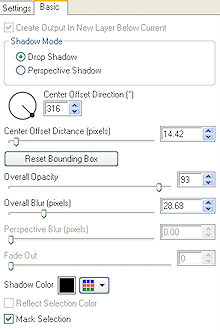
25- Effects / Alien skin Eye candy 5/ Impact / Perspective shadow / drop shadow blurry as below :
26- Add a new raster layer
Layers / arrange / move down
27- Flood fill that layer with a linear gradient as below
Choose colours matching your tag
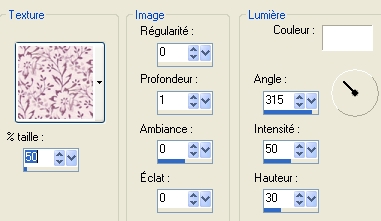
28- Effects / texture effects / texture paper_155_4 as below
29- Activate the top layer ( with your tag )
Open the tube "spirale", copy it and paste it as a new layer
Place it as shown on my tag
30- Add a new raster layer
In your material palette , close the foreground and set your background in white
Activate your text tool set as below and write the title of your fairy tale

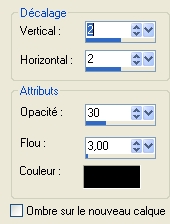
31- Place your title at the right place and apply the following drop shadow or a drop shadow of your choice
32- Add a new raster layer
Write the other part of the title with the font Copperplate Gothic Bold, size 20 , using a contrasting colour
I didn't put any drop shadow ( it's up to you to put one or not )
33- Add a new raster layer and apply your signature
34- Open the tube "fillette" or a tube of your choice, copy it and paste it as a new layer
Put the tube at the right place
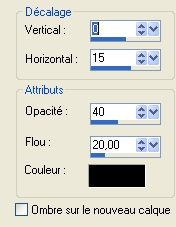
I have applied the following drop shadow to my tube
35- Image / add some symmetrical borders of 1 or 2 pixels in white or a colour of your choice
36- Save your work as a jpeg file and resize the tag if necessary
***************
That's it !! You've done it !!
If you 've enjoyed doing my tutorial, it would be nice to write a few words in my guest book ! If you 've had the slightest problem, please, send me a mail so I can see to the problem !
Tutorial translated on the 9th of January 2010
*********************
You'll find some versions of that tag in my gallery HERE