

Thank you for putting a link to this tutorial, whenever you display your realization of that tag on a website, on a group or in a mail !
**************************
You'll find some versions of that tag in my gallery HERE
******************
To realize that tag, you'll need the filters AP 01 ( innovations) , VM Extravaganza
and the material zip here
***********
*It is forbidden to suppress watermarks on the material provided , to alter, mist or rename the tubes in order to respect the work of the tubers
- The elements of scrap come from Mucki's site here
- The tubes of the woman and of the Eiffel Tower are by Guismo
You'll find some of her tubes on Dakara's site here
You'll be able to get her tubes by joining in her sharing group here
****************
Preparation
Duplicate your tubes and background. Close the originals and minimize the copies for now.
Put your selection in your selection folder
Export your brush in your Psp as a custom brush
********************
Click here to print the tutorial
*******************
You can use my arrow to follow your work

1- Open a white new image of 800 by 650 pixels
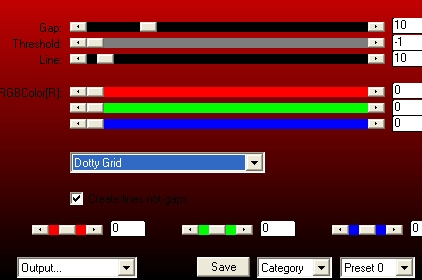
2- Effects / plugins / AF 01 / Lines- silverlining / as below :
3- Add a new raster layer and select all
4- Open the paper "papier carreaux" and paste it into the selection
Select none
You may colorize that layer if you wish
4- Image / resize at 60 %
5- Effects / image effects / seamless tiling default
6- Add a new raster layer
Selections / load from disk / choose "selectionpassion" / check Source luminance and Replace the selection
7- Set your foreground with a linear gradient, angle and repeat at 0, Invert NOT checked
with the light colour : ff8687 in your foreground
and the dark colour : a5111f in your background
8- With your flood fill tool, set as below , flood fill the selection with that gradient

Select none
9- Layers / duplicate
Image /free rotation / right / 90 °
Place that vertical band , on the left hand side of your tag
10- Open the tube cal-guis-paris1 or a tube of your choice, copy it and paste it as a new layer
Image / mirror
Move that tube towards the right hand side of your tag
11- Open the tube "coeur" or a heart tube of your choice, copy it and paste it as a new layer
Image / resize at 60 %
Place the heart as shown on my tag
Set the mode of that layer to Dodge
12- Open the tube of the woman "cal-guis- elegantered 3112008" or a tube of your choice, copy it and paste it as a new layer
Image / resize at 75 %; Adjust / sharpness / sharpen
Place the tube in the left hand side corner of your tag
13- Effects /3d effects / drop shadow / 4, 4, 50, 20, black
14- Add a new raster layer
Apply the brush Beautiful or a brush of your choice (set as below ) with a right click in order to use your background colour ( red for me )

Place the brush to your liking
15- Effects /3d effects / drop shadow / 4, 4, 50, 5, black
16- Add a new raster layer and apply your signature
17- Image / add some symmetrical borders of 1 pixel with your background colour
18- Image / add some symmetrical borders of 40 pixels in white
19- Select this border with your magic wand set as below :

20- Effects / plugins / VM Extravaganza / Transmission default
21- Selections / invert
22- Effects /3d effects / drop shadow / 4, 4, 50, 5, black / and - 4 horiz and vertical
Select none
23- Image / add some symmetrical borders of 1 pixel with your background colour
24- Open the tube "noeud" or a bow tube of your choice, copy it and paste it as a new layer
Image / resize my tube at 50 %; règlages / netteté / netteté
Place the tube on the bottom right hand side or your tag
25- Effects /3d effects / drop shadow / 4, 4, 40, 20, black
26- Open the tube "coeur gris", copy it and paste it as a new layer
Image / resize at 50 %; Adjust / sharpness / sharpen
Place the small heart on the bow as shown on my tag
27-Open the tube "déco feuilles" or a tube of your choice, copy it and paste it as a new layer
Place that tube as shown on my tag
Set the mode of that layer to Multiply and lower its opacity to about 80
28- Merge all and save your work as a jpeg file
***********
That's it !! You've done it !!
If you 've enjoyed doing my tutorial, it would be nice to write a few words in my guest book ! If you 've had the slightest problem, please, send me a mail so I can see to the problem !
Tutorial translated on the 28th of december 2009
****************
You'll find some versions of that tag in my gallery HERE