Thank you for putting a link to this tutorial, whenever you display your realization of that tag on a website, on a group or in a mail !
**************************
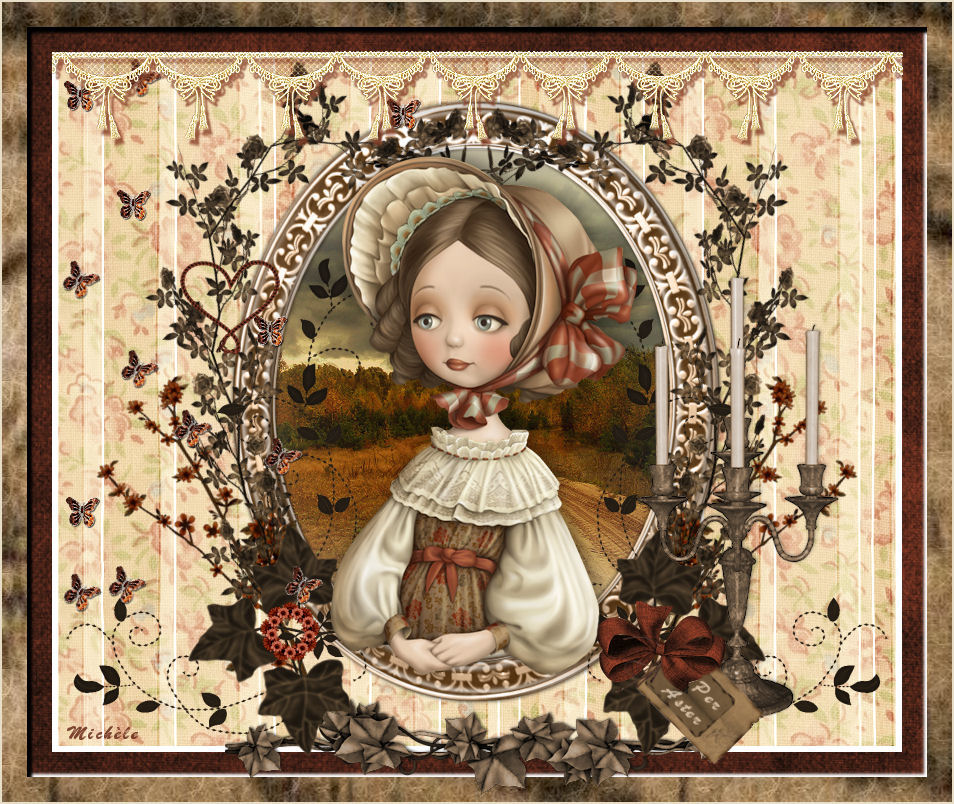
You'll find some versions of that tag in my gallery HERE
***********************
To make that tag, you'll need the filters :
- Filters Unlimited 2.0
and the material zip down below :

**************
*It is forbidden to suppress watermarks on the material provided , to alter, mist or rename the tubes in order to respect the work of the tubers
- The tube of the woman is by Aster.
- Her tubes are shared on Graph Sabine's tubes, here.
- The tube of the scenery is by Corinne Vicaire.
- You may join her sharing group here..
- The font I have used to write the title of this page is TK doodle.
- The elements of scrap I have used come from the kit "Freebie Edward" that you will find on the site Addictives pleasures here.
- You will find there other elements and the elements I have resized in ful size.
- The other elements that I haven't created, have been found on the net.
******************
Preparation
To be on the safe side, duplicate your tubes and image in your Psp :
-
Window / Duplicate
- Close the originals and work with the copies !
- Place the patterns in the pattern folder of your Psp files unless they are already there !
- Place the "Preset_UserDefinedFilter_Emboss_3" in the Presets folder of your Psp files.
*****************
Click here to print the tutorial
**********************
You can use my arrow to follow your work
Click on it and drag it all along the tutorial !

***************
Tutorial made with PSP XIII
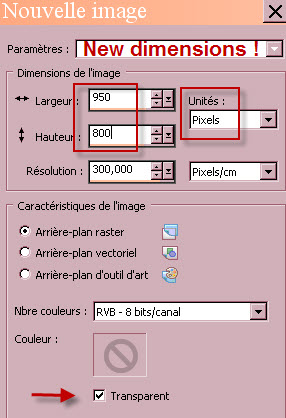
1 - Open a new transparent image of 950 by 800 pixels
2- Selections / select all.
3- Open the background "P3", copy it and paste it INTO THE SELECTION, on your transparent image. Keep selection !
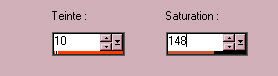
4- Adjust / Hue and saturation / Colorize like me or according to the main colour of your tubes.
5- Selections / Modify Contract by 50 pixels.
6- ADD A NEW RASTER LAYER.
- Flood fill that new layer in white like me or with a colour of your choice. Keep selection !
7- Selections / Modify / Contract by 6 pixels.
8- ADD A NEW RASTER LAYER.
- Flood fill that new layer with a light colour out of your main tube.
- My colour : e8ddc7. Keep selection !
9- ADD A NEW RASTER LAYER.
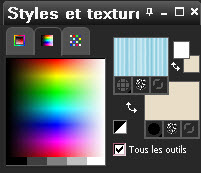
- Flood fill that new layer with the pattern "Stripes 29 / Corel_08_048" that you have placed in your foreground like me :
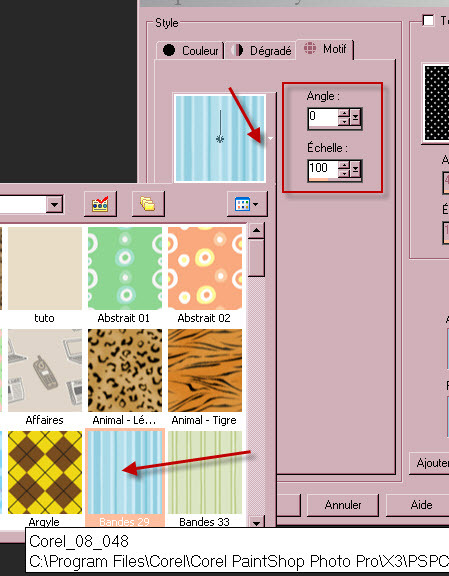
- Keep selection !
- I have set the mode of that layer on to Luminance legacy.
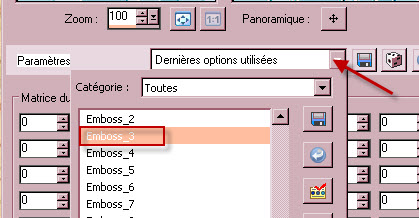
10- Effects / User Defined Filter / Emboss 3 as below :
11- ADD A NEW RASTER LAYER.
- Flood fill that new layer with the pattern "Fabric 07 /Corel_08_063" that you have placed in your foreground like me.
- You may use another pattern if you wish !
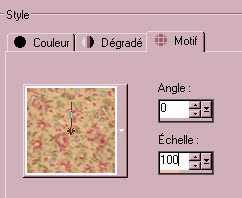
- I have set the mode of that layer on to Overlay.
12- Selections / Select all.
( That new selection deletes the previous one !)
- Selections / Modify / Contract by 25 pixels.
- Selections / Invert.
13- ADD A NEW RASTER LAYER.
14- Open the image "bois", copy it and paste it into the selection, on your new layer.
15- Effects / Plugins / Filters Unlimited 2 / Paper textures / Fibrous paper, coarse / 88, 128.
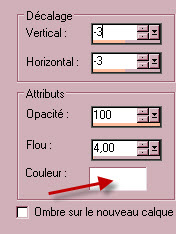
16- Effects / 3d effects / drop shadow as below :
 then
then 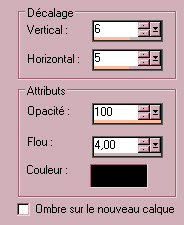
- SELECTIONS / Selection none.
17- Open the tube "golden_frame" or a similar tube, in your Psp and copy it.
18- Paste it as a new layer on to your tag. It is at the right place !
19- Activate your magic wand, set as below and click inside your frame.

20- Selections / Modify/ Expand by 7 pixels.
21- In your layer's palette, activate layer raster 4 (striped paper) :
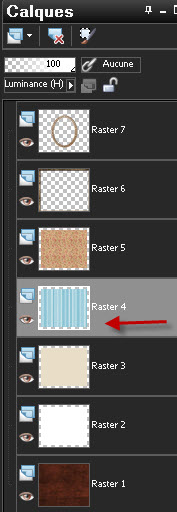
- Hit the delete key of your keyboard. Keep selection !
22- Activate now, the layer just above (layer raster 5).
- Hit the delete key of your keyboard. Keep selection !
23- Open the tube "Mist corinne.vicaire - paysage 72 - 2012" or a tube of your choice, in your Psp and copy it.
24- Paste it as a new layer on to your tag. It is, for me, at the right place.
25- Selections / Invert.
- Hit the delete key of your keyboard to erase the part of the scenery that is outside your frame.
- SELECTIONS / Selection none.
26- In your layers palette, activate the layer that is on top of the pile (your frame).
- Effects / 3d effects / drop shadow / 1, 1, 40, 4, black, then -1, -1, 40, 4, black.
27- Open the tube "Freeby_edward_ivy2"or a tube of your choice, in your Psp and copy it.
- Paste it as a new layer on to your tag.
- I have placed my tube that way:
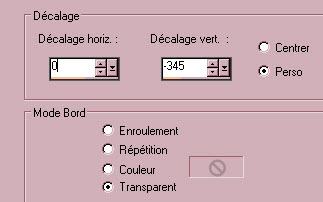
- Effects / Image effects / Offset :
28- Effects /3d effects 3d / drop shadow / -1, 1, 50, 3, black
29- Open the tube "Freeby_edward_leaves2"or a tube of your choice, in your Psp and copy it.
- Paste it as a new layer on to your tag.
- I have placed my tube that way:
- Effects / Image effects / Offset :
- same settings as previously with these new figures : 272 / -132.
30- Layers / Duplicate.
- Image / Mirror.
31- Open the tube "Freeby_edward_roses"or a tube of your choice, in your Psp and copy it.
- Paste it as a new layer on to your tag.
- I have placed my tube that way:
- Effects / Image effects / Offset :
- same settings as previously with these new figures : 165 / 34.
32- Layers / Duplicate.
- Image / Mirror.
33- Open the tube "Freeby_edward_ivy3"or a tube of your choice, in your Psp and copy it.
- Paste it as a new layer on to your tag.
- I have placed my tube that way:
- Effects / Image effects / Offset :
- same settings as previously with these new figures : 227/ - 105.
33- Layers / Duplicate.
- Image / Mirror.
34- Open the tube "Freeby_edward_bow"or a tube of your choice, in your Psp and copy it.
- Paste it as a new layer on to your tag.
- I have placed my tube that way:
- Effects / Image effects / Offset :
- same settings as previously with these new figures : 184/ - 246.
35- Open the tube "Freeby_edward_sunflowerwreath"or a tube of your choice, in your Psp and copy it.
- Paste it as a new layer on to your tag.
- I have placed my tube that way:
- Effects / Image effects / Offset :
- same settings as previously with these new figures : -187/ - 230.
36- Open the tube "Freeby_edward_candles2"or a tube of your choice, in your Psp and copy it.
- Paste it as a new layer on to your tag.
- I have placed my tube that way:
- Effects / Image effects / Offset :
- same settings as previously with these new figures : 261/ - 93.
37- Effects / 3d effects / drop shadow / - 1, 1, 30, 5, black.
38- Open the tube "Freeby_edward_rope2"or a tube of your choice, in your Psp and copy it.
- Paste it as a new layer on to your tag.
- I have placed my tube that way:
- Effects / Image effects / Offset :
- same settings as previously with these new figures : - 247/ 94.
39- Open the tube "Freeby_edward_oldtag"or a tube of your choice, in your Psp and copy it.
- Paste it as a new layer on to your tag.
- I have placed my tube that way:
- Effects / Image effects / Offset :
- same settings as previously with these new figures : 212/ - 298.
40- Activate the layer on which there is "Freeby_edward_bow" / raster 13 for me :
- Selections / select all.
- Selections / Float.
- Selections / Defloat.
41- Come back on the layer where your label is, on top of the pile.
- Hit the delete key of your keyboard.
- Deselect all.
42- Open the tube "titre_Per_Aster" and copy it.
- Paste it as a new layer on to your tag.
- Place on the label, like me.
43- Open the tube "Fairymist_Aster_butterflies"or a tube of your choice, in your Psp and copy it.
- Paste it as a new layer on to your tag.
- I have placed my tube that way:
- Effects / Image effects / Offset :
- same settings as previously with these new figures : - 264 / 67.
44- Open the tube "Little_girl"or a tube of your choice, in your Psp and copy it.
- Paste it as a new layer on to your tag. Erase Aster's watermark !
- I have resized that tube at 75% (Resize all the layers NOT checked).
- Place the tube like me or to your liking.
45- Effects / 3d effects / drop shadow / - 4, 4, 40, 20, black.
46- Open the tube "Lace"or a tube of your choice, in your Psp and copy it.
- Paste it as a new layer on to your tag.
- I have placed the tube against the top side of my wallpaper as shown below :

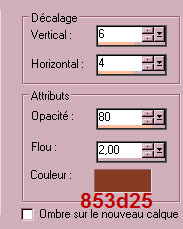
47- Effects / 3d effects / drop shadow as below :
48- Apply your signature
- Make sure everything is at the right place
- Image / add some symmetrical borders of 2 pixels with the colour of your frame :
e8ddc7 for me.
- Save your work as a jpeg file.
***************
That's it !! You've done it !!
If you 've enjoyed doing my tutorial, it would be nice to write a few words in my guest book !
If you 've had the slightest problem, please, send me a mail so I can see to the problem
Tutorial translated on the 20th of September 2014
*************
You can find some versions of that tag in my gallery HERE