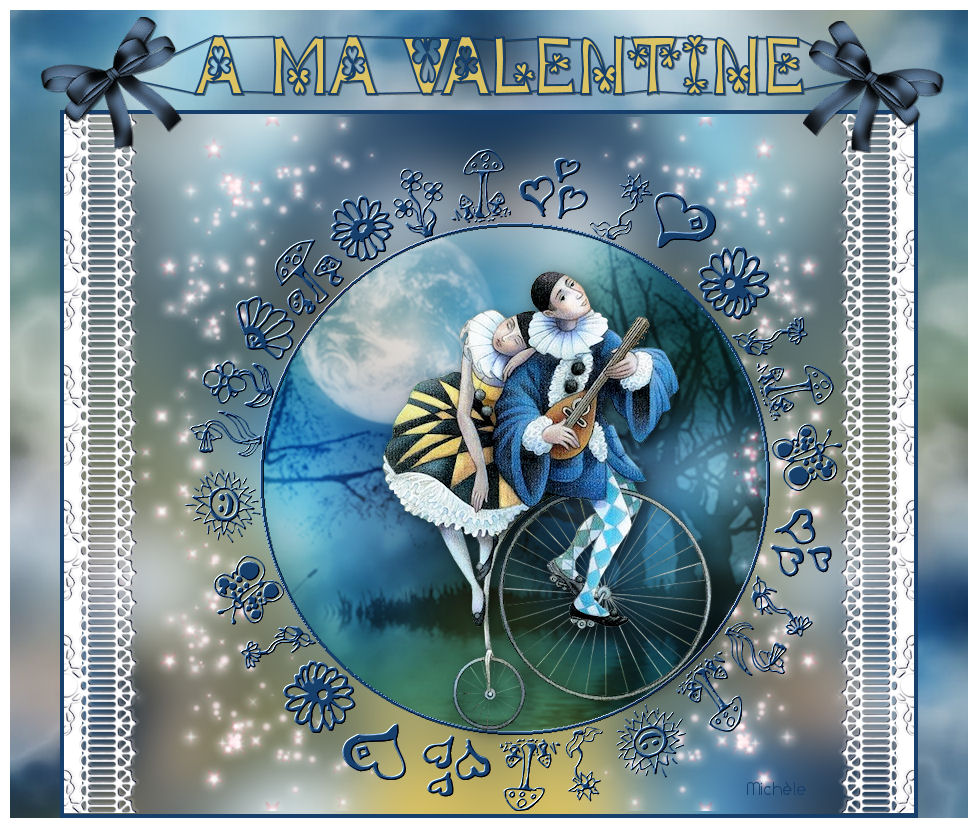
Thank you for putting a link to this tutorial, whenever you display your realization of that tag on a website, on a group or in a mail !
**************************
You'll find some versions of that tag in my gallery here
***********************
To make that tag, you'll need the plugins :
- Xe Xtras / Elemental
- Mura's Seamless / Emboss at alpha.
and the material zip down below :

**************
*It is forbidden to suppress watermarks on the material provided , to alter, mist or rename the tubes in order to respect the work of the tubers
- The tube of the couple is by Odette
- You will find her sharing group here .
- The other elements that I haven't created, have been found on the net.
******************
Preparation
To be on the safe side, duplicate your tubes and image in your Psp :
-
Window / Duplicate
- Close the originals and work with the copies !
- Open the font outside your Psp if you have Windows Xp or place it in the Font folder of Windows if you have Win7.
*****************
Click here to print the tutorial
**********************
You can use my arrow to follow your work
Click on it and drag it all along the tutorial !

***************
Tutorial made with PSP XIII
***********************
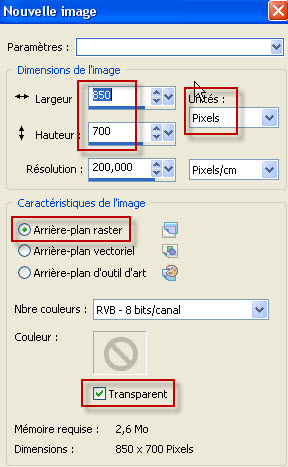
1 - Open a new transparent image of 850 by 700 pixels.
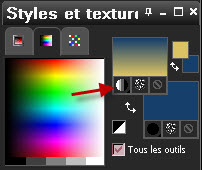
2 - Set your Material palette with two colours out of your main tube, as below :
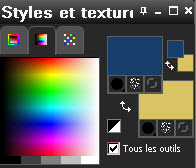
- My choice : Foreground : light colour : dbc363 for me.
Background : dark colour 173f6b
- Set your foreground with a linear gradient as shown below :
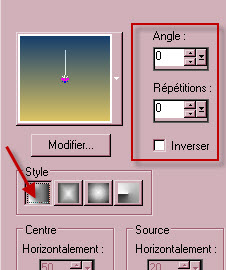
3 - Flood fill your transparent image with your foreground gradient.
4- ADD A NEW RASTER LAYER.
5- Selections / select all.
6- Open your main tube ("au clair de la lune-art" for me), in your Psp and copy it.
- On Odette's tube, don't forget to erase the watermark before you copy the tube !
7- Paste it INTO THE SELECTION, on your new layer. Deselect all.
8- Effects / Image effects / seamless tiling default.
9- Layers / Duplicate.
10- Image / mirror.
11- Layers / Merge all.
12- On that merged layer : Adjust / Blur / Gaussian blur at 30
13- Layers / Duplicate.
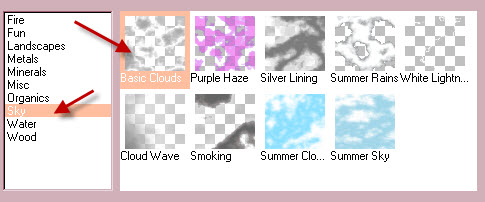
14- Effects / Plugins / Xe Xtras / Elemental / Sky / Basic clouds as below :
15- I have set the mode of that layer on to Soft light.
16- Merge all.
17- Windows / Duplicate.
- Save that duplicated layer as a JPG file and name it Background.
We'll use it later on.
- Let's keep working on the tag you have merged on point 16.
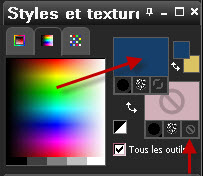
18- Set your Material palette as below :
- Swap your colours and take the gradient off.
19- Activate your ellipse tool (letter Q) and set it as below :

20- Draw a circle on your tag (the size of it doesn't matter !)
21- Write down my numbers as shown below :

- Don't click on the apply button (green for me) !!!
22- Objects / Align / Center in canvas.
23- Activate your text tool and set it as below :

- You may use another Dingbat if you wish but you will have to adapt the size of it !
24- ADD A NEW RASTER LAYER.
- In your Material palette, swap your colours again and shut your foreground.
(Your dark colour is in your background !)
- Make sure your new raster layer is activated in your Layers palette !
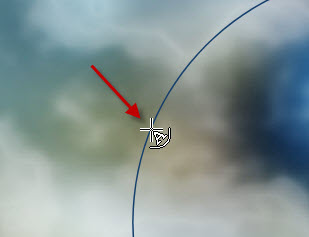
- Place the cursor of your mouse on the circle and when you get the symbol shown below, do a left click.
- It is now up to you to type the letters that give you nice drawings.
- Click as many times as necessary to cover your whole circle.
- When it is done, click on the apply button and convert your vectorial layer to a raster one.
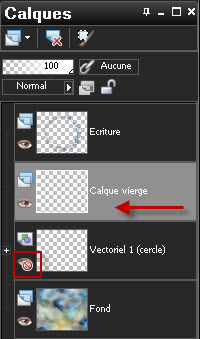
25- In your layers palette, activate the vectorial layer where your circle is.
- With your magic wand, set as below, click in the middle of the circle.

- Close that vectorial layer by clicking on the eye as shown below.
26- Activate the transparent layer just above as indicated below.
27- Flood fill that selection, with your dark colour (blue for me).
28- Selections / Modify / Contract by 4 pixels.
- Hit the delete key of your keyboard.
- Deselect all.
29- Optionnal : Effects / Mura's Seamless / Emboss at alpha default .
30- On that circle so that it doesn't touch your dingbats :
- Image / Resize by 95%( Resize all the layers NOT checked !)
31- Activate the layer on top of the pile (your dingbats).
- Optionnal : Effects / Mura's Seamless / Emboss at alpha default .
32- Layers / Merge down.
If steps 18 to 32 are too much bother for you, you may use my layer "fairymist_valentine_cercle_et_lettres" attached to my material.
33- Activate now the layer that is at the bottom of the pile (Background).
- Open the tube "fairymist_valentine_stars", in your Psp and copy it.
- Paste it as a new layer..
34- Activate your top layer (cercle and dingbats).
- With your magic wand, set a previously, click inside the circle.
35- Selections / modify / expand by 2 pixels.
36- ADD A NEW RASTER LAYER.
- Layers / Arrange / Move down.
37- Open the image "Fairymist_valentine_paysage" in your Psp or an image of your choice on which you have drawn a round selection.
- Copy that round image.
38- Paste it INTO THE SELECTION, on your new layer. Deselect all.
39- I have set the mode of that layer on to Soft light.
- Optionnal : Layers / Duplicate.
40- Activate your top layer.
- Open the main tube in your Psp and copy it.
41- Paste it as a new layer on to your tag :
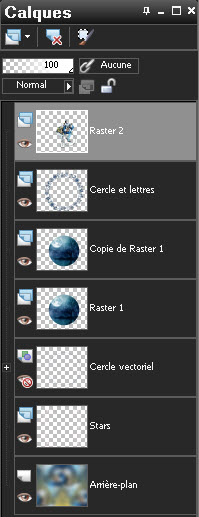
- Place it like me or to your liking (I have placed the wheels against the borders of my circle!).
42- Effects / 3d effects / drop shadow of your choice / 4, 4, 60, 20, black for me.
43- Open the tube "dentelle" or a fantasy tube of your choice, in your Psp and copy it.
44- Paste it as a new layer on to your tag.
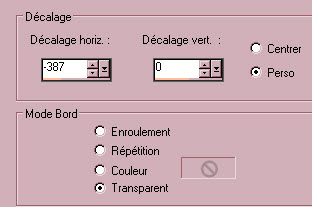
45- I have moved my tube against the left side of my tag, that way:
- Effects / Image effects / Offset :
46- Layers / Duplicate.
- Image / mirror.
47- Make sure everything is at the right place
- Image / add some symmetrical borders of 4 pixels with your dark colour :
173f6b for me.
48- Layers / Promote background layer.
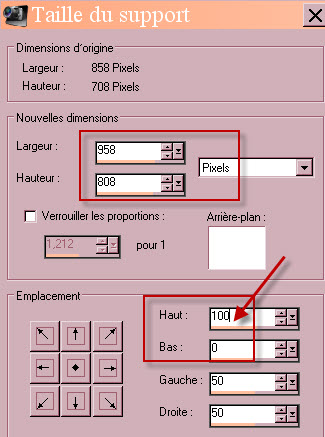
49- Image / Canvas size as below :
50- ADD A NEW RASTER LAYER.
- Select all !!!!!!!
51- Layers / Arrange / Move down.
52- Open the jpeg image of your background (saved on point 17) and copy it.
53- Paste it into the selection, on your new layer. Deselect all.
54- Activate your top layer (your tag).
55- Set your Material palette as below :
56 - With your text tool, set as below, write down the text "A ma Valentine" in capital letters or a text of your choice :

- Apply your choice and convert the layer into a raster layer.
57- Place that text on the top of your tag.
58- Optionnal : with my pen tool , I have drawn lines to join my letters !
(You may use my layer "fairymist_valentine_titre_et_ficelle" included in my material !)
59- Open the tube "fairymist_valentine_noeud" or another bow tube, in your Psp and copy it.
60- Paste it as a new layer on to your tag.
- Place it on the top left hand side corner of your tag, like me.
61- Layers / Duplicate.
- Image / mirror.
62- Layers / Merge down twice so that your text and the bows are all on the same layer.
63- Effects / 3d effects / drop shadow of your choice / 1, 1, 47, 1, black for me.
64- Apply your signature.
65- Image / add some symmetrical border of 10 pixels with a colour of your choice:
- White for me
66 - Save your work as a jpg file.
***************
That's it !! You've done it !!
If you 've enjoyed doing my tutorial, it would be nice to write a few words in my guest book !
If you 've had the slightest problem, please, send me a mail so I can see to the problem
Tutorial translated on the 8th of February 2014
*************
You'll find some versions of that tag in my gallery here
