
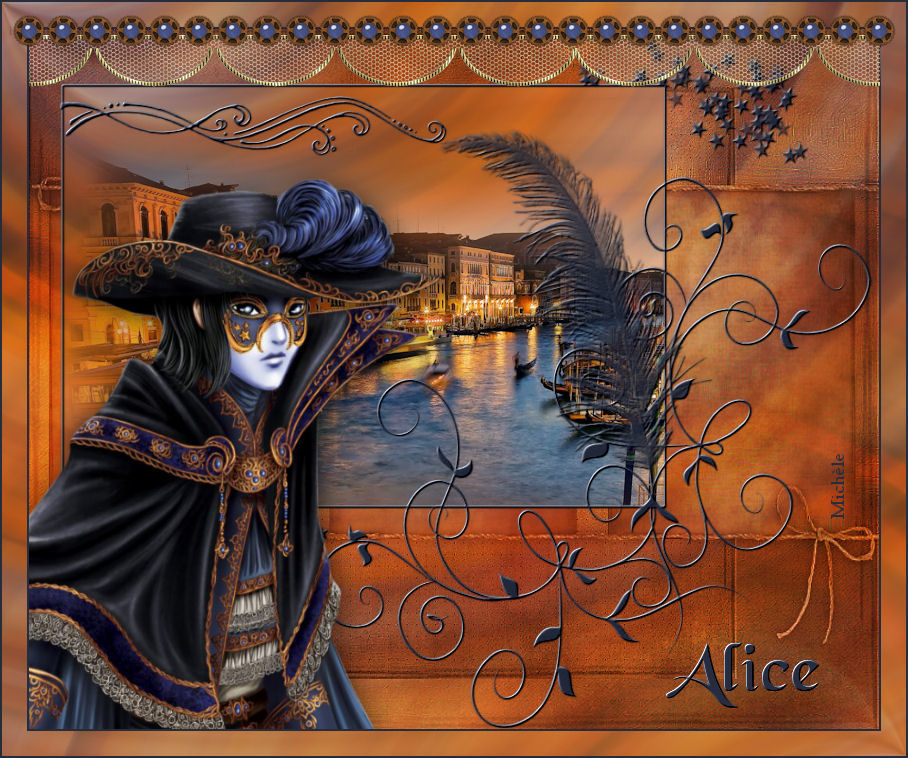
Thank you for putting a link to this tutorial, whenever you display your realization of that tag on a website, on a group or in a mail !
**************************
You'll find some versions of that tag in my gallery HERE
***********************
To make that tag, you'll need the filter :
- Mura's Seamless / Emboss at Alpha.
and the material zip down below :

**************
*It is forbidden to suppress watermarks on the material provided , to alter, mist or rename the tubes in order to respect the work of the tubers
- The image "JHanna_412 background.jpg" is by Jhanna
You may join her sharing group here
- The tube of the man is by Achim
- The tube of the scenery is by Guismo
You may find her tubes on Dakara's site
- The mask I have used is by Suzanne TDE.
- The other elements that I haven't created, have been found on the net.
******************
Preparation
To be on the safe side, duplicate your tubes and image in your Psp :
-
Window / Duplicate
- Close the originals and work with the copies !
*****************
Click here to print the tutorial
**********************
You can use my arrow to follow your work
Click on it and drag it all along the tutorial !

***************
Tutorial made with PSP XIII

Step 1 : The background of the tag
1 - Set your Material palette with two colours of your main tube as well as your scenery tube.
My choice : Foreground : Brightful colour e17c18
Background : Dark colour 272d3e
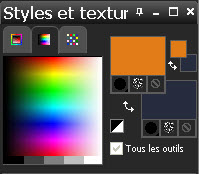
2- Open a new transparent image of 850 by 700 pixels.
3- Flood fill your new transparent image with your foreground colour.
4- Open the file "Fairymist_bg_alice_.pspimage" in your Psp and copy it.
5- Paste it as a new layer on to your tag.
6- Layers / Duplicate.
7- Image / Mirror.
- Image / Flip.
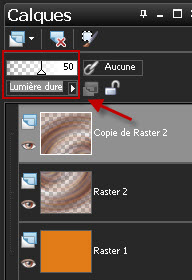
8- Lower the opacity of that layer at 50. I have set the mode of that layer on to Hard light .
- If you use different colours from mine, it is up to you to choose the modes that suit you better !
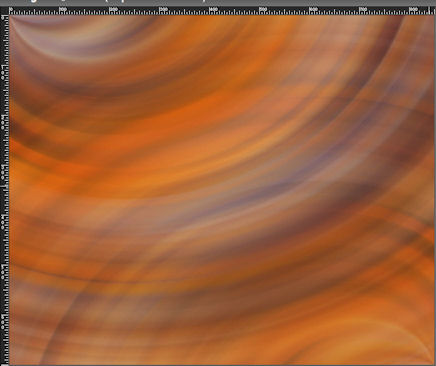
9- Layers / Merge all.

Step 2 : The mask and the scenery
1- ADD A NEW RASTER LAYER.
2- Flood fill it with your background colour (Right click).
3- Open the mask "tde_maske18.jpg" in your Psp.
4- Layers / New mask layer / from image /set as below :
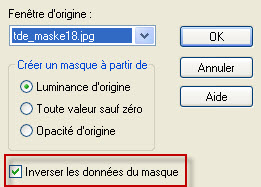
- Adjust / Sharpness / Sharpen more.
- Layers / Merge group.
5- Activate your deformation tool (letter D)

- If you can't see that tool in your tool bar, do this :
- View / Customize / Tools / Deform :
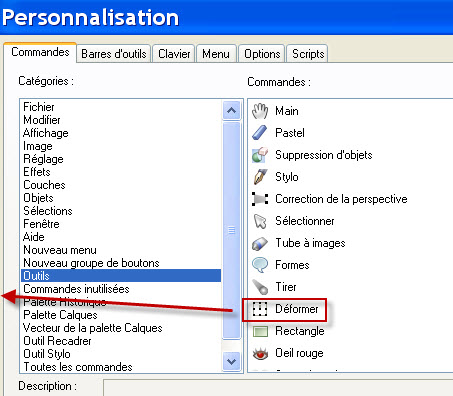
- Left click on the took, keep your left click pressed and drag the tool to your tool bar.
6- Make sure your Deform tool is set as below (on scale) :

- Slightly stretch the frame towards the left as shown below :
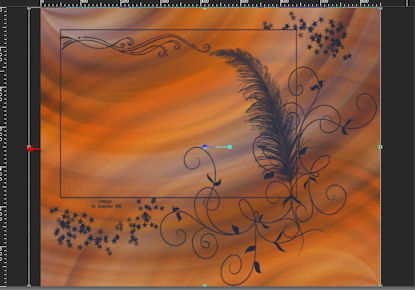
- Click on the move tool or any other tool, to get rid of your Deform tool !
7- Open the scenery tube "calguismisted27710.pspimage" or a tube of your choice and copy it.
8- Paste it as a new layer on to your tag.
- I have resized my scenery tube at 50% (Resize all the layers NOT checked).
- That scenery is for me at the right place!
- If you scenery isn't at the right place for you, use the move tool to drag it to the right place (Any part of this scenery that is outside the center rectangle of you mask will be deleted later on !)
9- Activate the rectangle selection tool, set as below and select the rectangle which is in the middle of your mask.

10- Selections / Invert.
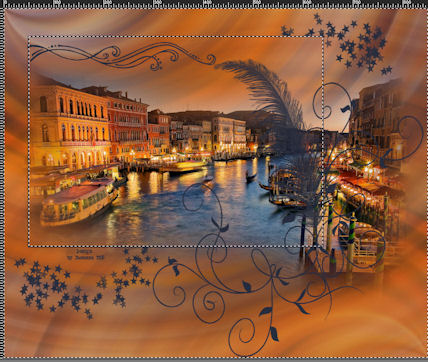
- In your layers palette, make sure the layer where your scenery is, is activated !
- Hit the delete key of your keyboard.
- KEEP SELECTION !.
11- Activate the layer at the bottom of the pile of layers (Background)
- ADD A NEW RASTER LAYER.
12- Open the image " JHanna_412 background.jpg" and copy it.
- Paste INTO THE SELECTION.
- Deselect all.
- I have set the mode of that layer on to Hard light so that the image takes the colours of the background.
13- Activate the layer on top of the pile of layers (the scenery).
- Layers / Arrange / Move down.
14- Activate the layer on top of the pile of layers (the mask).
- Effects / plugins / Mura's Seamless / Emboss at Alpha default.

Step 3 :The main tube
1- Open the tube "AK-Fantasy002-2005-Achim.psp"or a tube of your choice and copy it.
2- Paste it as a new layer on to your tag.
3- I have moved my tube as below :
- Effects / Image effects / Offset as below :
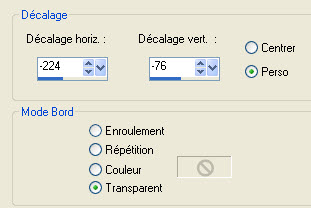
4- On my tube : Adjust / Sharpness / Sharpen.
5- Effects / 3d effects / drop shadow / 4, 4, 60, 40, black.

Step 4 : The borders and the decorations
1- Activate the layer at the bottom of the pile of layers (Background)
- Copy it, we'll need this copy very soon :
- Edit / Copy.
2- Make sure everything is at the right place !
- Image / add some symmetrical borders of 2 pixels with your dark background colour as below :
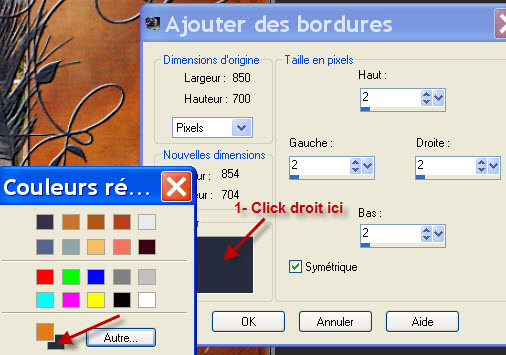
3- Layers / Promote background layer.
4- ADD A NEW RASTER LAYER.
5- Layers / arrange / Move down.
6- Image / Canvas size as below :
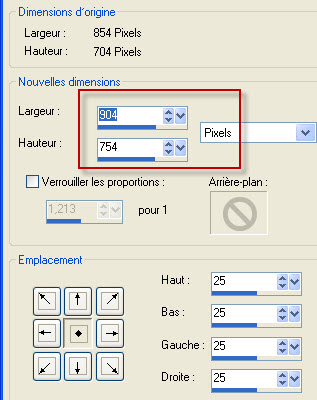
7- Selections / select all.
8- Edit / Paste INTO THE SELECTION (the copy of your background).
- Deselect allt.
9- Activate your top layer.
- Open the tube "dentelle.pspimage"or a tube of your choice and copy it.
10- Paste it as a new layer on to your tag.
11- I have moved my tube as below :
- Effects / Image effects / Offset as below :
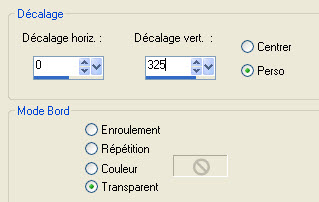
12- Open the tube "Fairymist_alice_deco.pspimage"or a tube of your choice and copy it.
13- Paste it as a new layer on to your tag.
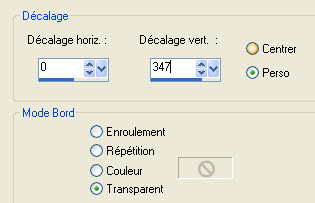
14- I have moved my tube as below :
- Effects / Image effects / Offset as below :
15- Open the tube "Fairymist_Alice_titre.pspimage" and copy it.
(Instead of my title you may prefer to put your own title or a tube of your choice!)
16- Paste it as a new layer on to your tag.
17- Place as on my tag or to your liking.
18- Effects / plugins / Mura's Seamless / Emboss at Alpha default.
19- Apply your signature
20- - Image / add some symmetrical borders of 2 pixels with your dark background colour.
21 - Save your work as a jpeg file.
***************
That's it !! You've done it !!
If you 've enjoyed doing my tutorial, it would be nice to write a few words in my guest book ! If you 've had the slightest problem, please, send me a mail so I can see to the problem
Tutorial translated on the 2nd of February 2013.
*************
You'll find some versions of that tag in my gallery HERE
